| WHEELS
AND TYRES |
Done |
| Check tyre pressure
(check your manual for the correct pressure) |
x |
| Check condition of tyres – cracked surface, tears or hernias on
tyre walls, expiration
date |
x |
| Check wheels – damaged rims, corrosion, lost
balance weights |
x |
| Check play at front
wheel bearings and adjust if necessary |
xx |
| Wire
Wheels Check tension of spokes, condition and play of Rudge splines and adjust (or adjust II [video]) when necessary |
. |
| Wire
Wheels Clean and re-pack Rudge splines on hubs and wheels |
. |
| Alloy wheels – apply Copperslip (anti-seize) to inner face of wheel
resting on the hub |
. |
| Check for tyre rubbing |
|
| Have your alignment checked and redone |
|
| Have your wheels balanced Wheel Section 5 |
|
| Rotate Your Tyres |
|
| . |
|
| . |
|
| FRONT BRAKES |
|
| Check brake
pads for wear Section 9 |
. |
| Check Brake Pads (if there is a lip, remove and chamfer) |
|
| Check Brake
Rotors/Callipers |
|
| Check Seals |
|
| Check brake hose
(twist, scuff, and cracked rubber) |
. |
| Check disc (thickness/runout,
scoring). |
. |
| Check bolts and install caliper bolt/lock wires |
. |
| Bleed front
brakes |
. |
| Check brake reaction bars (if you have installed them) |
|
| Check Fluid Level (change every 2 years) |
|
| Check Hand Brake Cable (This is a problem area for newer Morgans) Brakes section 6 |
|
| Brake TroubleShooting |
|
|
|
|
|
| FRONT
SUSPENSION AREA |
|
| Check play
in bushes. |
. |
| Clean bottom part – check for rust on kingpin (switch to hardchromes) |
. |
| Check bottom nyloc nut and base plate bolts or tightness |
. |
| Check one-shot lube bolt – brush clean and lube the one shot union (with WD40) (pre-2002) |
. |
| Check one shot pipe (pre-2002) |
. |
| Check the wing/side-light nuts for tightness |
. |
| Check wing stay (replace them with your own if you have a post 2001 version) |
|
| Clear vent hole at bottom of top tube of slider (yes there is one at the rear) |
. |
| Grease bushes with method dictated by model year |
. |
| Change damper
blade shims – turn damper blades over – grease (pre-2008) |
. |
| Check shocks for proper function. (article needed!) |
. |
| Check front indicator lights Electrical Index Section 11 |
|
| Check front parking lights Electrical Index Section 11 |
|
| Check wing lights |
|
| Check Hazard Lights Electrical Index Section 11 |
|
| Check Headlamp Alignment |
|
| Check horn (s) |
|
| Check bumper bolts, attachments and support bolts |
|
|
|
|
|
| STEERING BOX CARS |
|
| Check column end float – Lube top bush (steering box cars) Steering Section 5 |
. |
| Check oil level (steering box cars) Steering Section 5 |
. |
| Check oil seals on steering box (steering box cars) Steering Section 5 |
. |
| Adjust nut or peg Gemmer or Burman (steering box cars) Steering Section 5 |
. |
| Check split pin on drag link clamp (steering box cars) Steering Section 5 |
. |
| Check play and lube ball joints on drop arm, drag link and coupling
bars (steering box cars) Steering Section 5 |
. |
| Check and lube U-Js on steering column Steering Box |
|
|
|
|
|
| STEERING RACK CARS |
|
| Check steering play |
. |
| Adjust rack if necessary |
|
| Check and lub U-Js on steering column R&P |
. |
| Check all gaiters for damage and/or leakage. Replace if necessary. |
. |
| Check 4 bolts at center joining plate. Mark them for quick visual reference. (check plate for cracks and/or splitting) |
. |
| Check bolts and square spacers holding rack to cross frame |
. |
| Remove and fill end gaiter (one cone or 1/2 cup should be enough unless gaiter is replaced or completely dry) |
. |
|
|
|
|
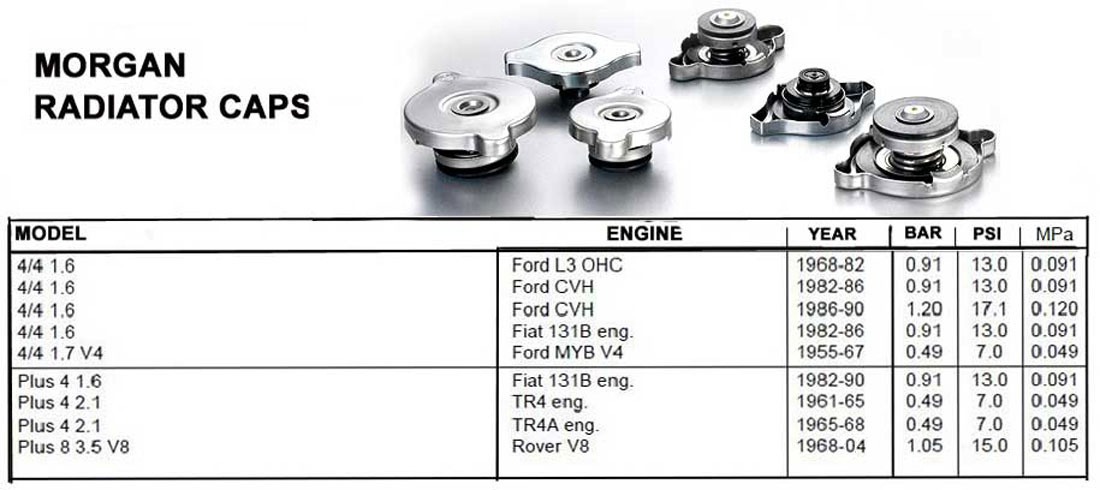
| COOLANT
SYSTEM |
|
|
|
| Check rad hoses for correct firmness, cracks or rubbing |
. |
| Check rad for leaks or rubbing |
. |
| Check coolant level |
. |
| Test coolant quality |
. |
| Change coolant. Flush and change every two years |
. |
| Check rad cap for leaks when hot |
. |
| Test Coolant for electricity (very important for alloy engines and rads) |
|
| Check fan function and the direction the blades are turning Cooling Section 6 |
|
| . |
|
| . |
|
| ENGINE AREA |
|
| Drain oil – replace oil filter – Fill up (All cars save Plus 8s see below) |
. |
| Fill new oil filter - replace old oil filter - Drain & fill up.
(Plus 8s only) |
. |
| Replace spark plugs – check & adjust gap to engine's spec |
. |
| Examine old plugs for condition |
. |
| Checking spark plug wires/leads & connectors |
. |
| Check heater valve cable |
. |
| Check fan belt tension and wear Note for later Plus 8s |
. |
| Check dynamo or alternator wiring |
. |
| Check regulator and fuse box for corrosion (if applicable) |
. |
| Check all engine mountings for bolt tightness and cracks in the rubber sections |
. |
| Check slave cylinder leaks and clutch master cylinder fluid level
(if hydraulic) (change both fluid every two years) |
|
| Check, lub and adjust clutch linkage and cable |
. |
| Check, lub and adjust accelerator linkage and cable |
|
| Check function of Inertia Switch |
. |
| Check engine earth (s) VERY carefully (both sides of the strap)
for broken strands or a bad contact |
. |
| Clean and dielectric grease earth strap(s) contact (s) on chassis |
. |
| . |
|
| . |
|
| CARB ENGINES |
|
| Adjust tappet clearance (Push rod engines) |
. |
| Check throttle and choke cable – adjust tension. if necessary |
. |
| Check carb linkages for wear (Especially twin SUs) |
. |
| Check wear in butterfly spindles to body |
. |
| Check mixture and idle speed- Check balance (twin carbs) |
. |
| S.U: check dash pots oil level Fuel Index Section 6 |
. |
| Strombergs Fuel Index Section 7 |
|
| . |
|
| DISTRIBUTOR IGNITIONS |
|
| Check distributor cap – contact points for cracked Bakelite Ignition Index |
. |
| Check condition of rotor Ignition Index |
. |
| Check wear on distributor shaft. (especially Kent engine) |
. |
| Check condition and function of vacuum auto advance hose |
. |
| Check function of vacuum advance (with strobe) |
. |
| Check dynamic advance (with strobe) |
. |
| Check throttle cable – adjust tension if necessary |
. |
| Change (or clean with K&Ns) the air filter (s) |
. |
| Change contact breaker – adjust points |
|
| Check dwell angle (if needed) |
|
|
|
|
|
| EFI |
|
| L-JETRONIC
(1984-1990) PLUS 4 & PLUS 8 |
|
| Check the
CO2 level of the exhaust gas |
. |
|
|
| HOTWIRE (1991-2000) PLUS 4 & PLUS 8 |
|
| Run a Diagnostic Check, resolve and clear fault codes Section 3 |
|
|
|
| ALL OTHER EFIs |
|
| Run a Diagnostic Check, resolve and clear fault codes |
|
 servicing but will reap benefits whenever it is done.
Of course, it should be mildly modified to reflect each particular models differences. It is a work-in-progress
and will become more interactive over time with more links to detailed explanations.
Any contribution you feel is missing will be welcome and merit a credit.
servicing but will reap benefits whenever it is done.
Of course, it should be mildly modified to reflect each particular models differences. It is a work-in-progress
and will become more interactive over time with more links to detailed explanations.
Any contribution you feel is missing will be welcome and merit a credit.