 Leaf
Spring Choices
Leaf
Spring Choices
by Lorne Goldman
Difficulty in fitting brake lines to the master is due to the ends of the steel flares having been squashed by over tightening. Girling calls for a tightening torque of 15 inch lbs. The tube nuts should be able to be easily threaded all the way into the master cylinder ports by fingers alone.
N.B. I replaced my master cylinder with a dual line arrangement. I used 90 degree fittings with pipe threads into the M/C and have been told that it is a no-no because they cannot be trusted not to leak. Proof of the pudding is that one of them does leak. In looking at John Sheally's car at MOG 30 I noticed that he had banjo fittings on the M/C and he said I could get them at a truck supply house. Having tolerated the slight leak throughout a weekend of vintage racing I now plan to do something proper to correct it. The banjos worked for John.
The other care to take on fitting the lines to a tandem master is to make sure that the correct line goes to the correct port in the MC. They should never be swapped.
For the person who is concerned about what to put under the aluminum straps on the rear deck of that freshly rebuilt Moggie the suggestion is: marine bedding compound. It is a waterproof putty-like material that is meant to be applied under items to be screwed down to the deck of a boat. It is semi-solid, and oozes into nooks and crannies under the cleat, stanchion, etc to be affixed, and then hardens somewhat, but never becomes brittle. It keeps water, both salt and fresh, out, preventing rust and dry rot, and would probably work quite well on a Morgan.
Stripped
Wheels Studs
by John Sheally, Chris
Towner and Lance Lipscomb
This happens when the nuts fail or are improperly torqued, (too tight or too loose).
Depending on the flange you should be able to knock the stud out with a well placed knock of a soft wheel hammer and replace it with press in splined stud (obtainable at a factor or NAPA etc). The exception is if the stud has been tagged or spotted in then you would have to carefully drill the old studs out. Check for a spot weld on the back of the stud before. If there is a spot weld, that weld can be cut with a dremel or and angle grinder. Some studs are just pressed in. You can knocked the piece out and use a lug nut and a socket as a spacer to pull the new one in so that there is not need to remove the hub.
If there is insufficient room to drive the old stud out, the assembly will have to be removed. Once the stripped stud is driven is out a new one is pressed on and/or pulled through. You can a wheel nut on backwards and use an impact gun to "pull" the new stud into place. Thing of using the highest quality replacements you can find..such as ARP studs.
Wheel
Nuts
by Tony McLaughlin,
Ron Davis, Simon Orebi Gann, Roderich Schwarz & Dave Farmer
Lubricate the lug nuts with "never seize" and torque them to 65 lbsft.. Because the end of the studs going into the wheel hub are smaller than the end that goes through the wheel, the torque that the stud can safely take is limited by the inner end. 65 lbfts of torque is plenty to hold the wheel securely. Much more is running a risk of either damaging the threads of the nuts or studs or loosening the studs from the hubs. This information applies the all bolt-on Morgans. For further information, please check torque specifications for different wheel nuts HERE.
Leaf
Spring Choices
by Lorne Goldman
Morgan Leaf Springs have come in a number of variations over the years. People get confused as to which one to use. To my mind, the more compliant a suspension is, the more your wheels stay on the ground rather than bounce off it, especially in a road car. However, this has not always been the accepted lore for the Morgan company and the sad reputation of Morgan suspensions reflects this.
7 leafs; Which in the past produced an almost unbearable ride for 4-seaters.
6 leafs: In the past often used on 4-seaters and installed as stock on Plus 8s and Roadsters, creating a very stiff non-compliant ride. BRUTAL for 2 seater 4/4s.
5 leafs: Also used on Plus 8s with good results until the 2000s, Used on Plus 4s and 4/4s
4 leafs:
A
high quality product supplied by a supplier new in 2004ish (GME),
normally a very reputable UK spring
expert. Yet many of these began failing. I went throuigh three sets
between 2005 and 2008. I finally resolved it by getting the same
springs from the same supplier but through another source, not the MMC.
The problem of finding the right supplier remains to this day. (2026).
I found their suspension ride somewhere between the traditional 5 leafs and the 6s. Personally, both I and David Rutherford find the old 6 leafs that Morgan switched to for Plus 8s and Roadsters later unwelcome. A trad handles better when its stays on the gorund rather than bouncing over it.
| WATCHPOINT!!!!!!!! There is an important watchpoint in retro-fitting them to pre-1993 Morgans, or doing anything to center your wheels.. When switching to these leaf springs they simultaneously decided to centre the rear wheels in the rear wings wheel wells. Previously, the rear wheels were always a bit forward of centre. These new leaf springs were designed to cure that by drilling their holes for the axle bolts a bit more to the rear on the leafs, which pushed the axle and the wheels a bit rearward into the center of the well. However, with the dangerous hand brake bracket welded to the axle rear (pre-1993), this can push that bracket into the petrol tank or unacceptably close to it, making the possiblity of a disaster EVEN MORE LIKELY. Of course, the petrol tank can be "relieved" to create enough space but you should be aware of the REAR END COLLISION RISK inherent in pre-1993 cars. I urgently recommend all those with pre-1993 Morgans, and who haven't yet done so yet to remedy this ASAP. |
 Leaf Springs
(To
Grease Them or Not!!)
Leaf Springs
(To
Grease Them or Not!!)
by Jean Frederic Frot
I feel inclined to give you my observations on this prickly matter. A very humble opinion.
You will struggle to find an agreement on which solution is the best as both methods have their advantages and faults. In fact, it is not a question of the best but what you are trying to achieve. But read on.....
The Greasing Option
Grease was used systematically
from the days of the horse drawn carriages and was adopted in the same
manner on horseless carriages all the way until  the
second world war. Luxury cars where equipped with gaiters to contain the
grease and add grease through grease nipples on top of the gaiter. On more
modest automobiles, one would wrap the blades in grease impregnated cotton
gauze. Some manufacturers went to the extent of fitting the car with a
tank, pump and valves which allowed you to oil all four corners from a
button on the dashboard (Horch and Maybach, Panhard & Levassor). If
history can teach us something, one would think that they would not have
persisted for so long and spent so much effort in error.
the
second world war. Luxury cars where equipped with gaiters to contain the
grease and add grease through grease nipples on top of the gaiter. On more
modest automobiles, one would wrap the blades in grease impregnated cotton
gauze. Some manufacturers went to the extent of fitting the car with a
tank, pump and valves which allowed you to oil all four corners from a
button on the dashboard (Horch and Maybach, Panhard & Levassor). If
history can teach us something, one would think that they would not have
persisted for so long and spent so much effort in error.
This was abandoned after WWII as roads got better and manufacturers wanted to save money to make their cars cheap and for everyone. The main reasons for the lubrication where two-fold: Wear and comfort. It is not rocket science to understand that fitting 4 to 7 blades of tempered steel with different spring rates will cause them to rub against one another as they adopt different shape as they bow or flatten when the vehicle goes over the bumps. You can hear it if they are not greased, it is that annoying squeaky noise from the rear.
This rubbing action is detrimental to the full travel of each blade, some energy being lost in the friction. So first important point, dry blades travel less than greased ones. Second conclusion, the friction causes each blade to wear and loose a bit of its thickness so the assembly will become weaker and weaker. Again this can be observed, this is the reason why you have to re-tighten the nyloc nuts of the shackles from time to time. Contrary to the legend, they do not come loose, but your blades rubbing at every bump for thousand of miles just grind them thinner. To avoid the loss of travel and have the most comfortable ride without noise or wear, blades were lubricated. This was important as roads were terribly uneven, potholes were very common and it was not unusual to brake the main blade (which takes the most of the load).
In our modern days motoring, we can distill this wisdom into a FROT'S LAW; If you want a softer, more comfortable rear suspension, grease it
 This
will mean that if you drive mostly on continental european roads on long
distances, it will be more comfortable but also, the road holding will
improve as you will stay in contact with the tarmac a little longer and
you will limit the wear considerably. Lorne, the GoMoG Webmaster is an
ideal candidate for greasing with his very high mileage, love of uneven
little country roads where the car bounces from potholes to bumps and I
am sure that his vertebrae are grateful for it. An important point, if
you have the luxury of adjustable shockers, consider stiffening them a
bit as a softer suspension requires more damping. The main drawback is
that grease retains dirt eventually turning grease into valve grinding
compound, this is why if you grease, it is better to fit gaiters or wrap
them, (or clean them regularly and regrease. Webmaster).
This
will mean that if you drive mostly on continental european roads on long
distances, it will be more comfortable but also, the road holding will
improve as you will stay in contact with the tarmac a little longer and
you will limit the wear considerably. Lorne, the GoMoG Webmaster is an
ideal candidate for greasing with his very high mileage, love of uneven
little country roads where the car bounces from potholes to bumps and I
am sure that his vertebrae are grateful for it. An important point, if
you have the luxury of adjustable shockers, consider stiffening them a
bit as a softer suspension requires more damping. The main drawback is
that grease retains dirt eventually turning grease into valve grinding
compound, this is why if you grease, it is better to fit gaiters or wrap
them, (or clean them regularly and regrease. Webmaster).
by Lorne Goldman
Few do it but washing and lubricating trad leaf springs improves
the ride of the car. Some even use leather or canvas sacks (above right and left) to encase the
 springs in grease. (Personally I find that tedious. ) With
the leaf springs clean and lubricated, you will have a smoother ride. Leaf springs are cunningly designed to shape
the way the car deals with road anomalies. In that they are very
sophisticated, more so that coil springs.They also spread the stress
rather concentrate in one place as coils springs do, which requires the
latter to use complex methods to distribute the stress. This is the
reason the heaviest vehicular loads (trucks) still rely on rear leaf
springs. In North America, the place of long distance trucking, one can
find leaf spring makers roadside throughout the continent.
springs in grease. (Personally I find that tedious. ) With
the leaf springs clean and lubricated, you will have a smoother ride. Leaf springs are cunningly designed to shape
the way the car deals with road anomalies. In that they are very
sophisticated, more so that coil springs.They also spread the stress
rather concentrate in one place as coils springs do, which requires the
latter to use complex methods to distribute the stress. This is the
reason the heaviest vehicular loads (trucks) still rely on rear leaf
springs. In North America, the place of long distance trucking, one can
find leaf spring makers roadside throughout the continent.
Of course, trad leaf springs. if uncared for, quickly rust together, creating a super stiff suspension. Long delayed maintenance will then have a tendency the shear the leafs or the U-bolts or even the saddle pin. :(
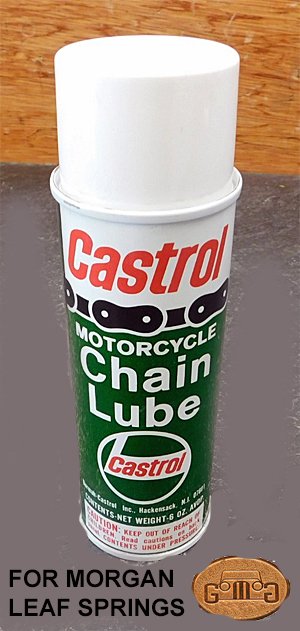
I
wash my leaf springs once a year. The easiest method for this is the
use of pressure washer (mine are 1400-1600 psi) after removing the axle
area cover.
On the other hand, slathering heavy grease or motor oil on the leafs (leaves?), is a pain and it will take some time for the
grease to penetrate, if at all. So like most Morgan old timers, I use Castrol Chain Oil or Castrol Chain Wax. It comes
in a spray. (see to the right) This uncanny stuff goes on thin from the can..as it is designed
to penetrate and creep between the leaves. But it then turns into
a thicker grease after contact!!! Tell your favorite mechanic of this trick
and you will impress him. Maintenance once a year is fine, whether you live in a very wet climate or a dry one. (I kept trads in both such locations simultaneously for more than a decade.)
| HOWEVER, Some suppliers recently began to place
anti-friction material placed between the leafs amnd these material can
be damaged by oil-based products. Find out whether you have such springs and act accordingly. |
(Removal & Fitting) 1997
I am at the stage of the replacing the fuel tank rear axle and suspension back to where it came on my 1980 4/4 4 Seater. At the shackles at each end of the spring there is a long bolt several large washers and two spacers one longer than the other. My problem is in which order do they go. Mike
 No two Morgans are alike.
The size of these spacers and their positioning varies from car to car.
Therefore you have some fiddling to do to find out what goes where on YOUR
car. The keys are to assure yourself that. The leaf springs are parallel
to the frame.
No two Morgans are alike.
The size of these spacers and their positioning varies from car to car.
Therefore you have some fiddling to do to find out what goes where on YOUR
car. The keys are to assure yourself that. The leaf springs are parallel
to the frame.
1. Remove your weather equipment and sidescreens.
2. Remove the axle space carpet and the plywood cover underneath it.
3. Remove the seats.
4. Move the upholstery and remove the covers over the fronts of each leaf spring.
5. Jack the car at the rear and place it solidly on jack stand. Leave the jack positioned under the axle.
6. Remove the tyres and immediately place them under the chassis. Morgan or any car jacks provided by the manauafarcturer are rarely fool proof. This pacement of the tyre (s) under the car turns the inevitable event of slipped jack into a minor issue rather than a disaster.
7. With a the right socket (5/8"?) remove the inboard nuts on the u-bolts (2 per side)
8. Jack the axle up carefully (MAKING VERY SURE YOU DO NOT MAKE IT LIFT THE WEIGHT OF THE CAR FROM THE STANDS)
9. When you have sufficient clearance to the outboard bolts, remove them. (slow going here).
10. Place the full weight of the car back on the jack stands by lowering the jack under the axle.
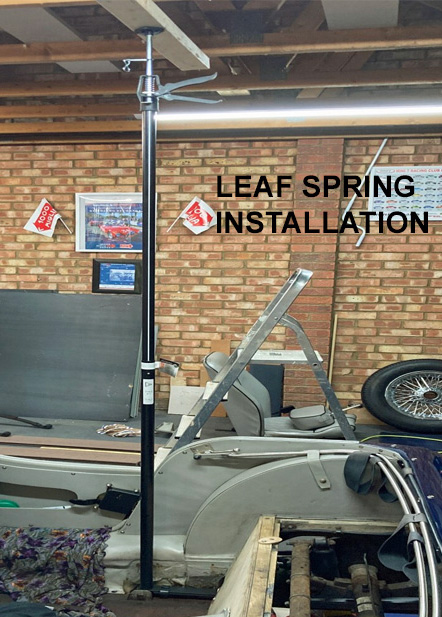
11. Remove the nut from the holding bolt at the front eyelet of the leaf springs. Now re-thread it on back on a couple of threads.
12. I had a friend stand on the leaf spring with feet near the front eyelet.They were able to apply the precise pressure needed by simply pressing on the ceiling with their hands or even using a broom stick if it is too high. We found it was not difficult for him to do his part of the job. Once the spring eye is aligned with its hole in the frame, a bit of light hammering will get the bolt in or out using the nut you left on to protect its threads when removing . Once the bolt is removed, they can slowly remove the pressure of their weight. This is the way I use. I had never heard of it before but it worked easily. Others will have their own methods.
13. Remove the leaf spring bolt at the rear.
14. Remove the old spring and re-install using these directions in reverse.
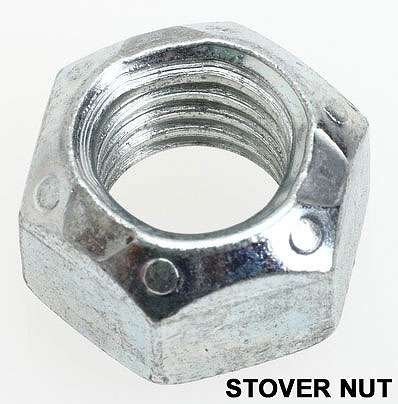
N.B. Please consider replacing your U-Bolts and their nuts at this point. as an alternative to nylocs, stoffer nuts can be considered.
2025 The image to the right is that of a Briish mogger who came up with a varitation on the GoMoG theme that only requires a single person. He goes by the moniker of Mybluemog and posts to Talk Morgan. He has graciously allowed the image to be used here.
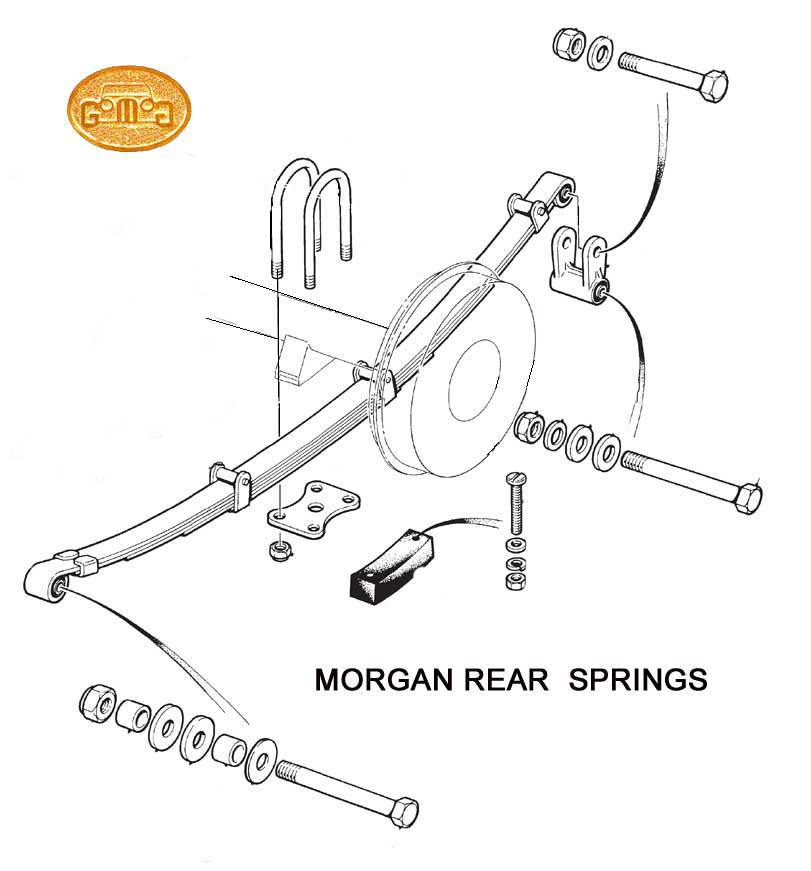
Morgan Axle U-Bolts
and Saddle Plates
by Lorne Goldman
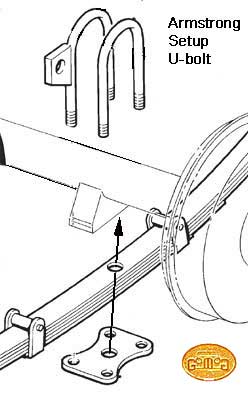 Morgan
has used pretty much the same axle U-Bolts and saddle plates for more than
a half century. Sadly, much of the community still does not understand
their peculiarities and that can cause great damage unwittingly. As can
be seen from the Factory's adjacent drawing,
Morgan
has used pretty much the same axle U-Bolts and saddle plates for more than
a half century. Sadly, much of the community still does not understand
their peculiarities and that can cause great damage unwittingly. As can
be seen from the Factory's adjacent drawing, 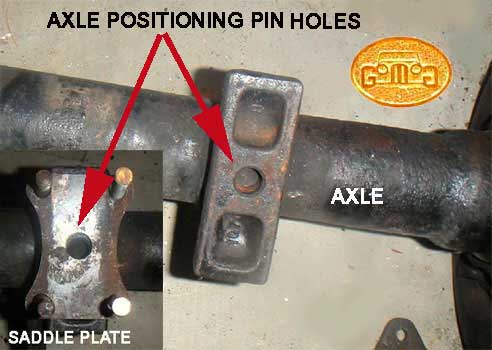 the
u-bolts and their saddle plates hold the axle to the leaf springs and therefore,
the car. The plates have five drilled holes. Four hold the u-bolts and
the last, in the center of the plate is for the axle locating nut which
holds the plate in position on the leaf springs.
the
u-bolts and their saddle plates hold the axle to the leaf springs and therefore,
the car. The plates have five drilled holes. Four hold the u-bolts and
the last, in the center of the plate is for the axle locating nut which
holds the plate in position on the leaf springs.
| WATCHPOINT: These locating nuts must be made of the strongest metal possible. If they shear, the axle becomes loose on that side and will move forward or rearward on the leaf springs severely skewing the axle and prejudicing driving control. In many countries, the strength of these nuts/pins are governed by law. However, Morgan has axle locating pin/nuts machined in Factory. These inevitably shear, especially with axle tramp with the bigger engines or when the plate or the u-bolts are used to anchor suspension systems and anti-tramp bars. |
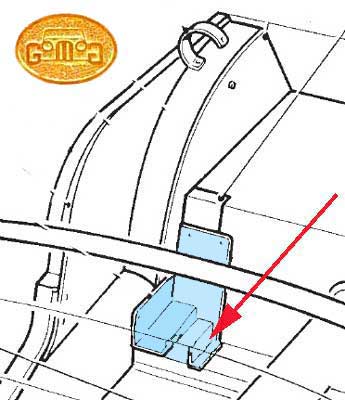
The inboard Morgan U-bolts are special. THEY MUST BE MADE SHORT, (or they will hit the frame flange and split it which can lead to the frame splitting at that point).
Sadly, damage to that flange
is common. They jack the car from the rear and in doing so
they compress the suspension. In compressing the suspension, they bring
the rail flange right up to axle u-bolt nuts, often to the point where
the outboard nut touches the flange! As they can no longer
easily access or turn the outboard u-bolt nuts, they come up with all sorts
of weird cures, involving crowbars, wooden blocks and sometimes, sadly,
drilling access holes below the outboard nuts through that all- important
frame flange!
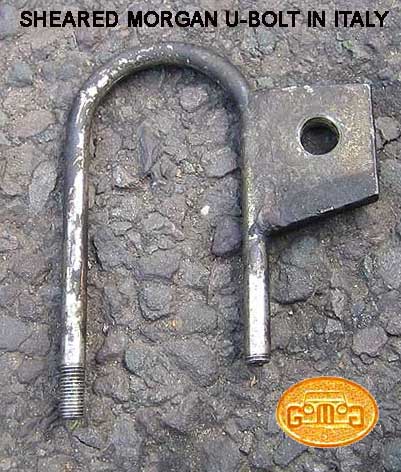
| WATCHPOINT II: It is a RULE
that u-bolts should be tightened and replaced from time to time. U-bolts
should NEVER be re-used after they are removed. Morgan used the same
u-bolts for decades, even while the bhp was going from 36 to 200+! They
shear. Many owners notice the use of nyloc nuts, and with some logic, get
distressed! (Nylocs cannot be fully torqued. Many owners try to cure
this issue by replacing the u-bolts with new, longer ones (They do not
want to drill the plate for u-bolts of a wider OD.) They use longer standard
axle u-bolt nuts. Stoffer nuts is an excellent solution.
N.B. The use of longer
u-bolts or u-bolt nuts forces the outboards into the thin frame flange each
time the car is jacked for improper access to the u-bolts or every time
the rear suspension compresses. A dditionally, it shortens the suspension
travel of the car and creates an impact point. In little time, the
flange is damaged or split. If that thin flange splits, the chassis usually splits as well. |
The nylocs and the short u-bolts are there for a reason. The MMC is/was trying to address an issue with the car's design. The weakness of the U-bolts used before those of very recent years CAN be addressed with stronger u-bolts of the same length but with thick bar stock and a better grade of metal. The MMC has been using thicker u-bolts on the newer cars. These bolts are also treated and the plates are anodized to slow rust. However, the plate is no thicker and the stronger u-bolts bow and weaken them in short time. You can purchase these new bolts and saddle plates from the Factory. For something bullet proof, buy the ultimates from. I recommend his upgraded u-bolts and plates for any owner with a suspension or anti-tramp system using the u-bolts or the axle saddle plates as anchors.
| WATCHPOINT III: UBOLTS The MMC U-bolts stretch
with tightening over time. As the metal stretches, it weakens without a
visible sign. U-bolts, especially the less strong ones installed by the MMC, should be changed at EVERY service, especially on the more powerful Morgan classic.
I strongly suggest that performance graded (5s or better) u-bolts and
saddle plates be used. That will make changing them unnecessary. |
Torque Specifications for Morgan U-Bolts
3/8" - 30 ft. lbs (standard)
7/16" - 45 ft. lbs
| WATCHPOINT IV: If a bowed saddle plate is evident, it MUST be replaced. |
The nyloc nuts the MMC used
here are another weak point. They are not a good choice for this
application. They cannot reach or hold torque and must be tightened frequently AND
replaced regularly. A better idea, considering the lack of space, is the
use of Stoffer nuts. They have an even lower profile than nylocs, can take a
high torque and never need re-tightening aside from compensating on rare
occasion for u-bolt stretch. On the other hand, they are harder to find
and a bit longer to fit. UK
Source or US
Source
ACCESSING THE OUTBOARD
U-BOLTS
by Lorne Goldman
Jack the car at the rear frame as you would normally. Place the rear solidly on jack stands (ALWAYS USE JACK STANDS ANYTIME YOU ARE UNDER THE CAR!!!) Remove the jack. Place it under the axle. Jack the axle upwards until the outboard nuts are easily accessible (easiest with the inboard u-bolts out) but never so much as will make the frame's weight completely leave the jack stands. Wedge in a block of wood a side between chassis and leaf springs and then lower the car off the axle jack.
REAR BEARINGS
by Norm Patterson
at the eMog
Pub March 9, 2011
7HA Phase 2 Salisbury
Front Pinion:
M86610 front race
M86643 front bearing
Rear Pinion:
HM88610 rear race
HM88649 rear bearing
Axle bearings:
LM501311 race
LM501349 bearing
Morgan U-Bolts Holding the Leaf Springs 4 sections
by Lorne Goldman
 These thingies are a bit tricky, but easy enough after you know the watchpoints.
1. The u-bolts MMC uses are thin cheap things..better changed to stronger fare. They originals can shear and stretch (yes metal stretches!) & this requires,, regular verification and tightening. Replacement at each service is advisable. This MMC feature becomes dangerous the more powerful your Morgan. MUCH
better, thicker & stronger ones made of a higher grade of metal,
These can be had from Morgan performance suppliers or you
can modify the outboard u-bolt of a set purchased at a reputable
auto factor/store length. Bring the old outboard bolt to the store to verify the length of what you are purchasing. Drill out the u-bolt plate a bit to fit the thicker stuff or by an alloy u-bolt plate from a performance supplier. Buying quality reduces over-time costs in this area.
2. There is a sad characteristic in this area. Regular (non-Morgan) outboard
u-bolts are too long and that is not noticed until it is too
late. Owners jack up the car, creating space between the outboard
u-bolt bottom and the thin horizontal flange of the chassis. When they
lower the car, they do NOT notice that the u-bolts collide into that
flange which quickly causes it to crack and split the flange.
3. The length of your u-bolts depends on how many leafs you have. See the table below. If you have any of the missing lengths, pleae tell me them. The MMC doesn't have them either.
|
| WATCHPOINT VI: After more than 25 years and 260,000 miles mogging different continents, provinces, States, Comtés, Départments
and nations, (wryly) I have come to conclusion that Morgans can be made to be
the most reliable vehicles I have ever encountered. It costs very
little to assure that..just wisdom and prudence. Owners should remember
the GoMoG RULE of BREAKAGE: Morgan
Breakage happens almost exclusively during your MOST precious Morgan
time, namely when you are using it! In other words, don't ruin the
best moments of your life (whether a weekend drive or a holiday) by
ignoring such stuff. In this case, it is nothing to swap in adequate
u-bolts or tell your service fellow to do so. As a rule, he is supposed to be checking/changing your u-bolts at every service anyway. P.S. If someone tells such stuff is a waste of time, they probably park their Morgan permanently on their coffee table with extremely limited usage, if any. Wisdom is free. |