 plugs or woofers or
removing the engine or your wife to create adequate space! :) And over
the last few years, technology has made it even easier.
plugs or woofers or
removing the engine or your wife to create adequate space! :) And over
the last few years, technology has made it even easier.
I had problems in the past with refinishing wood on other early automobiles. Recently when I did the original mahogany dashboard over on my Morgan I took all kinds of precautions to get the "perfect" high gloss varnish finish including spraying it upside down suspended from the ceiling so the dust wouldn't settle on it while the varnish was still wet. It came out just as I expected, however it had that "cheap glossy look" and also provided unbelievable amounts of sun glare. I ended up wet sanding the gloss with 600 paper and finishing it off with a high quality furniture wax. The result is a non-glare very rich looking finish.
With mahogany and other open grain woods it is essential to use a paste wood filler or other sealer before varnishing. Otherwise it can take many many coats of varnish before you fill all the pores in the wood. One of the best sealers is a low molecular weight epoxy such as West System #505 resin with their #206 special coating hardener. This does not provide a very smooth finish but seals the wood well. Sand this down with 150 paper and follow with 2 or 3 coats of polyurethane spar varnish sanded lightly between each coat and then do the wet sanding with 600 paper followed by the paste furniture wax. It's beautiful, and after 2 years it still looks like I did it yesterday even though I have not rewaxed it since the initial application.
I also used a dark red mahogany rstain before re-installing.
'64 +4
Chester, NJ
Refinishing a Mahogany Dash II
by Jack Claxton 1956 +4
1) I sought out and found a clear finish coat for exterior
applications; Minwax Outdoor Clear Shield (Satin). A quart-sized
can was $11.95. The front label says "weather resistant coating for wood",
"tough, hard protection from sun, rain, dirt, scratches", and "advanced
ultraviolet absorber formula". The
fine print says "three coats are recommended for exterior
use" and "exterior surfaces coated with Clear Shield should be maintained
by lightly sanding and adding additional coat(s) as required". I would
guess that lawn furniture, wooden doors, etc., in the sun continuously
year-in, year-out would need refinishing more frequently than a Morgan
dash, which hopefully may last quite a while without maintenance with such
a product (time will tell).
2) The Clear Shield above is recommended for use with Minwax Gel Stain, that comes in several colors. At $3.95 for an 8 oz. can, I tried 5 colors on the back of the dash before settling on Honey Maple 604 (an 8 oz. can was enough for the job).
3) I sanded the mahogany down completely to bare wood with 220 grit sandpaper and applied the gel stain per the instructions. When dry, I applied a liberal coat of Clear Shield per the instructions, did light sanding with 320 grit paper, and applied another liberal coat of Clear Shield. After the second coat of Clear Shield I sanded it smooth as silk with 320 paper, being careful to remove all depressions in the Clear Shield coat. The Clear Shield by now had filled all the wood grain "pores", if this is the correct term, and this sanding step put the Clear Shield coat completely flat and smooth. I then applied the final clear shield coat liberally, but then I went back over and over the final Clear Shield coat (while wet) with dry sponge brushes so as to remove any embedded dust particles and eliminate the need for sanding the final finish when dry. I brushed only enough to get the dust particles out, using several sponge brushes on this last step. I left it in the somewhat "wet" state to dry overnight.
The next morning the results were far beyond my expectations, and better than what I thought myself capable of achieving. The satin finish has no "glare" and the color is absolutely rich.
Clear Coating Wood
by Charles Hill
I've had good luck in topcoating automotive wood with clear coat finishes from automotive base coat/clear coat systems. Its expensive, but the results are worth it.
| Webmaster Note: I have tried this myself with success. Its virtue is how uncomplicated it is, but many LIGHT coats are required, spaced over a few days. |
The concern with an open air car dash is with UV which causes most finishes to break down. I'm not sure if Danish oil is UV stable but it does give a great finish. In my experience, shellac doesn't like sunlight. Marine spar varnishes have UV stabilizers and hold up better in the sun (the car will see the sun, won't it?) Try one part oil based marine spar varnish (glossy), one part boiled linseed oil and one part turpentine. This formula builds a film slowly so many applications and rubs with steel wool gets great results. To keep the wood stable, put some finish on the back side as well.
Most owners despair of hearing music in their Morgan,
even if your ambitions are reasonable. However, we have found it IS very
possible, and without the use of headphones or ear plugs or woofers or
removing the engine or your wife to create adequate space! :) And over
the last few years, technology has made it even easier.
The problems are apparent.
1. There is precious little place to fit speakers.
2. There is precious little place to fit a receiver,
cd player and/or amplifier.
3, Most of what you can do is very invasive, requiring
the car to be butchered to some degree.
I have seen many attempts to address these issues, some of them downright bizarre. However, between the minimum necessary for discernible sound at speed with the top down and the restricted options, I will simply confirm here what you have should have admitted to yourself by now and tell you what I did to cope with it. I have received much urging from mates to reveal that on GoMoG. Music and Morgans is a personal thing. I applaud every one who has tried anything. This article is simply my experience.
The home truths;
SPEAKER PLACEMENT: Unless you choose to hack up your dash (shiver!) and place them facing you, the only site you are going to hear a speaker is at your ear, and then only if it is powerful enough. The traditional placement is to the space rear of each door in the side panel. For those with the silly inertia reel seatbelts, the reel will prevent the use of an effective speaker. The 100mm (4") Morgan stock speakers are woefully inadequate. There is also insufficient depth, required by decent speakers at the time of this writing.
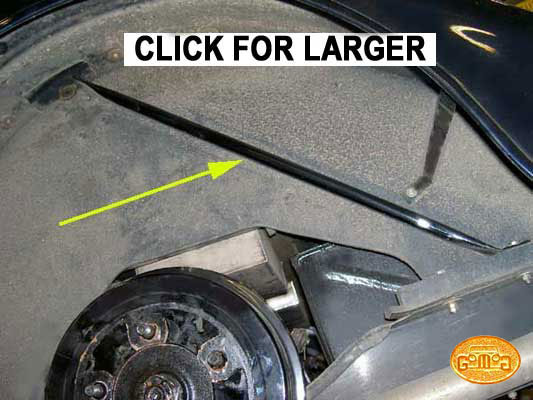
I have recently seen the Factory place bigger speakers in a specially made the panel just forward of the doors in the footwell. There is a pocket of empty space thee, out of harm's way! This got me excited and I bought a set of the panels and placed top quality 5.5 inch speakers in them and reupholstered the area giving me 4 speakers! I tried them and they were great.. Then our legs, placed as they must in front of them, blocked the sound pretty thoroughly. until my wife and I got into the car. So don't waste your money like I did. Here, above, is a picture of these new speaker placement optionpanel installed in a new car at the Factory.

 There are few other options and none of them are happy
ones. For example, the rear bulkhead (wooden board behind the seats) will
have the seats muffle precise sounds. However, a sub woofer (mostly vibration rather than sound) could
be placed in the middle of the rear bulkhead. But will require the construction
of a mandatory woofer box to be fit in the rear axle area with a big hole
to be cut for the speaker. It would also make the area impossible to use for storage.
There are few other options and none of them are happy
ones. For example, the rear bulkhead (wooden board behind the seats) will
have the seats muffle precise sounds. However, a sub woofer (mostly vibration rather than sound) could
be placed in the middle of the rear bulkhead. But will require the construction
of a mandatory woofer box to be fit in the rear axle area with a big hole
to be cut for the speaker. It would also make the area impossible to use for storage.
SPEAKER SIZE:
I
as not happy with the speakers that came with car. So I spoke to a few
auto audio suppliers and audiophile friends. They confirmed my
experience to that time (2000). Getting a sufficiently powerful sound out any
audio system requires a minimum amount of speaker size. The 100 mm (4")
speakers used in Morgans do not cut it. However, anything bigger has
insufficient space in the target panels if one has seat belt inertia reels and the
panel has insufficient depth behind it to accommodate the depth of a good
speaker. I now use the top quality speakers, Infinity Kappa 2-way
speakers hich are 5.25" (132 mm).
I was able to place them by ridding the car of the silly inertia bels
and running to something safer and more practical rather than relying
on regulations that I now make no sense after our accident.
Regulatorily acceptable seatbelts can burn you alive..trust me on this.
You see, the testing governments do covers the likelihood of fire
and seatbelt effectiveness but NOT the ability of the passenger to
find a little button at the side in their stomach/hip area in the dark
(or daylight for that matter) when the car is ablaze and you are both
in a panic. Try it. If you don't like it, switch to a prettier, more
period affair that may save your life.
 TESTING FOR SPEAKER POLARITY
by Lorne Goldman
This
is a big mistake that most people carry around with them. After many
years, they find that the polarity of their speakers is wrong,
producing a tinny sound in one or bother speakers. This test not only
allows you to test which speaker you are dealing with, but also the
wiring to it and the polarity in one step.
1. If you are
wiring a car stereo and have the wires plugged into the speakers but at
the other end do not know which wires go to which connection rather
than tracing each wire separately, use a 9 volt battery (to the
left), hold one wire on a terminal, tap the other wire on the other
terminal, and it will make the speaker pop. Now know which speaker is
connected to that wire.
2. Also, if
wired correctly +/- the speakers' cone will pop OUT; if it sucks in,
you have the polarity backwards. You want ALL of your speakers to
pop out with the +/-. This will make your car stereo (or your home
system) sound much fuller. If it sounds hollow or lacking bass, you may have just one speaker wired backwards.
SEAT BELTS
by Lorne & Audrey Goldman (revisited two decades after their accident)
Let's be honest with ourselves:
A. The seatbelt solutions that the Factory has been using since they were first required by law 50 years ago are pretty ugly. We can confrim that the current version (like most other cars) is downright deadly. It was seconds from fyring us in our 2002 accident. Its only advantage is that governments decided (wrongly) that they are legally acceptable when, in fact, they are not. They may pass the regs, but they are dangerous. Governments are traditionally stupid and that is not subject to change. They are NOT crash experts and do not go through the process of review over time. Manufacturers focus on profits, and are only pushed to safety measures, if cany, that are mandated by the government. There is no one to protect billions of drivers and their passengers.
B.
The later and current silly anchoring wand for seat belts (including
Morgan) is suspended in the air to the side of the occupants. Try
finding it in the dark with flames framing you seat after a rear
collision..even one as little as 5mph (8kph) which is sufficient to breach the petrol tank. From personal and related experience, hunting in the dark for a little
button suspended in the air around your body in the hip area is not easy when your car is burning
about your ears and your flat cap is aflame.
I have tried that. Happily,
Audrey had forgotten to put on her seatbelt. She was out of the car and screaming at me still in the flames before
I could find the button, release the Morgan belt and leap over the crash-seized door. I instantly discovered why racing regulations
prohibit drivers from using this type of belt release. It
kills people. But happily racers live in an environment where such
silliness is fully realized. Racing organizations will NOT allow cars
on the tracks with MMC seatbelts.
C. The later inertia belts also use the same silly wand release.
D. The later inertia belts use a reel is so large that it takes up space that would be better used for adequate speakers and a much better belt. It is for you to decide whether an inertia belt/reel is necessary or whether you are sufficiently intelligent and skilled enough to adjust a non-inertia belt to fit YOU.
E.
The inertia reels fail also. The company will not sell the reels alone or
one side only. The cost to replace the assembly is in excess of $400 USD at the time of this re-write, more than double other options.
F. The
anchoring system the MMC uses is both ugly, cumbersome and a magnet for
grime and that weird goo Morgan sprays over their supposedly
non-rusting cars (since Superforms. (This goo also covers one of the
best British ideas in automobile history, Section 3 for Lucas wire colours.) The anchoring points are ALL nutty. (see below for smarter)
 So for all these reasons, I got rid of the Morgan inertia belts that arrived with my earlier cars AND the
Morgan inertia reel seatbelts that arrived with my current car, the Phoenix. I
recommend they be swapped with a smarter 3-pointer. Read on.
So for all these reasons, I got rid of the Morgan inertia belts that arrived with my earlier cars AND the
Morgan inertia reel seatbelts that arrived with my current car, the Phoenix. I
recommend they be swapped with a smarter 3-pointer. Read on.
| WATCHPOINT:
I take no reponsibility for what is written here..for obvious legal
reasons. I simply suggest you use your logic and common sense, or go to
a race track and examine what they must use by regulation. These belt I
suggest are also inexpensive and easy to install as the MMC anshors
belt at the seeta with a special graded bolt threaded into the seat frame and the top point below can be properly anchored at little or no cost..much like the strap suggested in front as a brake reaction bar. However, the issue here is life threatening and not merely one of steadying the front end under hard breaking. You have to ask yourself whether the hassles of a simple fix are worth saving your life. It has taken all this time (20 years) for me to write of this with complete comfort. I didn't realize I was avoiding it until I read what I wrote so long ago. |
SMARTER, PRETTIER AND MUSIC-MINDED SEATBELTS
I consulted with my Morgan mates for a solution. The many racers amongst them pointed me to racing belts. These all have a "quick release" feature and fit at 4-5 points. But they are, expensive,
very invasive to install and aesthetically jarring for a Morgan road car.
expensive,
very invasive to install and aesthetically jarring for a Morgan road car.
 WATCHPOINT 1: This third anchor on the arch (used for 2-3 decades) is a grave risk as the Factory originally installed it. The Morgan wooden rear wheel arches were never made to sustain an impact OR the force of an adult body thrown forward. They can produce two sad results when the car crashes. Firstly, if your car is hit at the front, your body is thrown forward with sufficient force (easily achievable in an impact, the rear wing will be pulled off and your body will lurch forward and your head collide with the windscreen. There have been many such incidents. Secondly, if this type of Morgan seatbelt is hit at the front of the arch, it will take both the arch and the upper seatbelt with it and the seatbelt can violently strangle you or snap your neck. (Yes, it has happened resulting in a fatality!) Properly anchored, you are safe..or so I have been told by someone who installed this type of anchor strap after the hit the front winddscreen with FORCE. THIRDLY, it will permit the placement of a speaker that will deliver the music and sound deserved of a car of this rareity and price. I have tried the MMC footwell speakers. Waste of money and hassles unless you are NOT SEATED IN THE CAR. Simple reason. Your offside legs, once you are in the car, cover that speaker. (duh) However, there is an easy solution. Simply run a metal strap from the wheel arch's anchor bolt on the underside of the wing to a fixing point on the chassis..very much like the brake reaction bars I recommend. In fact, if you are not in the mood to make them and you don't wish to have a mechanic do so, then buy and extras set of reaction bars. In my humble opinion, the switch to the idea above, will keep your car clean, aesthetically pleasing and "period". The aded bonus is that non-reel seat belts provide space for a decent speakers in the only place they are effective. Is there any reason for a reel is if you put on or take off weight. The Company tried something similar but ran super long straps through the rear compartment area, over the petrol tank and on to the end of the chassis.Then they sprayed them with their infamous tar-like goo. They quickly become filthy at the rear, and upstruct access to the limited space over the axle. They currently attach the strap at the side of the rear chassis, which is not much of an improvement. :( |
 Depth
To
create the depth I needed to fit the speakers I had a local wood worker
make circular spacers in walnut. I then stained these to match the burl
dash and door cappings. I then clear coated them until they had a deep glossy
shine that matched my dash. By using spacers, I also had no need to increase the smaller speaker
holes in the panels that the car came with. I turned my attention
to the other components.
Depth
To
create the depth I needed to fit the speakers I had a local wood worker
make circular spacers in walnut. I then stained these to match the burl
dash and door cappings. I then clear coated them until they had a deep glossy
shine that matched my dash. By using spacers, I also had no need to increase the smaller speaker
holes in the panels that the car came with. I turned my attention
to the other components.
CONSOLE PLACEMENT:
There are now many more entertainment options than there were when
I first wrote this article 15 years ago. Even into the era of the CD
player, where could you put
one in addition to a receiver  amplifier?
But one of the points with Morgan
sound equipment remains the same. The system control must be easily
accessible and at hand. And there
are not many areas in the car that are protected from the elements and
you do not want to prejudice the limited storage capacity in the car.
amplifier?
But one of the points with Morgan
sound equipment remains the same. The system control must be easily
accessible and at hand. And there
are not many areas in the car that are protected from the elements and
you do not want to prejudice the limited storage capacity in the car.
Again, the traditional placement on the gearbox cover forward of the levers proves to be the least invasive. I was just determined to make it all aesthetically pleasing along with a decent sound and easy removal and refitting!
RECEIVER/AMPLIFIER/PLAYER
After being disappointed with many units back then, I stumbled across something that covered all the bases..even back in 2000. It was a Visteon product (Ford's electronics division). They had designed a high end "double din" unit that is a receiver (one AM and 2 FM bands) and has a built-in 6 cd changer and can easily be expanded for MP4 players. That meant I would have a capacity of 120 cd tunes and take no more space than I had. That wasn't bad for 2002! Most importantly, it had 4 speaker channels and LOTS of power (80 watts RMS). It was expensive at the time..$650 new but it was too good a fit to be bothered. (They now sell units for $100-200 on ebay.com). (But be careful, there are different versions and some require a sub-woofer. 3R3T-18C815-KA, 3C3T-18C815-AB and 1S8F-18C815-AC suit. They can now be found on any ebay for 50£! 15 years later, I still have not found a reason to change them. (I found one on eBay.UK with a burl walnut facade!).
GPS
I
have learned to love GPS. They have made our mogging stress free and
opened up back roads and cities all over the world for us. I am still  currently using a Garmin Nuvi (775T)
(after a number of earlier models). It has an immense amount
of features, one of which allows instructions to be wirelessly
played through any nearby ( the car's) FM along with an unlimited
amount if your music, which you install either
in the Garmin or in it's expandable memory slot. The music
automatically pauses when instructions are given. Current GPS
technology has dumbed down a lot in the last few years. But that works to your advantage. The original Garmin 775T is not
currently using a Garmin Nuvi (775T)
(after a number of earlier models). It has an immense amount
of features, one of which allows instructions to be wirelessly
played through any nearby ( the car's) FM along with an unlimited
amount if your music, which you install either
in the Garmin or in it's expandable memory slot. The music
automatically pauses when instructions are given. Current GPS
technology has dumbed down a lot in the last few years. But that works to your advantage. The original Garmin 775T is not  longer
made and sold for $1200 USD. But it is still serviced and can be had,
refurbished by Garmin, off ebay for under $200. It contains both
North Americn and European maps and other maps can be added for a fee.
We use it in Ecuador!!
longer
made and sold for $1200 USD. But it is still serviced and can be had,
refurbished by Garmin, off ebay for under $200. It contains both
North Americn and European maps and other maps can be added for a fee.
We use it in Ecuador!!
This depends on how much you are concerned about whether the aethetics of your Morgan are consistent. The first console I designed was made by a cabinet maker. (image to the right) It had map lights on both sides, toggle switches, a power outlet and contained the unit and a place for maps. We still used them back then! Sadly, that car was destroyed in 2002. But it gave me the opportunity to upgrade the unit and continue experimenting with something less expert-intensive. I also learned from the first one. I made the console smaller and easier to remove and install as one piece with everything it contained. You do not want a console that i tedious and time-consuming to remove or re-install. This required a better method to secure it which will require two small holes through the gearbox cover and its leather shroud. The CD6 units must be purchased with an interface plug that comes with instructions and any wire length already attached. Remove this one plug, undo the two fittings and the entire unit pops out or in.
The
systems have been faithful companions to us on two
continents. We can hear music clearly with our top down up to 80
mph and
more. As an added bonus, we get comments on how their aesthetics,
though utilitarian, actually ADD to the charm of the car and do not
prejudice its period appearance.