Fitting a New Radiator Fan (with
a surround)
by Bill Beddows 2002, REVISTED IN 2019 by GoMoG
INTRODUCTION
Morgans are notorious
for over-heating. But before investing in a high capacity aluminium radiator
it is worth considering installing a modern fan. Modern fans are far more efficient than the standard fans fitted by the MMC. That being said, if you have one of their later plastic radiators, please upgrade to something better.
These notes deal with the fitment into the car, the connection
of the fan will covered by the instructions provided in the kit. All the
dimensions etc. are based on an 1982 +8 but from memory the 1982 4/4 is very
similar.
GENERAL
All radiator fans should be behind the rad. When
placed
in front, it blocks airflow when switched off! (thereby prejudicing the
non-fan airflow and causing the engine to run hotter..kinda
counter-intuitive!).
1. VERIFY YOUR CLEARANCE from the cross-bar when fitting a new fan or rad.
2. You can increase your radiator efficiency by
canting more upright, thus preventing the incoming air from merely
flowing over the front and the top, taking the path of lesser
resistance, and lesser cooling!
3. The efficiency
of all fans is seriously increased by sealing it to the rad with some form
of shroud so all the air pulled by the fan is coming through the matrix...but I have never needed to do so.
4. Morgan made a silly mistake and made a sad
reputation for their cars when they attached low flow fan to the
crossbar. Aside from the inadequacy of the fan used, which used to make Kenlowes very popular in the days of yore, by
attaching the fan thusly, they created a risk that the radiator core
can be compromised by the fan blades, either when removing
or installing either the rad or the fan, or if the fittings on
either become loose thereby allowing them to move into each other.
5. The best place to install a rad fan is ON THE
BACK OF THE RADIATOR. However, do NOT do this with straps running
through the core. This is easy but is also often destructive, immediately AND over time.
Leave the delicate core alone! There are fittings that can be attached
to the outer back of radiators. This requires a bit extra time to
remove the radiator, but it is the very best way. I prefer welded
brackets made specifically for the fan purchased. It also makes installation a one rather than two part job. As for which fan to use, CLICK HERE or for more powerful fans and read on.
TYPE OF FAN
Fans are available from suppliers who service the performance
market. There are a number of brands like Kenlowe, Facet. (Webmaster
note; The Factory and most of the aftermarket now use a SPAL with 2.3
times the capacity
of the Kenlowe/Facet. If used on the
crossbar (ugh!) it will need an extra fitting on the upper radiator mount to
support
the added weight. The much larger motor size is made possible by an
ingenious
design of the fan blades and the installation is very similar.) 13
inches is the biggest fan which will fit (in my car) and the Kenlowe 13”
suction fan is 66mm thick which will go in from underneath, anything much
thicker will not. This fan is £100 approx and the kit contains the
thermostatic control, wire and connectors and decent instructions. The
kit also contains a metal shroud but I could not get it in using my own
instead.
| WATCHPOINT 1: Size. I use 12in SPALs..though a 13" would likely fit. Rear
clearance required (from the crossbar) assuming the fan is
attached to the rear of the radiator, was over 3 inches. HOWEVER,
I installed my last SPAL over 15 years ago (2002) and SPALs keep
improving..in blade types, motors and the air (CFM) they can flow. The MMC does not use the best SPALs available.
That clearance is significantly less than it used to be. There is a
SPAL suitable for every Morgan now. They also have SPAL centres in Italy (head office & manufacturing the UK, the USA & Australia. Each will offer downloadable schematics that will give you every detail you require. I would post one if these diagrams if their fans weren't improving and changuing so quickly! Go to these sites, find the diagrams and check out the most up-to-date design for your Morgan. |
| WATCHPOINT 2 : Clearance
will also be a function of the radiator chosen. For example tne Morgan
radiator is relatively deep and a perfornace Ron Davis Racing radiator
even more so. The depth cuts down on the available clearance between
the rear of the fan and the crossbar (or the fan blades and the rear of
the radiator if you unwisely choose to attach the radiator to the
crossbar (as
Morgan did for many years until they too abandoned this method in the
late 1990s under the then development director Bill Beck who also switched the company to SPAL fans). Peter Mulberry discovered
years ago that thicker radiators resists airflow through them. His
second version, with a less deep core cools more efficiently and, as an
added bonus, they create more clearance for fans! The thinner one cools and extra 2C! |
| WATCHPOINT 3: In
all cases, compare the CFM and amperage draw of any radiator fan
purchased contemplated. These two figures will determine the
effectoveness of the fan. Additionally, the start-up
amperage draw of the fan will determine whether specially wiring, a big
fuse and a heavy duty relay is required. When Morgan began using SPALs,
they merely added a 30 amp fuse to the fan position of the fuse box. Of
course, the relevant radiator wiring was not rated to 30 amps, and
would burn, eliminating the fan when it was needed most. Don't
blow an engine with that mistake! Click here. |
FITTING & REMOVAL INSTRUCTIONS (if fitting a fan to the crossbar) (not a great idea!)
1. Remove the bonnet. Then tape a sheet of stout cardboard
over the back of the radiator to reduce the risk of damage to the core.
Put the car on axle stands. Disconnect the power supply to the fan and/or
disconnect the battery. Remove the fan from the support bracket. If the
fan has never been removed the spacer tube may be corroded onto the bolt.
In my case, one came off and the other would not budge even after 24 hours
of release agent. I was able to drive an old screwdriver between the halves
of the tube clamp using a medium sized “Morgan adjusting tool” and then
cut the bolt with a Dremel and a hacksaw. Once undone the fan will easily
come out between the chassis cross member and the track rod.
 2.
Working from underneath check the new fan for position. The performance
is not affected by not being in the middle of the rad but it should not
project outside the edge of the core and not rub on anything. Some awkward
measurement and guess work will give a starting position for the fan relative
to the tube clamp bracket. It can be adjusted later.
2.
Working from underneath check the new fan for position. The performance
is not affected by not being in the middle of the rad but it should not
project outside the edge of the core and not rub on anything. Some awkward
measurement and guess work will give a starting position for the fan relative
to the tube clamp bracket. It can be adjusted later.
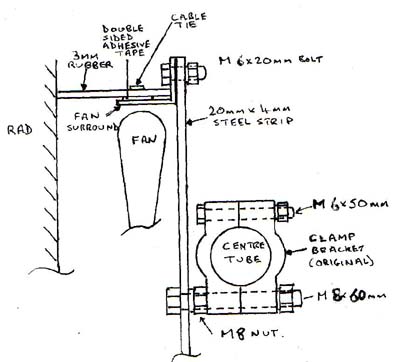
3. The Kenlowe fan has 2 mounting holes (the SPALs have 3-4). The ones
to use are flush with back of the included surround in a recess. The others
should be cut off with a hacksaw both in the diameter and in the height
to give a 12 to 15 mm clear space all round the surround so the fan can
be sealed to the radiator. I used 20mm x 4 mm steel strip to make the mounting
plates but anything sensible is ok.
Cut strip to length, mark out and drill 6mm holes for
the fan and 8mm holes for the mounting bolts. Take care that the holes
for the mounting bolts are accessible from the rad side of the fan so you
can get the bolts in. Put a strip of double sided adhesive tape as sold
for trim repairs round the outside of the fan surround but leave the backing
tape on. Measure the circumference carefully to make the shroud. Two M6x50
mm bolts are needed for the tube clamp and two M8x60s for the fan mounting.
If they are too long you cannot get them in.
4. From under the car feed the fan in between the rad
and the cross member. Insert the mounting bolts from the front of the fan
and put a nut a few turns on the bolts. Put the M6 bolt in the front half
of the tube clamp before putting the M8 in the tube clamp. About 6mm clearance
is needed between the mounting plate and the clamp. Either use washers
or the nut already on the bolt (with a shake proof washer). Start feeding
the mounting bolt into the clamp and then repeat on the other side. If
using the nut as a spacer tighten it now. With luck you can get a ring
spanner with a slight crank in it onto the bolt head from the back of the
fan. Without it you have a problem. A second pair of hands is useful at
this point.
Put the back half of the clamp on and tighten until the
fan can be held in position but adjusted. Side to side adjustment is easy
but if the height is wrong the fan has to be removed and a new 8mm hole
drilled in one or both mounting plates to achieve a correct position. (
I got it right at the second attempt). Position the fan as parallel to
the rad as possible and then tighten up the clamp.
5. Measure the distance from the rad to back edge of the
clear rim on the fan surround. Any suitable material can be used for the
sealing shroud. I used 3mm thick nitrile rubber sheet. Cut a strip to the
correct width and the measured circumference + 2mm in length. Peel the
backing strip off the adhesive tape and put the rubber on making sure the
front edge is lightly pressed against the radiator core. Make a daisy chain
of large cable ties and use this to secure the shroud to the fan.
6. Unless you choose to use the original Otter rad fan
thermoswitch (shiver) follow the manufacturer’s wiring instructions to use the
one included with the Kenlowe or the SPAL. The thermometer bulb goes in the top hose.
Again due to age mine would not come off and I had to cut it. Having a
new hose available avoids problems. The control box can be mounted on the
inner wing in an accessible place. On my car the outside rearmost connector
on the fuse box provides an “always on” connection which allows the fan
to continue running for a while after the ignition is turned off. Fitting
an in-line fuse is advisable if this connection is used.
This job requires the standards attributes for working
on a Morgan.
The hands of a woman
The strength of an ox
The agility of a monkey
The patience of the biblical Job
REMOVING AND INSTALLING A RADIATOR WITH THE FAN MOUNTED ON THE RADIATOR
by Lorne Goldman
With the fan attached to the rear of the radiator, the risks
and potential sad damage of removal and installation are vastly
mitigated. (Re-coring a radiator
makes the cost of a new fan neglible..or you can try to be happy with
the resultant bent fins, which prejudice cooling and create sad hot
spots in the core!) :( Installation of a fan backed radiator is not only safer, it is a one operation job.
Sadly, the best access is from the bottom of the car. This is
easy for a dealer with a lift, but a little fiddly for those of us
without one.
1. Drain the cooling system.
 2. Detach the hoses from the radiator. The bottom, the top and the overflow hoses
3. Disconnect the fan wiring.
4. Disconnect the wiring (if any) from the radiator fan switch (aka Otter)
5. Now, in my case, I use jackstands and my little
jack alternating both with large blocks of wood underneath to achieve
the height required. N.B. Do not use the jack that came with the car.
Those jacks are for emergency only for changing a tyre when on the
road. When using them, place the spare and then the flat tyre under the
car in case they slip..which they can do with the greatest of ease.
This little trick can safe you MUCH sadness, either to your Morgan or
to you.
6. Once the car is up a bit, you can loosen the radiator's
top fitting on the crossbar and remove the radiator bumpers' top
or bottom nuts. Then, in may case, I remove the big BRACKETS
attached to chassis. This gives me a bit more clearance. The key is not
to have the radiator hit anything on the way out or in.
7. Disconnect the radiator fan wiring.
8. Disconnect the
9. I then finish jacking the car up to allow the radiator to clear.
10. Remove the bottom brackets completely.
11. If you had previously had the radiator fan mounted on the crossbar, loosen it.
12. Now remove the top fitting completely making sure the radiator will not fall or hit the old fan.
It is a good idea to use Bill Bellows idea above and carefully tape a
large piece of stout cardboard to the back of the radiator.
13. CAREFULLY allow the radiator to drop, guiding it so it does
not hit the old fan on the crossbar. Place it somewhere out of
reach.
14. Remove the old fan from the crossbar and remove its brackets.
15. Installation is the reverse of removal..except the
cardboard is not needed and the risks, with the new fan ON THE RAD, are
neglible.
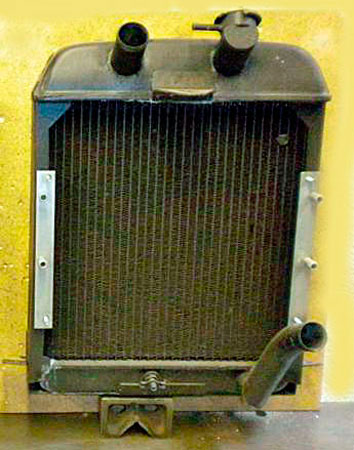
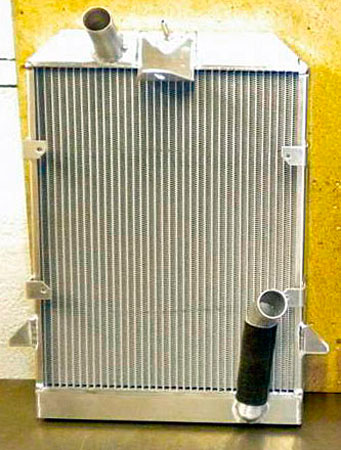
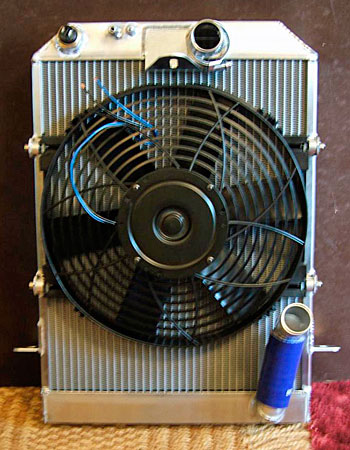
Here is are images of a rad with the fan brackets welded on. With and without fan on. They are elongated Mulberrys.
| RADIATOR WITH ADD-ON BRACKETS |
RADIATOR WITH BRACKETS |
RADIATOR WITH BRACKETS AND FAN |
 |
 |
 |
Removing the Exhaust Manifold Bolts
tip forwarded by Bill Beddows
There is an obvious danger in removing the exhaust manifold
bolts and on many Plus 8s. The heads are aluminum and the bolts are steel
which is often a recipe for a disaster and though the miracles of modern
technology can have you avoid a rebore and re-threading by using a helicoil
or the like..stripping the bolt hole threads is to be avoided.
Time can make these bolts very reluctant to release. A
penetrating oil and pateince can often help and I have applied heat gently
to some effect but remember that alloy gives no warning before it melts.
Here is a trick from a fellow at Rimmer Brothers. Simply
run the engine until it is really hot. Then, with welding gloves on, try
to remove the bolts. You should get a better reception. They should be
torqued to 14 ftlbs.
By the way, there was a long period where no gaskets were
used between manifold and heads. There are gaskets available now from a
number of sources, individual ones for each branch of a branch manifold
(heddars) and large ones for the heavy cast manifolds.
BACK