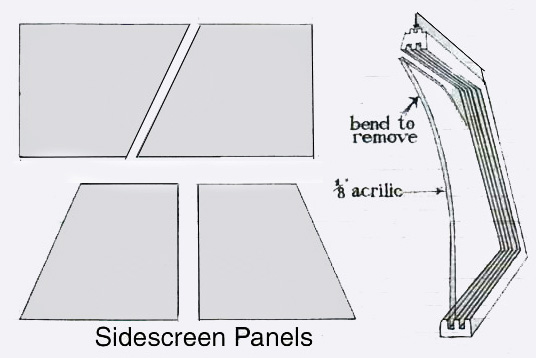
SIDESCREENS
Replacing Sidescreen
Panels
by Cuthbert J. Twillie and Lorne Goldman (updated
November 2012 and again January 2023)
| Replacing
sidescreen panels (and windscreens) on British cars used to be a
regular maintenance job every 10-20,000 miles. Flat screens of all
types, glass or plastic, regularly scratch or pit. Happily, it is a
inexpensive task for a rainy day in the garage. Sadly, the Morgan
owners of today are not the Morgan owners of 20 years ago. Where it was
once thought the the internet and technology would free and
instruct car owners for such things, the opposite has happened. The
discussion groups of old have become the "forums" of today and they are
full of errant information and inappropriate advice. :( The
safety of collegiate debate has disppeared and odd posts are made
googleable for the innocent world to be confused and harmed by. Where
the simple Morgan gave its owners an enviable reputation for the most
mechanically adept of the British sports car crowd, that is now
reversed. We have been made prey for the predatory. Sidescreens
are an example. A 1/8" Perspex sheet (I prefer Lexan) can be found
anywhere locally. It can be found in sufficently large sheets to
make a full set (4) for $36 usd or less. If you don't want to cut
it,,a neighborhood glass cutter will do it for you. If he is honest
(such people still exist!) he will charge you for 10 minutes work.
Replacing your screens yourself or locally will give you a superior
product. Your outlay will cost you $36 (or the same in £) rather than circa 200£. More importantly, you will enjoy it, and you help preserve simply human skills. |
The side curtains on most Morgans look like they're still
in London. Sitting inside you'd think you were in the dreaded fog.
Yet, it is easy to cure the scratched and blurry plastic pieces that only
the completely incapable of us would hesitate to replace them.
 The
plastic pieces just slip out if they are bent enough and they are made
to bend. Make sure they have been in a warm room or heat them mildly with
a hair dryer. Then bend carefully until the top edge comes out of the channel.The
old ones can be used make a perfect pattern for the new ones. Front
and rear are the same dimensions and have the same angles.
The
plastic pieces just slip out if they are bent enough and they are made
to bend. Make sure they have been in a warm room or heat them mildly with
a hair dryer. Then bend carefully until the top edge comes out of the channel.The
old ones can be used make a perfect pattern for the new ones. Front
and rear are the same dimensions and have the same angles.
Buy some Perspex (original material) or Lexan (a product
that is a bit more brittle than perspex but scratches much less easily)
at a hardware store or glass supplier. It will be about $20US for a sheet
of 24in x 48in x 1/8in thick. The same thickness is important to prevent
screens from rattling in the channel. The side curtains are 10" high so
cut two 10" strips from the short side giving two pieces of 10in x 24in
inches. (Often, the acrylic sheet comes with a protective layer of film
which should be left on until all the cutting and sanding are finished.
Now, the old pieces laid on the new acrylic will result in perfect copies
without the ruler work.
For many, the project gets no further than the frustration
encountered when little cracks emanate from the edge of the cut using our
finest blade saber 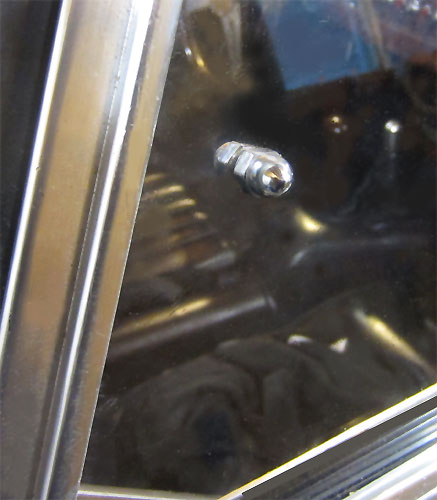 saw.
I know, slow down, use tape, etc. but it still isn't that easy. One solution,
offered by Dennis Sayers, is to buy a router attachment for your Dremel-
and then use the cutting blade with a straight edge. This makes the job
so easy you could make sidescreen windows in any shape you so desire. A
jigsaw will also work if you have BOTH sides taped and go very slowly.
Finish the edges like a fine paint job. Start with coarse and go to finer
sandpaper/emory cloth.
saw.
I know, slow down, use tape, etc. but it still isn't that easy. One solution,
offered by Dennis Sayers, is to buy a router attachment for your Dremel-
and then use the cutting blade with a straight edge. This makes the job
so easy you could make sidescreen windows in any shape you so desire. A
jigsaw will also work if you have BOTH sides taped and go very slowly.
Finish the edges like a fine paint job. Start with coarse and go to finer
sandpaper/emory cloth.
The pro trick is in the final finishing. Use a product
called M.E.K. ( Methyl Ethyl Ketone). Put some on a cotton ball and, run
the cottonball gently on the edges of the lexan. Hold the lexan piece "up"
so if you have any drips it will run to the floor or over your hand.
This will make the edge as smooth as a baby's bottom. This stuff
melts Perspex/Lexan, so don't get any drips on your finished product or
you'll be sorely sorry. It does, though, give you a professional
edge. Even though it is simple, I suggest practice on a spare piece
before you go to the final finishing.
Once the two pieces are four, smooth the edges and making
doubly sure the new pieces are not bigger than the old. These do have to
slide, but not too freely because then they won't stay closed. Looking
through the new side curtains you will think you are in a sparkling new
Morgan. However, I am not adverse to shaping the screens a bit to making
this fit more easily. See Below as well. After
the cutting and edge finishing has been done, choose a appropriate bit
to make the indentations for the screws as you see in the old deflectors.
Installation is simple. Bend the warm panels to fit into theire channels.
For the little pieces of plastic used to slide the panels open and closed,
I find the orginals cheap looking and unattractive. I use a threaded post
and two polished acorn nuts on each side. See the image.
The windscreens should require no bending to fit properly
(rubber
molding solidly on the inside corner of the draught extruder)
assuming
the sidescreens are properly installed and tightened.
However, I am not adverse to shaping the screens a bit to help the fitting
process turn out right. But this should only be tried by the intrepid.
Only a little is necessary and the possiblity of going too far, breaking
one of the corner welds or cracking the perspex is possible.
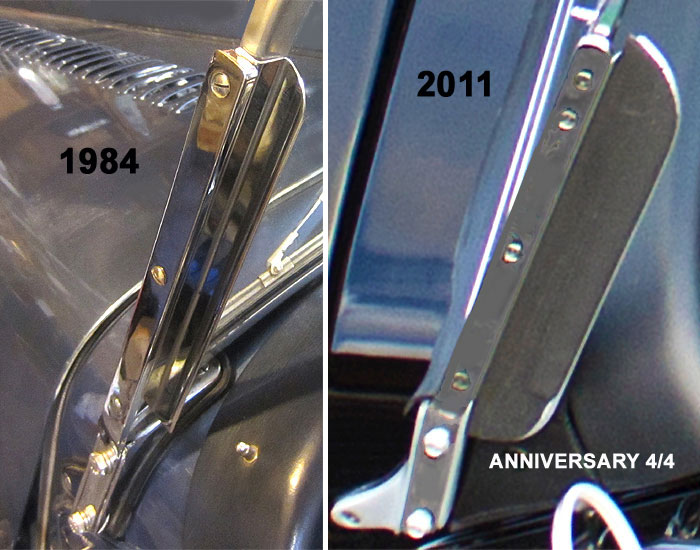
Replacing Sidescreens Frames and/or Panels
(ideas)
by Lorne Goldman on the Morgan Experience in June 2018
Good news and bad news.
The Bad of it.
1. Sidescreens used to be made first, before the top that fit with it.
So none made after can be a sure fit unless the car and top is at hand.
2. 1962 was a transition year for Morgan sidescreens. Earlier sidescreens
were completely different to the later ones. They had a flat steel frame
with no sliding window but a lower flap which pushed out so the driver
and passenger could make for hand signals! The earlier frames are easy
to make if there is an original pattern
3. The
MMC or any supplier cannot longer be relied upon to get them right for
YOUR car. Not only have sidescreens been changed often from the
mid-1990s on, but each car is a little different.I guess that most dealers might be buying from the MMC.
| WATCHPOINT: This
is the reason I removed the dimensions from Cuthbert's
diagram above. I hoped to force the reader to do a replacement the right
way
and avoid part confusion. Assuming that the Morgan supplier network can
provide perfect unseen help for
bespoke Morgans made 15 years ago, let alone 60 is unwise. :(
Traditional Morgans
were made and designed for a skilled community. They blossom with
active owner care. Relying merely on online buying, especially after
the wave of constant changes in the last three decades is often
frustrating. Save yourself that, along with the enormous extra cost,
even when they get it right. |
4. I most strongly suggest
that you have new screens made under your own supervision using the old
screens as a template to follow. If you do not make them yourself, have
them made from the old panels used as a template at a glass cutters. Takes them minutes to cut and smooth the plastic edges.
5. I also
recommend that the screen knobs NOT BE MADE of little waste pieces of
the clear plastic you are using. They look junky and can be replaced by
any little knob you choose at the local hardware store. See the image.
The Good;
A. If you are practically minded and not a originality person, go for
the later type with the sliding panels as can be found pictured on this
page..
B. They are easy to make..assuming we can find you the channeled frames.
If you make them, they will be seriously cheap.
C. I have an extra set of the set of the posts that holds them to the
doors...or I can send you a template to follow.
D. They are easy to repair. You can be patient and find some frames
or a knackered set on ebay.co.uk
Sidescreen Panels TIPS and Materials
by Lorne (November 5, 2007) (updated November 2012)
Each channel holding the perspex/lexan is lined in a thin
cloth to allow the the panels to slide and yet not rattle. It is quite
common for the cloth's glue to crack and then the cloth dislodges, pleats
or crushes and blocks the easy movement of the rear panel. (The forward
panel is not supposed to move.) It can be can be cured by sorting the cloth
liner with new glue and a straight edge.
Alternatively, there is a possibility that the perspex
panels were replaced by someone unsure of how to install them. There are
panels being sold on ebay.uk at price considerably less than the Morgan
trade (15 vs 50). They are ok but come with unfinished edges which require
the standard bit of sanding and fitting. I have been contacted by many
that did not sand or fit and were JUST able to get the square unsmoothed
edged panels in. Of course, they then won't move.
The rubber molding around the side screens is one piece.
If the corners have split, you will need a very special glue to get it
to hold. These moldings are easy to refit with new and come with an excess
that you can trim. The rubber is absolutely vital to prevent wind and rain
egress. If the sidescreens are put on correctly, they will not leak up
to very high speeds. Since the Factory removed these rubbers in 2002, the
complaints of leaking Morgans have become legion.
You do not want to buy new side screens unless you have
a newer car and want to try the older type screens. Sudescreens are up
to 700 pounds for a 4-seater set and 400 for a 2 seater. Sadly, the Factory
does not always stock sidescreens for the pre-2002 or pre-long door (1998)
cars.
If you do replace your screens. See HERE
Putting on Your Sidescreens
(so they don't leak!) November 2012
by Lorne Goldman
Considering the amount we mog, my wife Audrey is often
asked by other wives how she puts up with the discomfort, especially when
driving in the rain. (The men simply assume I married wisely.) The
questions don't immediately register with either of us. Our Morgans are
comfortable and 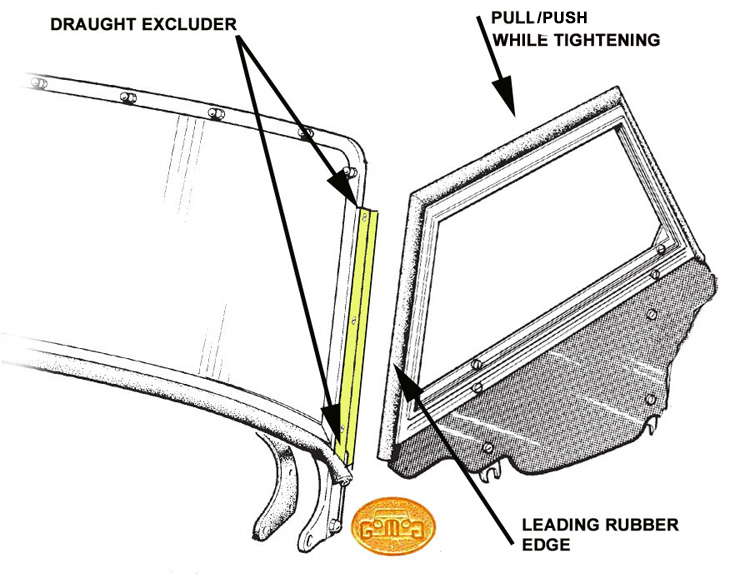 leakless.
Truth is neither of us has patience with hardship. We are definitely not
of the brigade that enjoys braving a Tsunami with the top down.
leakless.
Truth is neither of us has patience with hardship. We are definitely not
of the brigade that enjoys braving a Tsunami with the top down.
Where we live, there are only 2/3 Morgans in an area the
size of Western Europe. We had no contact with other Morgans for the first
years of ownership. We thought something was wrong with the leaking cockpit,
top and the unacceptable suspension so we fixed it. It was years before
we discovered that most owners assume that these drawbacks are necessary
to Morgan ownership and tolerate them.
One thing we noticed people get wrong is the sidescreens.
They put them on poorly and the top front gapes open with any speed, letting
wind and rain in. We now see elaborate attempts at closing that gap with
all manner of items..most of which seal you in the car by attaching the
sidescreens to the windscreen. (ugh!). That is too invasive for my taste
even if it was the only solution. We have had to get out of a burning
Morgan once.
Of course, Morgans made after 2002 are much harder to
waterproof. The cars have had more changes in the last 10 years than in
the 40 years before. Most of these have been attempts to copy fine aftermarket
improvements without the guidance of their designer. The results have been
not been stellar. In this case, in trying to replicate Steve Simmonds' brilliantly
made Hoods, the Factory removed the important rubber sidescreen moldings
they had used. Amongst other things, this has made a leakless Morgan far
more problematic since then.
However, this simple method works well, for classics made
before the present era began. The older moggers must forgive me for this.
It may seem ABC.
A bit of understanding first. The sidescreens
are attached at only two points. That means one is not, per se,
able to solidly secure them with ease as two 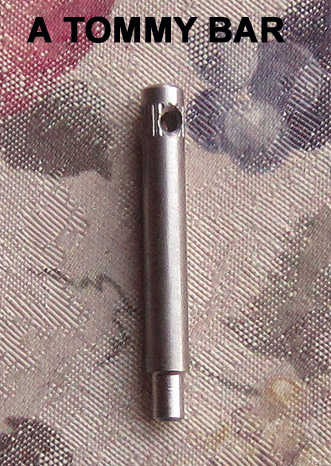 points
form a rotational axis. If the knobs are not tightened well or the screens
ill-placed, the screen will cant. As the daught extruider acts as a stop
for the amount of inboard rotation, but the screens most often gape outboard
if anything is done wrong. That allows wind and rain to enter and the gap
to get wider as speed increases. The draught extruder is vital. The sidescreen's
molding is can be shaped inward to meet it. But as the sidescreen is on
an axis, there is a wide choice of tightened positions that can result.
Only one will do and you must help the screens find it.
points
form a rotational axis. If the knobs are not tightened well or the screens
ill-placed, the screen will cant. As the daught extruider acts as a stop
for the amount of inboard rotation, but the screens most often gape outboard
if anything is done wrong. That allows wind and rain to enter and the gap
to get wider as speed increases. The draught extruder is vital. The sidescreen's
molding is can be shaped inward to meet it. But as the sidescreen is on
an axis, there is a wide choice of tightened positions that can result.
Only one will do and you must help the screens find it.
 Secondly, I find that one cannot possibly hand-turn the
knobs enough to hold the screens securely enough. So the other vital component
to proper sidescreen is the tommy-bar. After the screens are on, this cute
tool (which is slip on your key ring) allows you to tighten/torque the
screen sufficently. Without tommy-bar tightening, the screens waggle far
more and will gape open. The smaller end of the tommy bar is made to fit
into the holes made for it on the knobs. Slip it in and use it at the end
of the fitting to tighten the knobs properly.
Secondly, I find that one cannot possibly hand-turn the
knobs enough to hold the screens securely enough. So the other vital component
to proper sidescreen is the tommy-bar. After the screens are on, this cute
tool (which is slip on your key ring) allows you to tighten/torque the
screen sufficently. Without tommy-bar tightening, the screens waggle far
more and will gape open. The smaller end of the tommy bar is made to fit
into the holes made for it on the knobs. Slip it in and use it at the end
of the fitting to tighten the knobs properly.
I find this method keeps my sidescreen solid and postioned
to protect me up to speeds over 85 mph.
I am not as familiar with the many variations Morgan has
tried in this area since 2002. There are many sad complaints on all of
them, which is likely the
reason for the many changes. Hoods, pillars, draught extruders, fasteners,
hoods, hood stays, the windscreens and moldings have been changed multiple
times without a happy solution as yet. Since 2009, we are told that scores
of newer owners were even advised by the Factory and dealers to claim for
cracking
new screens from their personal insurers, often multiple claims for
the same car.
The current sidescreens, have no molding to seal area
between the sidescreen and the windscreen. They now use a crushable padding
in an attempt to seal the gap. However, without having the sufficent build
quality expertise, this area has become especially problematic. This, in
turn, has resulted ng in wider and wider daught extruders and padding
in hope of stopping wind and rain. They are no longer made in polished
stainless and the results aree unsightly and create a blind spot (for me).
The padding doesn't seem to work on an ongoing basis it is the sidescreens
that are gaping away from the draught extruder and not vice versa. As well,
ar best, the padding soon gets too flattened and requires regular replacement.
The newest pillars combine the tasks of draught extruder and pillar in
a single piece of unpolished cast metal..for cost and labour saving.
In any event, hopefully using the described method
of sidescreen fitting will help the current cars as well.
WIND DEFLECTORS
by Lorne Goldman
I am a fan of wind deflectors. These
are plastic pieces, of many shapes, that people hang  on swivels attached
to the windscreen pillars
in on swivels attached
to the windscreen pillars
in 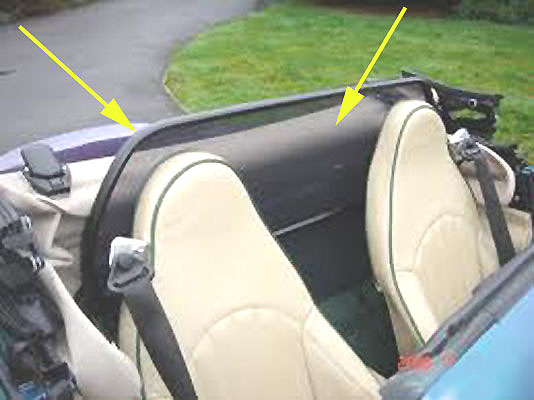 hope of stopping the wind flow. I used them for a while many years ago
until a wise and famous someone pointed out that they do not stop the wind.
I tried removing them
and instantly found he was right!. They change the sound more than the
wind. They also prevent easy entry and exit with the car when the side
screens are on. They are also unsightly, altering the sublime
lines of the classic Morgan. hope of stopping the wind flow. I used them for a while many years ago
until a wise and famous someone pointed out that they do not stop the wind.
I tried removing them
and instantly found he was right!. They change the sound more than the
wind. They also prevent easy entry and exit with the car when the side
screens are on. They are also unsightly, altering the sublime
lines of the classic Morgan.
If wind is problem for you, our mogging (450,000 kms) proved that you will have more of an effect
with;
1. the sidescreens on (top off)
2. the top on (sidescreens off)
3. a wind spoiler placed behind the headrests. These
come in various configurations and do the job, but they are rather invasive and aesthetically displeasing as
well.
Making Wind Deflectors
Replacement wind deflectors can be made using the same
materiels and methods described above in making
replacement sidescreen panels.
|