 One might even consider publishing
the GEMS electrical schematics as a service to Morgan/GEMS owners.
One might even consider publishing
the GEMS electrical schematics as a service to Morgan/GEMS owners.
You have already heard the main symptoms of the car – sudden (otherwise inexplicable) poor idle, rough running below 2,500 rpm, poor fuel consumption, and no real signs of trouble from the Rovacom except a split between the stored and current throttle voltages. Kevin had done some diagnostic work and found that the +5 volt supply to the Throttle Position Sensor had failed, and sent the ECU to be repaired – but when it was returned there was still no +5 volt supply when it was installed and it was ashttps://www.gomog.com/allmorgan/HotwirePLUS8.htmlsumed that the ECU was still faulty.
The problem turned out to be the pressure sensor in the GEMS Land Rover V8 engines are designed to run at a specific temperature range, typically between 90°C and 100°C (194°F and 212°F). Some models may operate slightly higher, up to 105°C (221°F). The GEMS (Gas Engine Management System) managed engines, introduced in 1995, often operate at a higher temperature, around 96°C, to meet emission standards fuel pump unit, which is also supplied by the same +5 volt drive from the ECU. This had failed to a short circuit and was effectively grounding the +5 volt line - as soon as the sensor was disconnected things returned to normal. This sensor was introduced in the 2002 model year with the installation of the “advanced evaps” (Advanced Evaporative Loss – AEL) system. This system depressurizes the fuel tank and uses the pressure sensor to check for leaks, and is (was) required for US emission compliance. This sensor failure in Henrietta required the replacement of the fuel pump assembly – which was not entirely unfortunate. GEMS cars (at least the 2002+ cars – perhaps the earlier ones too) - have some instances of the tank being contaminated by silicon sealer extruded from the pump/tank interface when it the pump is installed. This is then ingested into the valve at the foot of the small tank that surrounds the pump (and which is designed both to prevent the pump running dry and provide cooling at low fuel levels) and prevents it from retaining any fuel – and this, in turn, results in the pump overheating. Henrietta had a lot of this contamination in the tank and stuck in the valve. You can (usually) remove the pump by undoing the tank retaining bolts and moving it around until you can maneuver the pump out, but this proved to be difficult with Henrietta and so the tank was removed and the silicon vacuumed out.
So, as in all good stories, the heroine was restored to her former glory. I think that it is worth replacing the IACV and the TPS if there is the slightest sign of a problem; they are both mechanical (unlike the other sensors) and so have a finite life, even if it is often a long one. Richard may choose to have this done. The later IACVs also have a shorter time constant (they move faster) than the earlier ones. You are probably aware that if the time constant of the control system approaches that of the system being controlled the combination can become unstable, so an IACV with a faster response is additional insurance against problems in this regard.
So what are the lessons from all this? Here are some suggestions:
1. It is worth pulling the fuel pump on all GEMS cars and checking for silicon contamination, cleaning the tank if there is silicon present, and replacing the fuel pump (as a precaution) while the thing is apart. The philosophy of “if it ain’t broke don’t fix it” may be attractive, but chanting this mantra is not going to help when the pump fails in the rain on the beltway at 3.00 AM.
2. Spontaneous failures are unlikely to be the ECU; it has an excellent reputation and is very well engineered. Sensors are of a more disposable nature, and many of them share common electrical circuits (grounds, if not power, like the two culprits in the story). So if you do have an odd failure it is worth investigating to see if there are any common elements that would cause complex results.
3. If one had written a manual for the GEMS system it
might be worth updating it in view of any developments that might have
occurred in the intervening years. One might even consider publishing
the GEMS electrical schematics as a service to Morgan/GEMS owners.
4. Morgan/GEMS owners who feel that they would like the
GEMS electrical schematics before the manual is updated might like to contact
the writer of the manual Off-Group and ask for them. N.B. Webmaster If he is
not off again on some damn fool expedition to God knows where. (affectionately)
FUEL CAPACITY AND RANGE
by Lorne Goldman and David Poole
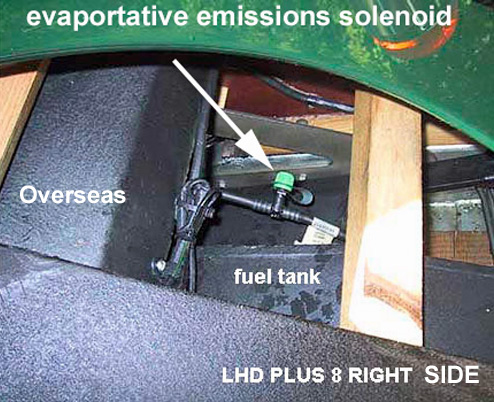
GEMS
became required on Plus 8s in 1998 (Overseas) and the rest of the world
in 2000. They came with an "advance evaporative emission" system.
This consists of:
| WATCHPOINT1: This
all has a BIG effect on range, as practically speaking, for fuel pump
safety (especially an in-tank one), you must leave at least 2+ Imp
gallons
(in the tank) or run the risk of burning the pump out. That reduces the
useable fuel to GEMS cars to 7.5 imperial gallons (or to 9 US gallons,
aka 34 liters). That is a combined city/highway range of approximately 153 miles or 250 kilometers. 2 hours driving. Keep filling up when you can. |
| Fault Codes |
| P0441 – Purge valve flow fault |
| P0443 – Purge valve open or short circuit |
| WATCHPOINT2: This adds to the right-to-left problems the LHD GEMS Plus 8s (most which were made for LHD countries) already have with the battery placement if one rectifies the issue of the original battery by placing a traditional standard battery (rather than the silly red top one) on the engine bay bulkhead and back to the traditional placement in the axle area. Then the weight difference adds 20 pounds to the already lopsided car and that too must be doubled to get the difference right to left. 40 lbs = 18 more kilos. |
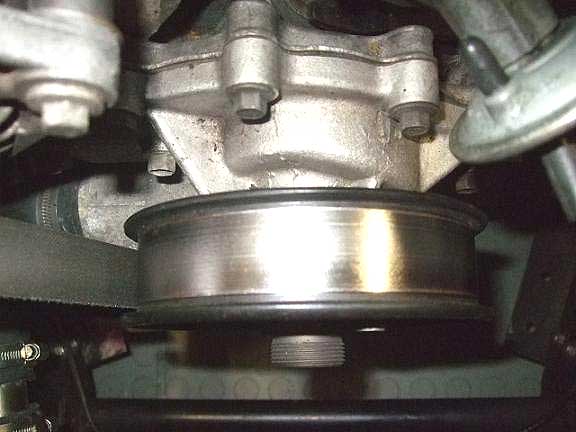
SERPENTINE (FAN) BELT
by Lorne Goldman and the Owl
 It
is often the case that the Morgan Factory uses front belts other those
that are originally used by the engine's manufacturer. The reason for this
is simple. Morgans rarely carry the same range of equipment that the original
manufacturer does..for example, no power steering and often no air conditoning,
both of which have pumps run by the originals belts. This is very much
the case with Morgan Plus 8s and is also the case with the GEMS engine.
In this case, the Factory turned to the aftermarket, specifically a Gates
belt # 7PK-1025. Since then there have been complaints of squealing belts
and pulley scoring. Here is the Owl's story and he is sticking to it!
It
is often the case that the Morgan Factory uses front belts other those
that are originally used by the engine's manufacturer. The reason for this
is simple. Morgans rarely carry the same range of equipment that the original
manufacturer does..for example, no power steering and often no air conditoning,
both of which have pumps run by the originals belts. This is very much
the case with Morgan Plus 8s and is also the case with the GEMS engine.
In this case, the Factory turned to the aftermarket, specifically a Gates
belt # 7PK-1025. Since then there have been complaints of squealing belts
and pulley scoring. Here is the Owl's story and he is sticking to it!
March 4, 2009 from the eMog Pub.
Greetings old chap,
The squeaking and shrieking used to drive me nuts, and everyone was an expert: 'add this shim, remove that shim, use this spray, do not use that spray' .. and so on, and so forth.
I remember a few years ago I spent forever with spanners and sockets and rulers and what-have-you and finally, finally, got the blasted thing perfectly lined up and quiet. It stayed quiet for some months, the first months that it had EVER been quiet. I then took it to a well-known Morgan establishment and when I picked it up some time later the boss smiled at me warmly just before I drove it away and said, ''Oh! You'll be pleased to hear .. one of our mechnics saw that your belt was out of line and adjusted it for you". I drove away contemplating murder listening to the bl**dy thing shrieking again.
However, here is the good news. I fitted a 6PK-1025 and now, at last, no more problem. It is slightly narrower than the existing 7PK belts, and so slightly narrower than the pulleys.
CHANGING THE GEMS AIR FILTER
by Chris Towner
1. Undo the 3 clips which hold on stainless snorkel on the right side of the engine and remove the snorkel.
2.. Central to the bonnet are 2 large diameter jubilee clips, loosen these.. (there is a sensor probe residing in the middle).
3. On the left hand side, there are 2 clips hold the feed tube. Unclip these . (They are next to the heater insulation box and more or less central to the bonnet halfs. Watch out as there is an O ring in there as well.
4. The stainless filter tube housing can now be persuaded off the 2 grommets at the bottom base and slid past the grommets at the right side vertical. This now allows the filter tube housing in a friendly position and allows the filter to be removed. The tube is now in a position that allows the air filter to be removed without obstruction.
5. There is a center nut and flat cover that holds the
filter in place, remove this and replace filter with OE or K&N.
Reverse the sequence for reinstallation.
GEMS Plus 8 Running Temperature
by Lorne Goldman
As with all cars, the later your fueling system, the hotter your Rover/Land Rover Plus 8 will tend to run. Later fueling systems, produce a leaner air/fuel mixture that causes that. And the rads and the rad fans from Morgan were never fully adequate. In my experience, they can only manage the recommended manufacturer temperatures for the carb'ed models up to 1986, assuming proper engine tuning and mild or cooler ambient temperatures. As the cars age, are not perfectly maintained, (no engine flushes, no radiator flushes, degraded tuning) and with our climate change, over heating occurs and we give this model a bad reputation it does not deserve. The shape of a Morgan, the small engine bay, designed in 1935 for a 36 bhp power plant, the cute tiny cowl... all conspire to create heat. I am happy to tell you that my muscly 4.8 (LR V8 Engine with Omega pistons) can best any condition, so your Plus 8 can as well.
The last of the line, the GEMS, was blessed by a much better stock rad fan than the others that came before. However, it produces more heat than the others as well. This can be controlled if you choose to do so. Look at the Cooling Index or drop me a line. We can work it out together no matter where in the world you are.
The LR recommended running temperatures for a 4.0 GEMS V8 are as follows:
A 4.0L Gems Land Rover V8's normal operating temperature is typically in the range of 90°C to 105°C (194°F to 221°F). The thermostat in these engines is designed to open at 88°C (190°F) and be fully open at 98°C (204°F) (at least that is what I have). Please correct me with back up if you have it).The engine is designed to run at these higher temperatures to meet emission standards. 100C is no worry in slow running though it panics newbies with only carburetor experience.| WATCHPOINT3: Please note that most Morgan trad fan switch is placed at the bottom of the rad where the coldest coolant is found, while the engine coolant temperature sender for your dash gauge has ITS sender at the top of the engine next to the thermostat, where the hottest coolant is found. When running, the difference in temperature is as much as 5C. It gets newbies nervous. Many pros suggest it would be wiser to have the rad fan pick-up be at the top as well, but these V8s often build an air pocket at the top. Just being aware of the temp difference is ok for most owners. |
| WATCHPOINT4 Once again there are differences between some "Overseas" Plus 8s and the regular cars Morgan sold to most of the world (the UK and Europe). Notably, these are the cars sent to the USA and Australia. Morgan kept the earlier fueling system, "Hotwire" until 2000 (or a bit into 2001 in the case of the USA) However, they used a bespoke fuel map with GEMS for the USA and Downunder from 1998. In 2000 all the GEMS, so we were told, began using the Land Rover Discovery 2 fuel map. The US cars since the mid 1970s have always been notably heavier than their UK and European brethren, reflecting their mandatory steel-reinforced doors, underscuttle rollbars, crash bumpers front and back. then their airbag system. This makes them slower and explains why they overheat more quickly. Of course, most of these changes can be reversed after purchase in most States and the cooling systems can be upgraded. |