The flapper air flow meter is nothing more than a fancy variable resistor. There is a flap inside that is deflected by the air entering the engine. This flap is attached to a wiper arm which wipes across a resistive track. As the flap opens, the electrical resistance increases and this is signaled to the ECU giving it a measurement of how much air is entering the engine. The ECU then matches the injector opening duration to that signal creating the proper air/fuel mixture at all levels.
The air flow meter also contains a temperature sensor for the intake air. This sensor is a semi-conductor whose resistance varies with the ambient temperature in an inverse relationship; that is, the higher the temperature, the lower the resistance. This information also helps the ECU determine how much fuel to inject, as intake air volume (supplied by the flap position) and intake air temperature (supplied by the sensor) arrive as two logarithmic signals that are combined and the result used by the computer to adjust fuel to that given mass of of temperature qualified air.
The air flow meter can be tested electrically by using a multimeter to test resistance and voltage across certain of it connections or its signals to the ECU plug. See "3.5 Injection System (Checking Procedure)". As well, as you might expect, the AFM's temperature sensor can be tested by attaching the multimeter to the proper terminals on the air flow meter and measuring the resistance at various temperatures. See "3.5 Injection System (Checking Procedure)". If it fails these tests..replace or repair it.
Lastly but not least, the air flow meter has a bypass passage for unmetered air to help set the mixture at idle with an adjustment screw that acts as a valve. Turning the screw clockwise blocks off the channel and so enrichens the mixture. Turning the screw counterclockwise opens the passage and so leans the mixture, as the extra air is not measured by the air flow meter and so the computer does not compensate for it.
These AFMs are available used for a few pounds on ebay.co.uk for about £15-20. In my experience about 50% of them will be fine and the others junk. You can also have them repaired. The cheapest for a full reburbishment is Fuel Injection Corp. They do a great job and bead blast it to new for about £85. Good warranty as well.
There is also Allcar Electronics in the UK. They run almost double but offer a great "hire" service where they send you a unit for testing purposes. If that was not the problem, you send it back and forfeit the hire price. If it is the answer to the issue, you keep and and apply the hire price against the purchase. Very fair.
Everyone else I have run across charge like bandits.
How do I set the fuel mixture on my Plus 8 Flapper EFI (1984-1986)
NORMAL OPERATION
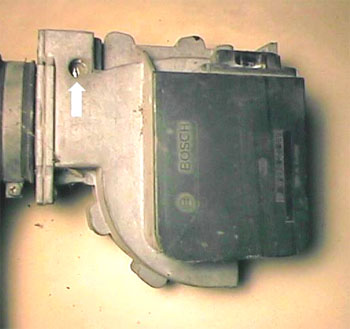
The fuel mixture is adjusted using an adjustment screw
on the Bosch AFM, as shown in Figure 2. Turning clock-wise on the
screw makes the mixture richer, turning counter clock-wise makes the car
run leaner. The mixture cannot be properly set without measuring the exhaust
with a CO meter, though your ear and the condition of your sparks can be
a rough guide.
OPENING THE AIRFLOW METER
This stuff is a lost art. Don't expect useful help from your friendly neighborhood dealer, Morgan or Rover. The only reason (outside of smoothing out and enhancing performance) that you should really have to go into the air flow meter is to correct for the inevitable relaxing of the spring inside. With age, its tension changes resulting in a non-ideal behavior..
To determine the meter's condition you will need access to an exhaust gas (Co2( analyzer. If you don't have one, maybe a nearby garage has one and let you use it or buy a Gunsen Gas Tester.
Run the car until it is at running temperature. Measure the exhaust Co2 at a 800-850 idle. (You can adjust idle at the plenum nose with an Allen key (clockwise for slower, counter clockwise for faster). If it is abut 1.5% for pre-1986 or 1% for cars after that. Then it is fine..if it is close, use the idle air adjustment on the AFM to attempt your adjustment.
If you are way off, it is time to adjust the spring tension inside. For that you must remove the black plastic cover. The contrived paranoia about opening the meter is silly. I have seen people spend hundreds of pound buying new stuff on issues they could have resolved in a few minutes themselves. It must be acknowledged that this Bosch airflow meter is the very core of the system. Undoubtedly, the latter Hitachi Hotwire has all the advantages of any mechanism without moving parts, but the Flapper can overcompensate for this different with its adjustability..effectively allowing for reprogramming on the fly. Run a blade on the three non-plug sides between the metal and the plastic and then VERY carefully pry off the black plastic pacing your screwdriver between on the plug side just under the plastic cover.
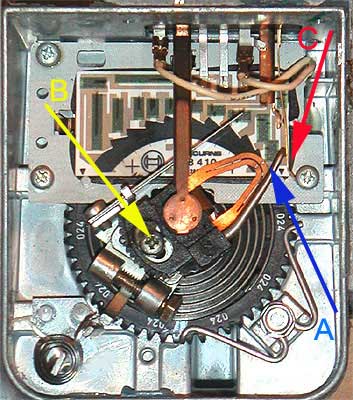
Now look at the potentiometer assembly. You will notice a toothed adjuster wheel that controls spring tension. It is held in place by a metal clip. You should be able to gently raise the end of the clip off the teeth to turn the wheel. Turning the wheel counter clock wise from the top will lean the mixture, and inch it vice versa and the mixture will get richer. Try one - or two teeth at a time.
Really lean mixtures can cause the engine to run too hot and a too-rich mixture at idle will affect, to some extent, higher rpm readings, so set the air bypass adjustment screw on the top of the air box (under the rubber cap) for 2-2.35% first.
You are looking for 2% at idle with the AFMs idle air
screw set mid-way. After you have that lean the mixture to 1.5% for pre-1986
and 1.2% for cars after that.
Really lean mixtures can cause the engine to run too
hot and a too-rich mixture at idle will affect upper end power and keep
your engine innards dirty.,
 Running
the engine with the open potentiometer and change the wheel to achieve
2% CO2 with the adjustment screw in its "middle" position between
its turning extremes. Only move the wheel one tooth at a time, and remember
WHERE you started from!
Running
the engine with the open potentiometer and change the wheel to achieve
2% CO2 with the adjustment screw in its "middle" position between
its turning extremes. Only move the wheel one tooth at a time, and remember
WHERE you started from!
Once satisfied with the CO reading, and seeing no sooty smoke when you blip the throttle, you are done. Remove the meter and delicately clean the carbon resistive element that the wiper runs on with a Q-tip and alcohol. Make sure there is no crap inside the chamber by gently blowing it clean with a camera blower/brush. Reseal the cover to the meter using a dry bond silicone ONLY. Other types will leave acid fumes inside, possibly corroding delicate parts. Let the meter cure overnight and reinstall. You may need to reset the idle CO more lean after installation, due to whatever slight airbox restriction exists.
So, that's it! You will be rewarded by better throttle
response, fuel economy, lower emissions, and maybe even better power if
you are lucky, or you find an expert. I have taught Ben Duncan (the dealer)
to do this and he has my tester and equipment at hand. Alternatively, I
am in England 4-5 times a year.
webmaster@gomog.com
With the car thoroughly warmed up measure Co2 at idle. You're looking for about 1.5-2.0% at idle (800-850 rpm) for earlier Flappers (1984-1988) and 1% for later flappers (1989-1990) . (Really lean mixtures will cause the engine to run too hot with consequent damage and a too-rich mixture at idle will affect, to some extent, higher rpm possibilities and make the engine innards filthy.) If you are already close, use the air bypass adjustment screw to trim it to where you want.
Get to the reading you want from there, use the air bypass screw. Remember there is a delay effect between a change and when its effect will appear on the meter. Rev the engine every few minutes to confirm where you are. If necessary use the idle adjuster on the plenum to maintain the same idle.
Once satisfied with the Co2 reading, you are done. Delicately clean the carbon resistive element that the wiper runs on with a Q-tip and alcohol. Make sure there is no crap inside the chamber by gently blowing it clean with a camera blower/brush. Reseal the cover to the meter using a dry bond silicone ONLY. Other types will leave acid fumes inside, possibly corroding delicate parts. Let the meter cure overnight and reinstall. You may need to reset the idle CO more lean after installation, due to whatever slight airbox restriction exists.
WATCHPOINT: Make sure the armature is its little line aligned with the bottom left corner of the rectangle at rest. (Arrow in the picture pointing at "A" and adjustable by loosening "B".) As well, "C" is the contact for the fuel pump. (We have noticed that this contact is the first thing to fail these AFMs. If that happens, simply connect your fuel pump to the ignition through an inertia switch when that happens. better system, safer system and if you report it to your insurance company as a anti-theft device, your premiums go down! [Position the switch for easy access and you can open it when you leave the car.]
So, that's it! You will be rewarded by better throttle response, fuel economy, lower emissions, and maybe even better power.