 1. Excessive
pedal travel and/or excessive handbrake movement indicates an overdue adjustment
or the need for new pads or shoes.
1. Excessive
pedal travel and/or excessive handbrake movement indicates an overdue adjustment
or the need for new pads or shoes. Freshly tuned carburetors,
proper running adjustments, an oil and filter change; these are just
the start of a successful driving season. Making sure that your car
will stop is probably the most important part of the spring maintenance routine.
This year, why not give your car a safety check?
1. Excessive
pedal travel and/or excessive handbrake movement indicates an overdue adjustment
or the need for new pads or shoes.
2. Sticky wheel cylinder pistons or incorrect master cylinder push rod adjustment will result in a 'dead' feeling pedal. Air in the system is the most common cause of 'spongy' pedal. These are the most common of storage-related brake problems.
3. An obvious and serious brake problem is indicated by the abnormal loss of fluid once the car is put in service. Do not just keep on filling the reservoir; clean and tighten the brake fluid connections. Look for fluid seeping out of the cylinder seals. Pay special attention to the master cylinder. If wheel cylinders leak into the brake assembly, the fluid quickly ruins the shoes.
4. Leaky rear oil seals are also a prime source of brake contamination. Often, both leaky wheel cylinders and oil seals rob your stopping safety. Determine the culprit and correct the problem.
5. Shoes that have been soaked with brake fluid and oil may sometimes be reclaimed with a proprietary brake cleaner, but it is usually necessary to replace them, as rear axle oil will soften the friction material, greatly reducing its efficiency and safety.
6. As brake fluid is susceptible to water contamination, it is essential to bleed the brake system once a year. Worn seals will allow air to enter the system without a sign of fluid leak. The need for repeated bleedings is a sure indicator of this fault.
N.B. Absolute cleanliness is essential when servicing brake systems. Be sure that the master cylinder top is clean before it is opened, so no dirt or grit enters the system. Small rubber caps (Moss 031-300) are available to cover bleed screws, and are an inexpensive and convenient way to keep dirt out of the bleeders. Wash the backplates and any other gritty areas before anything is disassembled for service. Remove the drums and clean the parts with brake cleaner or soap and hot water. Do not use an air blast to clean brake assemblies. The asbestos particles are a proven carcinogen. Do not handle the clean parts with dirty hands.
7. Carefully inspect the cylinder bores. Units having rust pitting, score marks, and 'rings' left by corrosion must be replaced. Internal parts must also be in good order. Disc brake pistons that are rusted or corroded will not hold a seal, nor will plungers and pistons that are scored or worn on one side.
8. Examine the rubber hydraulic hoses. The connections to the metal piping are commonly covered in grease. This area should be kept clean so any indication of cracking or swelling can be observed. An uncommon problem with rubber hydraulic hoses occurs when the inside of the hose swells and cuts off the fluid flow. No problem is apparent on the outside. If you are bleeding the system and no air or fluid passes from the cylinder in question, consider removing the rubber hose for close inspection.
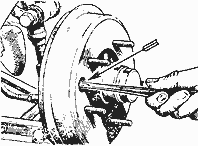
 9.
It is preferable to visually inspect front drum brake systems where two cylinders
are used. Back off the adjusters to permit the removal of the drum. Get a
helper to push the pedal gently. Observe the action of the cylinders' pistons
- only one cylinder may be working, while the other may be stuck. That will
stop the wheel, but not very well. If the cylinder does not retract fully
when pressure is released you can see right away that it will have
to be rebuilt.
9.
It is preferable to visually inspect front drum brake systems where two cylinders
are used. Back off the adjusters to permit the removal of the drum. Get a
helper to push the pedal gently. Observe the action of the cylinders' pistons
- only one cylinder may be working, while the other may be stuck. That will
stop the wheel, but not very well. If the cylinder does not retract fully
when pressure is released you can see right away that it will have
to be rebuilt.
Tech Tip:
Stuck pistons can be forced from cylinders by air pressure. Clean the cylinder;
remove corrosion in the exposed bore. Use an air nozzle to force air
into the cylinder, covering the open end with a rag to prevent damage
from flying pistons.
When rebuilding disc brake calipers, your shop manual or other service instructions probably recommend removal of the pistons by using pressure from the hydraulic system. This method is not only messy, but inhibits the work by allowing removal of only one piston at a time. It also forces you to work on the caliper under the confines of the fender while it is tethered to the chassis by the brake hose.
However, there is an alternative mechanical method which permits removal of both pistons at once, while allowing you to do the work off the car. Remove the caliper assembly from the car, disconnecting the hydraulic hose at the caliper. Determine the inside diameter of the caliper piston, then visit the hardware store and find a plumber's "test plug", or try the auto store for the rubber plug used to replace the steel expansion plug in a cylinder block core opening. Both are rubber sleeves with concave washers at each end and a center bolt used to compress and swell the rubber sleeve. Choose one of a diameter as close as possible to the piston bore.
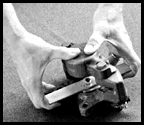
Now cut a piece of 1/4" x 1" steel strap about 6" long and drill a hole in the center that will fit the bolt in the expansion plug. Install the strap on the center bolt with the nut finger tight and cut off the bolt flush with the nut.
Insert the plug in the piston bore, install the strap and tighten the nut securely to cause the plug to grip the inside of the bore. If the plug should prove too small to expand enough to grip the piston, securely wrap a few turns of rubber tape around it until it is large enough to grip as needed. Rubber tape is far better than plastic or electrical tape because it will expand with the plug, having good friction characteristics.
Once the plug is tight in the bore, grasp the caliper and tool assembly with both hands, placing the thumbs on the back of the opposite cylinder and the fingers around the strap. Squeezing the hands closed will extract the piston from the bore. Then repeat for the opposite side. Either this tool or a C-clamp can be used to install the pistons following the rework.
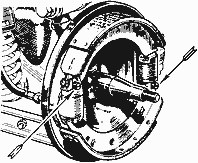
 There is easier way
to install the large "C" clip that retains the rear wheel brake hydraulic
cylinder of the in place. With the wheel and the brake drum off, you
will see that the axle flange sits almost directly above the hole through
which the slotted "neck" of the wheel cylinder is installed. Clamp
a large vise grip wrench to the bottom of the axle flange with the
head of the wrench pushing against the wheel cylinder (as shown), and you
will now have your own two hands free to install the "C" clip.
There is easier way
to install the large "C" clip that retains the rear wheel brake hydraulic
cylinder of the in place. With the wheel and the brake drum off, you
will see that the axle flange sits almost directly above the hole through
which the slotted "neck" of the wheel cylinder is installed. Clamp
a large vise grip wrench to the bottom of the axle flange with the
head of the wrench pushing against the wheel cylinder (as shown), and you
will now have your own two hands free to install the "C" clip.
The concave side of the clip is positioned against the inner side of the brake shoe backing plate. Insert one flanged end of the clip into the slot of the wheel cylinder, followed by the middle flange. Use a flat screwdriver and hammer to ensure that these first two flanges enter into the circular slot of the wheel cylinder.
The screwdriver is
then used to lift/pry the third flange of the clip up and over the neck of
the wheel cylinder to snap it into the circular slot. Check that all three
flanged areas of the clip are fully within the circular slot, and voila,
you have completed the job with no damage to the "C" clip itself, and almost
faster than it
takes to read this how-to-do-it.
 by Lorne Goldman
The pre-June 1993
rear brakes require regular adjustment for wear. Without this adjustment, not
only will the rear brakes become ineffective, but so will the 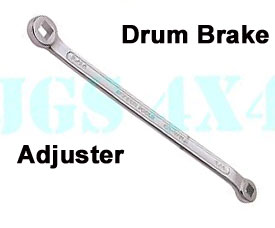 handbrake. In fact,
a feeble handbrake (pull on it) is the best sign that adjustment is needed.
handbrake. In fact,
a feeble handbrake (pull on it) is the best sign that adjustment is needed.
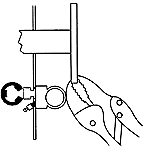
The adjuster post is found at the rear of each rear brake plate. It is a square post that can be turned in each direction. It can be held in a brake adjuster tool or clamped very tightly in a small needle nose vice grip. Each "notch" turned pushes the shoes closer or farther from the drum.
Raise the rear of
the car off the ground. Place it on stands. Remove the rear wheels one at
a time. Turn the adjuster until you can no longer turn the drum. Now turn
the other way once or twice, until you can move the drum again. A slight "scuff"
is permissible, but no drag must be present. Put the wheel back on and repeat for
the other side.
 One of the less
popular aspects of wire wheels is that they tend to go "out-of tune" and
need occasional straightening (or "truing"). This is caused by the spokes
stretching and by the spoke holes wearing, both of which result in a change
in spoke tension. This causes the rim to run out-of-round.
One of the less
popular aspects of wire wheels is that they tend to go "out-of tune" and
need occasional straightening (or "truing"). This is caused by the spokes
stretching and by the spoke holes wearing, both of which result in a change
in spoke tension. This causes the rim to run out-of-round.
Consider that the weight of the car is suspended on the few spokes that are uppermost in each wheel and that they are constantly moving into and out of this weight-bearing position when the car is moving. Add side loads from cornering and you can understand the stresses that cause the spokes to stretch and move around.
A wheel which is tuned to run true may be kept this way by a monthly checking of spoke tension. Run a pencil around the spokes and note whether any make a sound which is markedly lower in pitch than the others. Tighten these "flat" ones with a Moss spoke wrench (#385-800) and you will maintain the wheel in a nice, round condition.
If your wheels have
not been trued for some time, simply tightening the "flat" spokes will not
necessarily make them run true. You might just tighten them permanently into
their buckled condition! An old wheel should be properly trued to eliminate
radial and lateral run out before being put on the monthly maintenance program.
see Tuning Wire
Wheels.
Because servicing them is a dirty job, wire wheels are perhaps the most neglected components on a British car. Many times I've bought or worked on a car and found it nearly impossible to remove one of the wheels! This is likely due to very hard, dried-up grease which essentially freezes the wheel on.
I've heard about many techniques for removing stuck wheels with torches and chisels, and even trying to drive around without the knock-offs installed to loosen the the wheel. Before resorting to such drastic measures, try using a can of carburetor cleaner to dissolve dried up grease. Jack the car up, remove the knock-offs and spray well up into the cavity between the wheel hub and the splined extension, The carb cleaner will dissolve hardened grease in short order.
Be sure to place a
pan or tray under the wheel to catch the dissolved grease and carb cleaner.
Let the carb cleaner soak in for a few minutes and repeat the process while
wiggling the wheel around to help break up hardened grease.
Do you have wire wheels? If so, be very careful when you disassemble both sides of the front or rear suspension. The previous owner of my car had reversed the two front hubs. Consequently, occasionally as I came to a stop one of the spinners would go flying off the car and take off down the street. More than once, I held up traffic while I chased down a wild spinner. Of coarse, as I started this restoration, I forgot to write down which way the spinners turned on each wheel. But I'm no fool - don't bet on that my wife says, you can't even tell time. Remember the 2 to 3 month estimate to fix that Morgan. Its been over 2 years now! - I put each spinner on its hub, labeled them, and set then on their respective sides of the car. Unfortunately, I removed the labels when I cleaned and painted the hubs, not to mention the fact that they all ended up in one pile. Oh well, maybe I still have a few lessons to learn. The hubs should go on so that the spinners are tightened in the opposite direction to the way the wheel normally turns.
Mounting Wire Wheels & Tightening Knockoff Spinners
by Lorne Goldman & Tim Waller
There are a number of methods and theories on mounting wires wheels. First and foremost, let's examine the goal and the dangers of not attaining a tight enough fit. Most wire wheels (and all those used on Morgans) mount the wheels on a splined post which interfaces with splines in the wheel's hub. The wheel is held on the splines by large thread nut called a spinner, where can have two or three ears or be a simple hexagon. They can be tightened in number of fashions which will discussed a bit further on. The recommended system is to make the snug in the air and then torque on the ground.
eMog Pub "When I had my 1956 TR3 I recall reading that the spinners wheels of the Rudge-Whitworth design are self-tightening due to the interaction of the tapered face on the hub with the tapered backside of the wheel. According to that author, one should be able to snug them down (not excessively) and drive off, ending up with spinners tighter after driving. Duncan"
I have run across that saw as well...though only with one manufacturer, Motor Wheel Services in the UK..the supplier to Morgan. The tighten-only-'til-snug solution versus the bang-em-til-you're- blue-in-the-face majority. What IS definite is that there has been much misery over the years with Morgan knock-offs and, for that matter, other marques. The reason is simple, if there is ANY looseness, the splines on both the wheels and the hubs wear VERY quickly as they can work against each other. And if the spinners are supposed to "self-tighten", then someone forgot to tell the spinners. ;( With the Later Plus 8 and early Aero 8 alloy knockoffs, the situation became epidemic and the Factory had to send out super long spanners to the owners to install and remove them. I have come to the conculsion that MWS and some retailers are more concerned with issues other than function and longevity. He also recommended the use of a special spinner fitting used with a long bar for leverage and torque. I haven't bought a spinner since. Since that time, many other soruces have sprung up.
After destroying a set of eared spinners every 1-2 years, I settled on the long beaker bar and a fitting fo three-eared spinners from a source Tim recommended (thanks again Tim!!!). I then measured the extension to the breaker bar I needed to have the torque I wanted by pushing my hardest at its end and had the extension made at the local machine shop to order. I have not damaged a spinner since. I would suggest you ignore advice on using wooden spinner tightening aids. They cannot, at all, tighten your spinners sufficiently.
But even now, I do not regret the earlier crushed spinners. New spinners are cheap compared to 4 new wheels and hubs. I have seen that happen too often with others.
WATCHPOINT: Alloy Wheels
by GoMoG
In the mid-1990s, the Company fit knock off alloy wheels to one Classic model, the Plus 8. (They later tried the same thing with their first Aero 8s). However, the forces working on rear wheels with a very powerful car cannot be exaggerrated. Fitting a softer metal (alloy) to a much harder one (steel splines) is not wise. Anyone who has worked with that combination, in ANY instance or area, can describe what happens from sad experience. Galvanic corrosion, fusing, rapid wear ALL result.
In the Morgan case, unless tightened to a perfect extent (250ftlbs+), the steel works away at the alloy, ruining the splines (and the wheels) and therefore allowing them to loosen and wear even more rapidly. There were many owners who lost a wheel (Plus 8s and Aeros) while driving a horrifying experience, even for an observer. Worn Splines
The Company even went so far as to send out a special wheel tightener that they assured owners and dealers could produce the torque adequate to provide some security. However, this tool was not an item that can be easily carried in the car. Most Plus 8 owners changed these wheels for safety's sake.
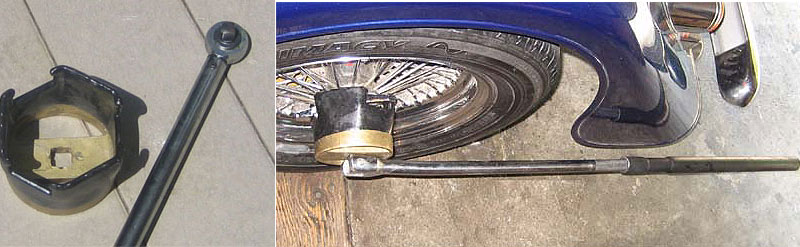
Our best advice is to have an adapter fashioned that will fit the spinner, as shown above, and carry it in the car. You can always find a standard breaker bar to fit in a roadside garage and use a pipe to extend it as necessary.
However, time passes and a new, less savvy crowd has enter the arena. They are unaware of the problems and come up with all the old reasons to use these alloys. They do not know of the risks and when they are discovered they are less forthcoming than the older generations have been with their fellow owners. Times have changed. As a consequence, these rejected alloys have become very much sought after! They can even be sold to the newbies badly worn and dangerous! :(