 N.B.
It is dangerous to use chemical strippers as they may enter under the molding
and cause further mischief. As well, blasting, unless done with the right
materials can warp the metal. Sanding or VERY fine blasting.
N.B.
It is dangerous to use chemical strippers as they may enter under the molding
and cause further mischief. As well, blasting, unless done with the right
materials can warp the metal. Sanding or VERY fine blasting.
There has been a widespread experience of bubbling at the molding edge of Superform wings (post-1998). Though the latest news suggests that the Company has made progress in this area owners of Superform cars report that the bubbles re-appear even after a re-spray. We will not go into the reasons or the history on the problem. Suffice it to say that it a characteristic of the paint preparation, it cannot be rid of with any number of resprays and will re-appear. It has been consistently refused as a warranty claim or latent defect. To date, the only sure cure has been new wings combined with very savvy preparation.
However, we have recently learned that there MAY be a method to address this issue which could avoid the necessity of wing replacement. We have been told it has been tried and tested and been largely successful.
1. Have the paint removed to the metal from the edge molding for about one inch (25mm) BOTH inside and outside of the wings.
N.B.
It is dangerous to use chemical strippers as they may enter under the molding
and cause further mischief. As well, blasting, unless done with the right
materials can warp the metal. Sanding or VERY fine blasting.
2. Now bake the wings at 65C for 40 minutes, allow to cool.
3. Now bake the wings again at 65C for 40 minutes allow to cool.
This should remove any moisture from handling.
4. Use Panel Bonding Adhesive (which I believe is a 3M
product - black) on the outer side edge of the molding
ONLY.
4. Bake again at 65C for 40 minutes.
As only, the outside edge has been done, any liquid remaining under the molding should escape from the still open inner edge.
5. Check carefully for any bubbling. If any is found, repeat 1-4 for the bubbled area only.
6. Again, use Panel Bonding Adhesive on the inner edge.
7. Bake inner edge at 65C for 40 minutes. (Bubbling can
be
checked for but it is less serious as the inner edge
is not visible.
8. Prep normally and paint.
This method has fixed the problem in the cars it has been used on..assuming your painter is patient and conscientious enough to follow it. Few are.
(And burning a little incense to the Auto Gods is never unwise.)
The method will increase the paint costs..but not by that much and nowhere near the cost of rebubbling.
SUPERFORM WING CRACKING AT THE WING STAY
In preparing the car for paint, we discovered covered two hairline cracks in the paint around the wing stay upper bolt hole. After sanding the paint off, we found the cracks were, in fact, in the wings themselves.
These cracks turn out to be common, and seem to be caused by the slotted wings stays as well. They must be cured, or they will lengthen and spread, cracking the paint along the way.
After discussing the issue with a number of trusty Englishmen familiar with the problem, it seems there is an easy fix.
1. Drill a 1-1.5mm hole through the wing at the end of the crack.
2. With a dremel, groove the crack.
3. Clean the area throughly
3. Use a TIG (aluminum welder) to fill in the grove and hole with fresh aluminum. The Superform alloy takes well to any aluminum welding.
4. Clean the underside of the wing to the metal.
5. Bond (with 3M bonder) a bondo or car filler applier to the underside of the wing. As an alternative, you can bond a 20-22 gauge aluminum piece 10mm by 10mm. It is felt the applier works better.
Morgan wings stay braces changed a bit a few years ago. Rather than being shaped, drilled and fitted individually to each car, the bolt holes are now slotted for an easy quick fit at the Factory. Sadly, this has caused some issues. The slot weakens the brace and inevitably allows unwanted movement, resulting in;
 1.
The braces snap quite easily at either the top of the kingpin assembly
or under the wing lamp. (My braces snapped and were rewelded no less than
5 times until I figured out what the issue was.)
1.
The braces snap quite easily at either the top of the kingpin assembly
or under the wing lamp. (My braces snapped and were rewelded no less than
5 times until I figured out what the issue was.)
2. The brace can grind into the underside of the wing. (This has often been diagnosed as an electroylytic reaction but there is no further strong evidence of this as yet.)
The solution is to fashion the wing braces the old way.
You shall need two metal staps of the same or greater length and the same thickness to your existing braces. Use stainless or mild steel. You will need a strong (large) table vice. A big hammer. A metal saw, a metal drill and patience.
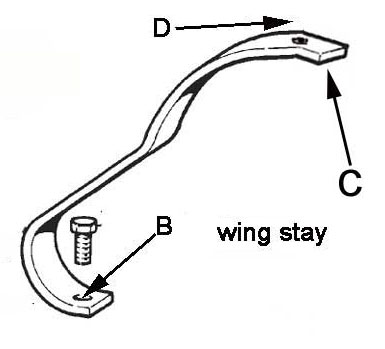
Use your existing braces as a template. The goal is to have the brace sitting comfortably and flat at its lower end (B) and to rise up to the lamp bolt (D) where you drill your hole and then immediately curve downward from that hole to its top end (C). The single hole prevents movement and the curve downward prevents rubbing the underside of the wing.
Leave a little space between the wing and the stay for a rubber washer. [The MMC also uses a new hole liner (looks like a plastic top hat) as a further precaution to prevent the alleged electrolytic reaction.]
ALUMINUM WING PREPARATION by Jean Frédéric Frot (with comments from Lorne Goldman)
WEBMASTER: Considering
the problems our Morgan aluminum wing brethren are having with various
problems, whether pre or  post Superform, I thought this posting would
be helpful. The most frequently run post Superform, I thought this posting would
be helpful. The most frequently run 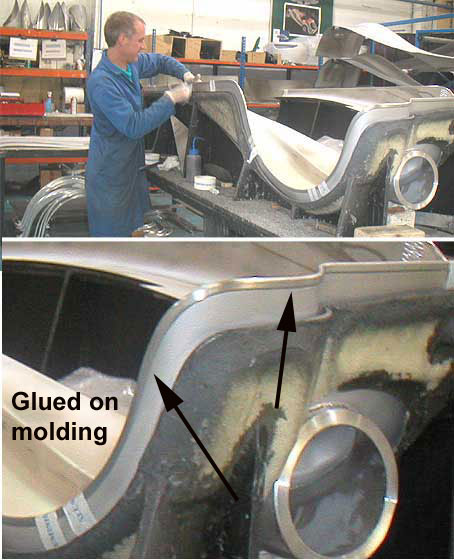 across tragedy
area for Morgan aluminum wings, (pre-or even post Superform wings
[2006]) is the edging.) Pre-Superform, the aluminum wings edge were
unwisely wrapped around a steel cable, without any galvanic reaction deterrent, and then, with Superforms, there was a long period where the Superform wing paint
would bubble.. often at the wing edge. However, the Superform edging,
which is a moulding that slips over the edge is not only smarter (aside
from the original bubbling) and is a pissbile cure for the problems
besetting earlier Morgan aluminum wings wing edging rotting much
smarter than wrapping aluminum around a notoriously
unfriendly-to-aluminum steel cable. When I spoke to the manufacturer,
Vintage, Wing & Radiator, 20 years ago, they refused any suggestion
of making the wings I needed, using a non-rotting cable or any
preparation that would inhibit the rotting. across tragedy
area for Morgan aluminum wings, (pre-or even post Superform wings
[2006]) is the edging.) Pre-Superform, the aluminum wings edge were
unwisely wrapped around a steel cable, without any galvanic reaction deterrent, and then, with Superforms, there was a long period where the Superform wing paint
would bubble.. often at the wing edge. However, the Superform edging,
which is a moulding that slips over the edge is not only smarter (aside
from the original bubbling) and is a pissbile cure for the problems
besetting earlier Morgan aluminum wings wing edging rotting much
smarter than wrapping aluminum around a notoriously
unfriendly-to-aluminum steel cable. When I spoke to the manufacturer,
Vintage, Wing & Radiator, 20 years ago, they refused any suggestion
of making the wings I needed, using a non-rotting cable or any
preparation that would inhibit the rotting. Like all of us, I was forced to buy Superforms. Sadly, SuperForms come in a very limited choice of wing shapes, the Morgan has had eleven Plus 8 wing shapes (IIRC) not including the other models. There is also LONG wait to have these from the MMC and it has become longer over the years. I asked the MMC whether I could purchase the wing edge SuperForm uses (to the upper right)as it seems likely this could be used on both earlier and Superform wings rather than scrapping the wings and preserving the original Morgans' wing shape. However, the MMC refused to supply the edging. |