Notes on the Refitting of the
Wood Frame and Doors
by Alan Alderwick
These notes are gleaned from response to a question
received by the Webmaster and passed onto the eMog Morgan discussion group.
The question received was as follows;
| I
am in the process of renovating a Morgan. I had to replace the firewall and
then found the wooden frame at the firewall crossmember was completely
rotten from hinge posts right up to the firewall.
I copied the
frame pieces and thought I did a good solid job but now doors do not fit
properly. Is there anything that I could have I done wrong? What do I do
to get these doors to fit like they should?"
|
Some of this advice may appear to be "closing the
door after the horse has bolted", but it may be useful to anyone who
is about to embark on dash/scuttle replacement.
1. Before I remove any tired and rotten timber I
always diagonally brace the frame from as many points as I can. Obviously
brace from places where you know that you are definitely going to leave good
timber behind and place the braces carefully so that you do not denying yourself
access to the trouble spots. This gives you a far better chance of all new
pieces going back in the correct place.
2. It is very important
that you make accurate card or thin ply templates of the existing door aperture.
Take heed that you only have to be a millimeter or so out when you start replacing
parts for the problems to compound themselves as you continue to add new
parts.
These basics dealt with, let's try to deal with
the problem your poorly fitting doors. I would suspect that the bottom rail
of the door is either jamming against the rocker, or the door is flying high
leaving you with a massive gap up the lock pillar ( or elbow rail as the
factory call it). If my suspicion is correct I would suggest the following
:-
3. Leave the hinges firmly
bolted to the door.
4. Remove all bolts and
screws from the new hinge pillar.
5. Cut two 8 mm. thick plywood
spacers (about 50mm. x 50mm ).
6. Peel back the trim to
allow access to the wooden rocker.
7. Place or temporarily pin the
plywood spacers in place on top of the rockers.
8. Now close the hinges, get inside
the car and offer the door up to the aperture. As far as you can, slide the
hinges into their rebates on the hinge pillar. Look carefully to see whether
the top or bottom hinge closes onto the bottom of the rebate first. If there
is a gap at the top or bottom between the hinge and the hinge pillar then
this is where you have to pack / shim to get the door to sit right.
I usually use brass or stainless shims but you can
use pretty well anything that will not compress on tightening of the hinges.
If you have a problem with the doors fitting in a vertical plane then this
a"whole new ball game!" as you say across the ocean and will require different
solutions.
|
REPLACING OLD DOOR HINGES
WITH NEW
1. by Bill Beddows (eMog UK)
2. by Paul Helman (eMog US)
3. by Lorne Goldman (eMog-Canada)
Bill Beddows
At some point in time the factory changed the hinges to a
"thicker" version. The causes doors of a car originally fitted with the old
hinges to foul on the latch plate when the new hinges are fitted. Sadly,
the Factory has confirmed that only the new hinges are available.
The difference is in the bend round the pin which gives
a larger gap between the plates in the closed position. With the doors closed
if the gap between the plates is about 1 mm you have old hinges, about 3
mm is new hinges. I had 1mm machined off the back of the plates on both sides
35mm back from the outside edge. In hindsight 33mm would have been enough
but you have to peer very closely to see the step.This solved the problem
in my case but if neccessary the latch plate position can be adjusted by
removing the lining behind the door. The latch plate usually has washers
behind it which can be removed as required.
Paul Helman
Over several years I had noted increasing sag to both B900's
doors. When I had rebuilt my car I drilled and tapped metal plates for both
doors and door posts so the hinges themselves had remained firmly in place.
Clearly the hinge pins had worn and this was apparent when manipulating the
doors up and down. It takes but a little play through hinge wear to
create a good deal of movement at the end of the doors! Removal was
easy and the only access needed was at the outside of the hinges since they
were screwed into the metal plate I had mades. (No wood screws at all.)
Driving out the old pins took some effort despite their
worn state. I found the easiest technique was to place the hinge over
a bench vice opened enough and a bit more to admit the head of the hinge
with the top edge of the hinge blades resting on the top of the vice. Then,
carefully using a small drift pin or center punch, hammer the pin out. N.B.
Hammering the bottom of the pin directly will distort and spread it, rendering
removal problematic.
The pins seemed about .250 or less based on uneven wear
along their length. The hinge pin passages were worn from .256 to .260.
They are made of fairly heavy gauge brass and the pins mild steel.
New hinge pins are widely available at hardware store and
are mild steel with brass plating and measure .258 along their length to
a section .268 starting about an half inch below the head of the hinge.
I cut the hinges to length matching the old pins and turned the .268
segment down to .260. Then I drilled each hinge section held with a drill
press vice with a "G" drill bit then pressed in the new pins using the bench
vice which worked nicely and needed only some tapping with (a padded) hammer
for the final quarter of a inch. This resulted in a very tight hinge not
easily opened in one's hands. Back on the car and no play in the door
anymore.
One little kink encountered in reinsallation was the one
of the screws into the door post plate came up a fraction of center and woudn't
engage the plate hole threads. There was insufficient play in the door
post hole to wiggle it home. What I did was lathe the screw's
end to a tapering point. Then it simply guided itself into place quite
easily into the plate hole's thread. Overall just takes a few hours and is
well worth the effort.
DOOR HINGE PINS (an easy solution to loose doors)
by Lorne Goldman
The method used most often England by professionals in the
know uses the same principle as a engine rebuild. John
Worrall makes slightly oversize replacement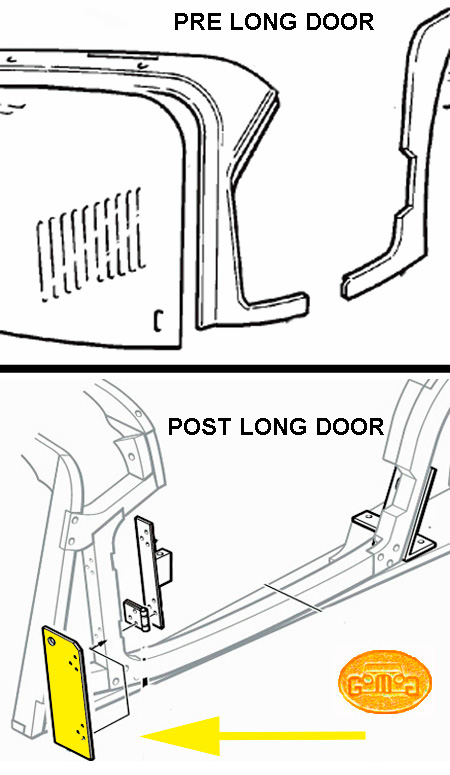 stainless steel door hinge pins. One runs the indicated
bit through the old hinge hole to create a fresh bore and tap in these oversize
pins. Good as new! Sadly, most people are unaware of this most simple of
fixes. Instead, consider switching to polished stainless hinges, a forever
solution.
stainless steel door hinge pins. One runs the indicated
bit through the old hinge hole to create a fresh bore and tap in these oversize
pins. Good as new! Sadly, most people are unaware of this most simple of
fixes. Instead, consider switching to polished stainless hinges, a forever
solution.
DOORS (or Long Doors versus Traditional Doors or the Truth About Long Doors or Morgan 2-Seater Roadster Doors From 1959)
by Lorne Goldman
There
is much confusion about "long door" cars..introduced by the Factory in
1998, a Charles Morgan initiative. They are agressively sold to used
Morgan buyers as being more spacious. But what is the truth?
Problem is, there are a number of doors even two major differences in long doors. 1998 to 2006 and 2006 to the present.
Pre-Long Door
Since
1959 (GoMoG deals only with Classic 4-wheelers from 1950 to 2003/4).
From 1950 to 1998, the doors and the structure of the 2-seater
Roadsters remained pretty much the same..and the eliminated most of the
GoMoG Deadly Domino Effect...(namely they had worked the sequential
bugs out). If one wanted
more room, a special request to the Factory could be made to provide
that. EXPERTS PANEL Cars
are not put together casually...the good ones are a painstaking blend
of harmoniously interacting parts and design. If one alters anything,
the DDE begins.
August 1997-2006
In
1998, Charles Morgan insisted on presenting a new door called "the long
door", part of an effort to create more interior space and a
greater ease of entering and exiting. Sadly, the "long door" is
only bit longer at the top which will only assist those withvery large buttocks
to enter. Inside the car, the steering wheel was pushed forward by
recessing the dash and shortening the steering column in the area.
1. The wooden tub had to be changed,
the dash and steering wheel was recessed forward, thus leaving no room
for
demister vents (all Morgans from October 1975 to the Era of the Heated Windscreens. That is
one of the easiest ways of determining what era your post 1975 Morgan falls in, do
you have demister vents? If not, you have a long door car. That effect was to force the replacement of the
earlier simple and inexpensive windscreen, that can be sourced anywhere and
replaced without a fuss, with a heated windscreen that is obtainable from
the Morgan Motor Company only and requires the purchase of the whole Morgan windscreen
frame with it..for a cost of 1000£ in the UK and much more outside
of the UK..along with a wait of many months. More here.
The added length of the top of the door opening is 51mm (the bottom of
the door remains the same). But useable space in the area is
not dictated by siz of the top of the door. It is a function of
the seat, the steering wheel
and the footwell space.
The Morgan staff used to joke that this is the reason the Aeros were created! Sadly, by pushing the windscreen and dash forward eliminated the space for demister vents
and Morgan was forced to adopt an unusual heated windscreen..which is
very costly, a bespoke part from Morgan only and often back ordered
from 1998 to present. It replaced the previous easy-to-replicate-anywhere piece of school bus glass (aka safety glass which is a
laminated to a stick clear membrane that prevents shattering.
| WATCHPOINT: Flat glass is very fragile, cracking easily and pitting after a bit of driving. Smart owners with the early glass spend the $100
to regularly replace it. But this is too onerous a cost with heated
glass wndscreens. I have had to replace five windcreens in a space of
12 months between two Morgans! If I had heated glass, that would cut
short 4 long mogging vacations and cost an extra $5500 and/or forced 5
insurance claims. |
2. Cantilevered WeightThe
longer doors add extra weight at the top end of the
door. This puts added pressure on the hinge post, a weak point on the
car, which soon had to be buttressed with added metal pieces on
the wood to unknown effect over time. Between the weakened area and
some ill-chosen (but cheaper) pot metal windcreen posts (that quickly
rotted horribly, the ill-fated 4/4 Sports between 2009 and 2012, suffered a plague of cracked heated windscreen.
3. Gearbox Cover
At the same time, the production department of the day (under Steve Morris)
decided to make the gearbox cover easier to make. Rather than continuing
to hand fashion the traditionaly-shaped cover for a significant space
saving in the foot well, the squared off the cover..thereby losing
approximately 3cm in each of the occupants' foot spaces and leg area. This is very problematic for the driver's throttle.
4. The New Sidescreens
The longer doors needed longer windscreens. And, in 2006, the Factory made the parcel shelf space where they were stored when unused for generations smaller and they could no longer fit discretely in the parcel compartment behind the
seats. That left Morgans most sublime feature of all, its lovely
silouette, prejudiced. If you want to take windscreens with you and
travel with your top down, they must be placed in the passenger's seat
(ugh) of dragged about handing on rear off a luggage rack (whether the
luggage rack is needed or not!). Most
of the cogniescenti remove the luggage rack when not in use..takes
seconds if you leave the lower brackets on and the car looks much
better unless you wish to hang you wash on the empty rack and let it
dry in the wind. (we have actually done that in an emergency once..a flash torrent on the Ohio River!!)
2006 on
Around
this time, the Factory added the measures they took (upon request) in
the pre-1998 times. They removed the obstructive crossmember at the
back of the seats, flipped it over, and replaced it UNDER the car. This
eliminated one of the barriers to moving the seat backwards. They also
reduced the parcel shelf space...leaving even less room to store side
screens. They also
found new seats that would clear the rear leaf springs posts. Frankly,
this was long overdue. Non-invasive, no DDE and can be reversed in the
sense that the seats can still be moved forward if wanted. However, the
prejudice caused by the unnecessary and critical modification described
in the first section, remain.
5. Additionally, in the same year, 2006, the Factory made the parcel shelf space smaller, leaving insufficient space for the sidescreens, where they had been
were discretely place, when not in use, for happy generations.
That forces owners to leave the sidescreen at home, leave them
permanent ly up, or place these important weather components hanging
off a luggage rack in the back..a permanet prejudice to a Morgans
finest feature, its incredibly lovely
silouette (along with the bulky bundle of the Easy-Up hood). Most cogniescenti remove the luggage rack when not in use..takes
seconds if you leave the lower brackets on.
  WATCHPOINT: To
give owners some perspective to what this all means, my wife and I
are known as long distance moggers. Between our three Morgans,
we spend 4-5 months traveling North America, Britain and the
European Continent every year for the last 25 years. We would take the
clothing needed, key parts and a full set of tools. We could pack all
that, plus top, tonneau and sidescreens and two Gladstone overnight
bags in the parcel shelf and a period looking hard case on the rear
luggage rack. We could not have done that with a Long Door Morgan. Can
you imagine the difference that would have meant for our lives?!! WATCHPOINT: To
give owners some perspective to what this all means, my wife and I
are known as long distance moggers. Between our three Morgans,
we spend 4-5 months traveling North America, Britain and the
European Continent every year for the last 25 years. We would take the
clothing needed, key parts and a full set of tools. We could pack all
that, plus top, tonneau and sidescreens and two Gladstone overnight
bags in the parcel shelf and a period looking hard case on the rear
luggage rack. We could not have done that with a Long Door Morgan. Can
you imagine the difference that would have meant for our lives?!! |
SUMMARY
The long doors of the first era sacrificed simplicity and created, (for most models) LESS SPACE RATHER THAN MORE
also at a cost of wood tub strength and the sacrifice of an
easy-to-replace-anywhere-anytime windscreen. I recommend these cars only to those of us with a large bum and breasts. Sadly, the last cars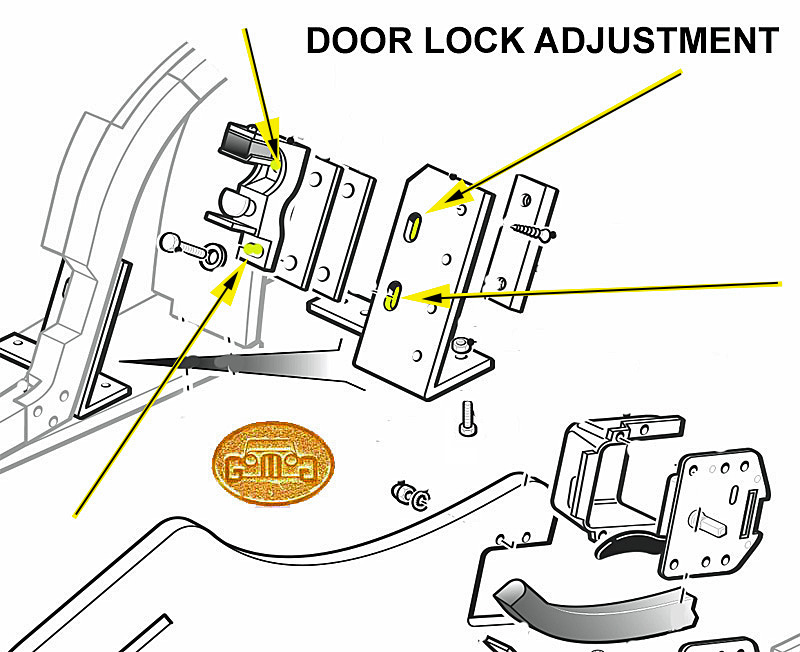 shipped to North America were primarily those made in the first long door era. 1998-2006. Yet dealers and owners alike there recommend the long doors as they believe the tales that they have more space....which simply isn't true..quite the opposite unless you are speaking to models that
have not seen North America in decades. And one has to be very tall to
require more space than what was there and there are smart ways of creating it without throwing the baby out with the bath water. Peter Morgan was very tall and never saw a need for them.
shipped to North America were primarily those made in the first long door era. 1998-2006. Yet dealers and owners alike there recommend the long doors as they believe the tales that they have more space....which simply isn't true..quite the opposite unless you are speaking to models that
have not seen North America in decades. And one has to be very tall to
require more space than what was there and there are smart ways of creating it without throwing the baby out with the bath water. Peter Morgan was very tall and never saw a need for them.
Ergo,
are the first long doors (1998-2006) worth the hype? I am afraid not. Even
the second generation are a HIGH price to pay for the domino effects
described above. I refused them when the Factory re-created my car in
2002 and saved 1000s in my use of the car since along with countless
vacations.
ADJUSTING THE DOOR LATCH (making sure it closes easily and holds without rattling)
I
was saddened to see that even the most simple of Morgan tasks are now
beyond the acumen of a community once known for being the most
mechanically enabled of all marques.
Like so many things on traditional Morgans and in this area, all cars, the door closure is adjustable.
The holding bolts are in slots, both up and down. They can be seen and
accessed easily enough when opening the door and examining the striker
plate but they cannot be trightened unless one can access the rear
nuts. This can be done by unscrewing the quarter panel covering them,
which will also entail removing the side panel to the rear of the door
to hold the relevant nut. Loosen all nuts and then fiddle it into a
position that suits you and safety. Sdly, you will have to tighten
these nuts/bolts so that when closing to the door to test them, you do
not alter their position
Ours is not to reason why. Ours is but to bang our heads against the wall."