REAR SUSPENSION KIT
by Lorne M. Goldman 1996
updated 2008, 2011, 2025
Morgan owners often note with rueful pride that they can
distinguish the difference between heads or tails when driving over a coin
in their Mog. I have my doubts as to the advantages of this sensory system
when bouncing about on our Canadian country roads. The Canadian fact of
small road heaving during the wild climate changes of our country provide
sterner stuff to navigate than the pleasant rural experience one finds
in most of Morgan's native Britain. I am not suggesting that our larger
and newer divided highways are all pot-holed but our smaller country lanes
have a special...er... "complexion" from winter heave. At the same time,
Morgans should be at their best on winding country tracks.
My experience with snowmobile suspension designing has
shown me that one's range of pleasure and possibility improves with a suspension
capable of taming the track. The better the suspension the more stretches
that will become joyful adventures rather than a flirt with danger.
My car came with lever arms. They were not up to the task.
I looked to other solutions. There are two groups of these so far. One
is the MMC system and the other is an early Rutherford design called the
Rutherford kit. I have used six rear systems on three Morgans, the lever
arms, the early MMC hoop, the Rutherford Kit, a modified Rutherford style
kit I made myself, the later MMC hoop (2003) and a Rutherford hoop (2005).
EARLY RUTHERFORD KIT
This is an early design (1960s) by David Rutherford, the
legendary Morgan Suspension guru. It is still made by David and copied
by Melvyn Rutter. It fits all trad Morgans (there is a version for four
seaters). It consists of two new U-bolt saddle plates with shock posts
attached and two large metal bracket side plates (with shock posts at the
top) that affix to the sides of the frame forward of the rear wheels. They
can use the four lever arm holes that are pre-drilled (check your car,
you have them) but with the codicil on travel I mention below. There is
an aluminum 1 inch angle iron that attaches to the top of the brackets
and straddles the car behind the cab wall. The bracket placement allows
for much more space for shock "travel" over the first hoop systems and
the shocks are more upright (good!) without inward angling, but rather
a bit of forward angling. (The best angling would be a 10-15 degrees towards
the rear but there is no space for that.
THE
RUTHERFORD KIT
The shocks you use with this kit are stock at your option.
I first used it with Spax adjustable gas shocks. Adjustable shocks
allow the driver to easily change the ride of the car to suit his taste
though, frankly, the softest or near softest setti.ng are the ones to use
with Morgans whether you are using Spax, Koni or Rutherford Avos or the new ones from Wolf Performance. I purchased
Spax shocks (G464 HN) with the first kit. Konis are great shocks as well
but they can only be adjusted ONCE as most other shocks like Spax and AVOs. Contact either Wolf Performance (Cain) or New Elms (Tim) and have them advise you.
Installation is fairly straight forward. Firstly, go to
a machine shop, (NOT a hardware store) with the side plates in hand and
buy the strongest bolts and lock nuts they have, preferably #8's or better.
These bolts are NOT included with the kit. Don't forget you will need two
extra bolts and lock nuts for the cross white metal bar.
Jack the rear of the car up about 18 inches, put it on
jack stands and remove the rear wheels. Make sure that the differential
is jacked to allow for access to the ubolts as otherwise they are too close
to the frame flange. Remove the old system if you have it. (I planted the
old yolk bracket bar as a garden ornament to much greater effect.)
Secondly, remove the large U-bolts straddling the leaf
springs and pull the bottom plate. Replace the bolts and the plate with
the new ones making sure to place the bracket properly (a diagram is provided
with the kit). You jack up the differential if you need more space to access
the plates' nuts. Take special care to insure the each nut used is a nyloc
and is properly placed to tighten down completely. If the nuts are tightened
unevenly, one or another will leave a tiny space to give you slippage
problems.
Next, loosely attach the side plates to the two bottom
holes on each side of the chassis just forward of the wheels.
| There is an important point here to verify if you wish.
There is a common failing with all systems, MMC, Rutherford or Rutter.
The distance between the shock posts must be such that the shock when installed
is halfway between its fully compressed and fully extended states. If not,
you will lose some of your ability to compress or extend. As the hoops
and lower posts changed and/or each Morgan is not exactly the same as another,
(considering the ride height changes over time (especially the first year
of spring life), any shock post placement should be verified regularly
and ALWAYS at installation.
With the early Rutherford kits, you can adjust the shock
post position by placing the side plates where they will be ideal for the
shocks. With the other systems, you must match shocks to the right hoop.
Measure your shock's length fully extended and fully shut and determine
the mid-point length. Measure the distance from the saddle plate (u-bolt
plate) post to the side plate post and, ideally, it should match.
|
Now, attach the other two bolts per side and tighten all
of them. Then attach the cross bar to each of the plates where indicated.
You will have to drill the holes in the cross bar but this is not a problem
with the appropriate metal bit. You MUST tension the brackets inwards a
bit to mark the drill holes on the cross bar. (If the tops of these brackets
are not "tensioned" inward by the angle iron they will move from side to
side to sad effect).
| WATCHPOINT MAKE SURE THE LEAF SPRINGS CLEAR THE BOLTS.
I had a friend who had my kit installed for him and couldn't figure out
why he was "bottoming" on one side so easily. They had left the bolt sticking
out in the way for the up and down movement of the leaf spring. |
Attach your shocks with their rubber mountings, in a manner
to easily access the adjustment screw. Do not over tighten the shocks'
bolts as if you start to crimp the rubber mountings this will affect the
shock's performance. Adjust each shock up to the softest, put on your wheels
and off you go for your test ride. You can adjust the shocks to your liking
but softest is the best setting for the rear on all shocks. The ride will
feel weird at first but you will quickly adjust to the added comfort as
the shocks handle the road anomalies and your car seems to float over the
bumps. Lastly, put the car back up on the jack stands and re-tighten every
bolt once more. Some will need it.
The specific cost of these kits, quality shocks and new
u-bolts cost 300 pounds and a slow day for an amateur in installation time.
| The Rutherford Kit has side brackets at 1/8 inch thick
in quality steel, the Melvyn Rutter Kit is made from 3/16 inch in a mild
steel. My redesign made the side brackets made to measure for my ride height,
had the side pieces made in 3/16 inch alloy steel called "memory" steel
which remembers its original shape and will bend temporarily rather than
break. They have 4.3 times the strength of the commercial brackets. The
lower bolt holes were threaded for ease of installation. With the graded
bolts included, my kit cost me 125 pounds. |
THE
MMC SYSTEM
In 1991, the Morgan Motor Company tried an improvement
to lever arms. This consisted of an elliptical bracket (dubbed the
"hoop") which straddles the rear compartment over the axle and which has
fittings at both sides for the upper mount of the shocks and fits the lower
mount at the rear of the wheel plates. The hoop crescent moons over the
differential and attaches at each side of the chassis above the axle. The
shocks angle INBOARD from the wheels to the hoop posts.
I tried a 1992 version of this system first. I have little
pleasant to remark upon it. It left too little travel for comfort and encouraged
constant impacts between the differential and the hoop. The hoop
passed less than one inch above the front of the differential allowing
only that space of "travel" before they 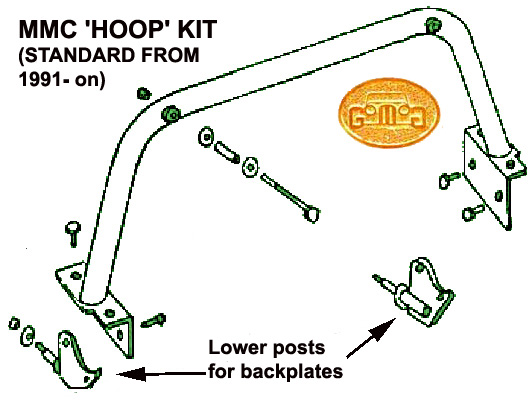 smashed together. In my case, the
paint on both the underside of the bar and the top side of the differential
disappeared and the pinion seal soon started to leak. British Agents have
seen these bars actually flattened at the contact point with the differential.
The fitting of the hoop concentrated too much stress at a weak point of
the frame, and caused frame cracks over time.
smashed together. In my case, the
paint on both the underside of the bar and the top side of the differential
disappeared and the pinion seal soon started to leak. British Agents have
seen these bars actually flattened at the contact point with the differential.
The fitting of the hoop concentrated too much stress at a weak point of
the frame, and caused frame cracks over time.
However, the later version (still used at present) improved
mightily in the last 18 years and now incorporate a large rubber bump stop
between the differential and the hoop. The travels space at that point
has tripled and the hoop section at the frame now spreads the impacts.
The shock angling is more vertical. The MMC makes two versions of the hoop.
Both of them are good. One must take care which shocks you purchase for
any hoop system. The needed lengths may vary.
Rutherford Engineering also has two hoop systems. One
is similar to the MMC's and another allows for a much longer shock positioned
and angled even more vertically. It is higher also above the differential
than the MMC configuration and its bottom post is lower but for that reason,
they need different dampers. They are great.
BTW, (webmaster observation)
shocks should normally be angled so as to be able to deal as directly
as possible with the forces exerted upon them. This side-angling
factory
arrangement cannot be ideal. It has to prejudice the effectness of the
shocks. Perhaps Morgan could not find shocks short enough.
BACK