WIRE WHEELS: Balancing Them & Replacing
the Tyres
by David Poole at the eMog
Pub
Some time ago I mentioned that I replace my tires and
balance my wire wheels myself, and there was some interest on eMog of a
description and pictures of the process. So since I am stuck in the
house in the middle of what looks a lot like Siberia, with so much snow
that I cannot even see the roads, let alone any snow ploughs, here it is…
in several parts so that the pictures can be included. Wish I had
my chum Lorne and his fleet of Snowmobiles buzzing around outside.
The reasons that I do this job myself are more or
less the same as the reasons that I do all my own Morgan maintenance and
engineering – it is a lot more convenient and results less agony than trying
to find someone qualified and hope that they do not screw things up (an
American technical term) in the process. I find that paying qualified
mechanics to damage my car causes me quite unnecessary grief – and I found
out years ago (even in the UK) that knock-off wire wheels are high on the
list of things that they can easily damage. I change the tires without
using any mechanical equipment or tire levers that can damage the wheels
– it is not difficult, and my wheels are undamaged and still look like
new after seven years/30,000 miles.
GENERAL APPROACH:
1. Order tires from
Tire Rack (US), mytyres.co.uk (UK) or similar.
2. Put cardboard or
an old blanket on the floor of the garage to protect the wheels.
3. Put the car on
axle stands and pull off all the wheels (I have seven, total, not all on
the car at the same time (grin) so that I can rotate (and true, if needed)
them by jacking one end at a time).
4. Power wash the
wheels and remove the valve cores and old weights.
5. Taking each wheel
in turn, cut a square hole in the sidewall, push the bead into the well
(stand on the tire wearing old workout shoes or buy a bead breaker), and
cut the bead with a bolt cutter – first the outer, and then the inner,
and peel off the tire.
6. Check the bare
wheel for damage, clean the well, check the silicon sealer and remove any
rubber adhering to the well from the old tire, mount the bare wheel on
the front suspension, fit a dial indicator on a magnetic mount, and measure
the run-out.
7. Using Armor-All
as a lubricant, tread the new tire on to the wheel.
8. Inflate them (you
will need an airline for this step if they are tubeless, so you might have
to haul them to a garage).
9. Negotiate the use
of your cones and balancing methodology with a garage that has a balancing
machine, and then buy (or make) wire wheel support cones to fit their machine.
10. Buy adhesive balance weights in ¼
and ½ oz. sizes.
11. Take the wheels, cones, and weights to
the garage and supervise (or perform, if they will let you) the balancing
process.
12. Thoroughly clean and polish the wheels,
and pick the best one for use as a permanent spare.
13. Replace the spline grease and refit them.
REMOVING THE TYRE
S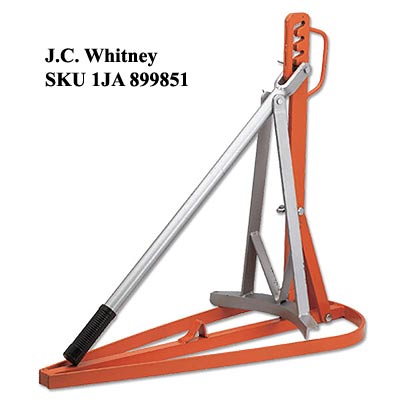 o
the most daunting step is getting the old tire off the wheel. After
this everything is pretty much downhill, at least from a difficulty viewpoint.
The hardest are modern very low aspect ratio tires – these are easy to
get off using this method but getting the new ones on can be a bear.
But typical Morgan tire sizes are pretty malleable.
o
the most daunting step is getting the old tire off the wheel. After
this everything is pretty much downhill, at least from a difficulty viewpoint.
The hardest are modern very low aspect ratio tires – these are easy to
get off using this method but getting the new ones on can be a bear.
But typical Morgan tire sizes are pretty malleable.
You start the removal process by taking out the valve
core to deflate the tire. You then lay the wheel with the outer side
uppermost and make a 2 in. or slit around the circumference of the sidewall
near to the tread ( it is very easy to cut) with a heavy duty knife, using
water or Armor-All as a lubricant, followed by two slits down the sidewall
toward the center of the wheel, followed by another slit around the bead
to allow a window in the sidewall to be removed. Years ago you could
cut across the tread from bead to bead but modern tires seem to use more
steel in the carcass.
You then tread the bead into the well with your feet,
or use a bead breaker such the one sold by
JC Whitney (SKU Part # 1JA 899851) The bead breaker is a piece
of cake to use, and you can wrap the business end in a shop towel to prevent
any damage to the rim. Then push another shop towel between the bead
and the rim before you use a pair of 24 in. bolt cutters to cut the bead
in the window that you cut earlier. Turn the wheel over and repeat the
process – cut the window, break the bead, and cut the bead with the bolt
cutters. You can then just peel the tire off.
With the tire off you can inspect the rim for damage,
inspect the silicon sealant (if you have modern wires and are using tubeless
tires), and polish the inside of the rim to remove any rubber that has
become stuck there from the old tire. It is worth getting it clean
since it will ensure that the new tire seats properly.
 CHECKING
THE RUNOUT
CHECKING
THE RUNOUT
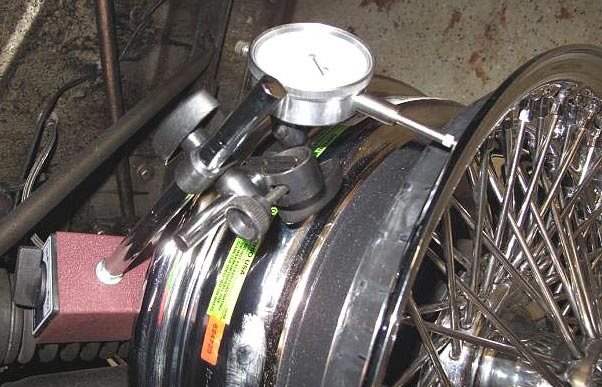
And now you can check the runout. I use the front
hub and stick a dial gauge on to the spring with a magnetic mounting.
Years ago I used to check both radial and axial runout separately, but
now I check them both simultaneously by setting the dial gauge at a 45
degree angle on the inner rim. The Dayton specs are 0.0625 in. max
as far as I can tell, and so I only look more closely at the wheel if the
aggregate runout exceeds .050 or so. So far all my wheels are around
.025 - .030 max, but you may find a local “bump” that exceeds that figure
since the rims are swaged from flat steel stock and welded into the final
diameter hoop. It is interesting that my two later Daytons (2005)
are better made than the five earlier ones (2002), but you have to look
pretty closely to see the differences. All the wheels look like new
under all but the closest scrutiny, but there are some fine scratches starting
to appear between the spokes on the rim, and the older wheels are starting
to show some signs of discoloration (which is a prelude to corrosion) in
the edges of well where the tires fits. I think that next time around
(perhaps two or three years away, by which time they will be ten years
old) I will replace the older ones.
MOUNTING THE NEW TYRE
The next step is mounting the new tire – but first replace
the valve stem after removing the core from the new one. I use metal
bolt-in stems that look good with chrome wires and are very reliable, but
you can use any that you fancy. Getting the tire on the wheel
is almost a piece of cake… and quite surprising in view of difficulty in
getting the thing off. Place the wheel on the floor outer edge up,
lubricate both the outer and inner edge of the tire with Armor-All and
push it over the rim. Make sure you get the tire the right way round
– uni-directional ones will need two of each direction, and multi-directional
ones have an inner and outer side. The inner edge will almost fall
on to the wheel; the outer edge will need some persuasion with your feet.
Start opposite to the valve (so that there is no impediment to the bead
going into the well) and walk the 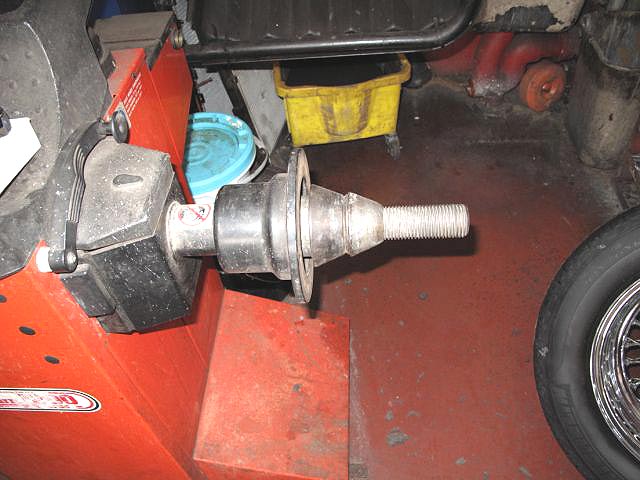 bead
around the rim with your feet. The last third or so may be a little
tough, but it will suddenly give up and roll over with a sort of resignation.
Bounce the wheel, rotate it, and bounce it again to set the beads.
And then pump it up with an air hose to the maximum pressure shown on the
sidewall. The beads will set with a bang, and then you can let the
air out, replace the valve cores, and pump it up to the recommended pressure.
bead
around the rim with your feet. The last third or so may be a little
tough, but it will suddenly give up and roll over with a sort of resignation.
Bounce the wheel, rotate it, and bounce it again to set the beads.
And then pump it up with an air hose to the maximum pressure shown on the
sidewall. The beads will set with a bang, and then you can let the
air out, replace the valve cores, and pump it up to the recommended pressure.
And so off to the friendly garage for the use of the balancer.
My local garage has an Accuturn – and I have thought of buying my own but
the cost/space/use ratio has never persuaded me to take the final step.
But here is the Whole Problem in balancing wire wheels; all standard balancers
are designed to pull the inner surface of the wheel hub into close contact
with a machined face on the balance shaft. And all wheels have a
flat surface designed to be mounted in such a fashion; all wheels except
knock-off wires, that is. So there is no point in asking any tire
company or garage to balance your wires unless they have the mounting cones
needed to support the wheel away from the flat mounting surface.
The next problem is that all balancers have a strong spring
on the central shaft that supports one of a number of inner cones
of varying diameters designed to provide rough centering until the wheel
is clamped to the balancer, when it collapses and lets the inner surface
of the wheel hub come into contact with the machined mounting surface.
Wire knock-off wheel do not have a true surface on the inside of the hub,
so if you let the wheel come into contact with this plate it will never
run true or balance correctly. The solutions is as follows:
 1.
If you have Dayton wheels you will need two medium size cones to support
the wheel since the hubs are machined to run true when supported by an
inner cone at either end. This means that you will have to buy a
medium size cone for the machine that you plan to use – no machines are
supplied with two cones of the same size since wire wheels are not in their
lexicon.
1.
If you have Dayton wheels you will need two medium size cones to support
the wheel since the hubs are machined to run true when supported by an
inner cone at either end. This means that you will have to buy a
medium size cone for the machine that you plan to use – no machines are
supplied with two cones of the same size since wire wheels are not in their
lexicon.
2. If you have earlier
wheels you will need an outer cone that matches the inside of the knock-off
nut.
3. In either case
the inner diameter of the cone will have to match the shaft diameter of
the balancing machine.
You can see the arrangement of the inner cone in the attached
photograph. I have used a large cone as a spacer to compress the
spring, and then a medium size cone (one that came with the balancer) to
support the wheel. The inner face of the hub must not touch the balancer
mounting plate.
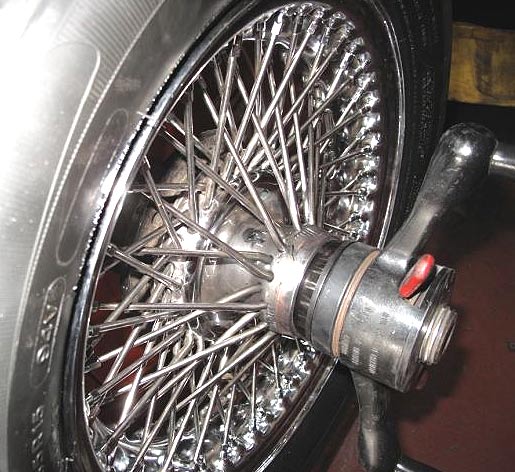
And if you have it right the wheel will now look this
in the second picture, supported entirely by the two cones. You can
see the additional cone that I bought on the outside of the wheel.
The next step is setting the balancer for the wheel size.
This should be easy, unless you are using adhesive weights, in which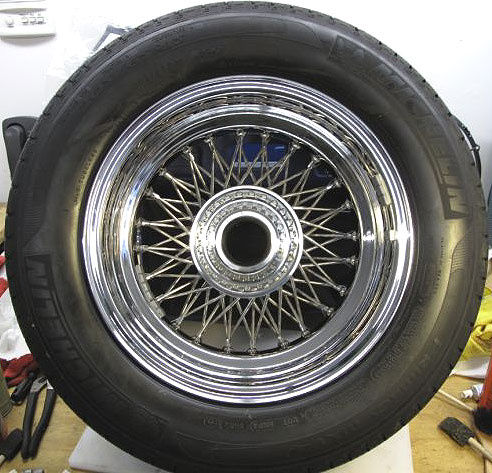 case
the distance to the inner edge of the wheel should be the distance to the
inner set of weights, and the width of the wheel should be set to the distance
between the inner and outer row of weights. In case this is a little
opaque, my wheels are 15 x 6 in., but I set 3.5 in. into the balancer for
the width of the wheel since this is the distance between the two rows
of weights. There is no room for the outer set of adhesive
weights on the outside of the rim (I have traditional rim-laced wires)
and so I place them behind the spokes on the center well.
case
the distance to the inner edge of the wheel should be the distance to the
inner set of weights, and the width of the wheel should be set to the distance
between the inner and outer row of weights. In case this is a little
opaque, my wheels are 15 x 6 in., but I set 3.5 in. into the balancer for
the width of the wheel since this is the distance between the two rows
of weights. There is no room for the outer set of adhesive
weights on the outside of the rim (I have traditional rim-laced wires)
and so I place them behind the spokes on the center well.
And this is what the inner side (the worst side) of a
seven year old all-weather Dayton chrome wire wheel looks like. You
can see the outer and inner adhesive weights on the rim; after the balancing
is complete I rationalize them and replace any multiples of ¼ oz.
weights with ½ oz. weights. I also settle the weights with
a rubber mallet, and then polish the wheels, which I try to do about twice
a year even if I do not change the tires, although I must admit that some
years I miss one of the bi-annual polishing sessions.
Before I was married I owned a Series II Healey 3000 (sidescreens,
three carb engine) when I met the girl who was to become my wife.
I remember settling her down in a car park (I was a pretty poor Royal
Naval fighter-pilot-in-training at the time with no garage) with the wire
wheels, a toothbrush, car polish and some dusters and asking to get on
with the job. I could not afford chrome wires in those days; they
were 60 spoke silver painted versions. The 72 spoke wheels with buttressed
heavy duty spokes were known as “competition wires” and were beyond my
means – but they were very strong, and that is what I now have on my car.
I have suggested to my wife (Juinette) on a couple of occasions that she
may like to relive earlier days and sit on the deck and polish my wheels….
but so far she has resisted the temptation (could not understand why (grin)).
I never could though; wire wheels, a shiny sportscar heading out into the
dawn, the sound of the engine as it winds up through the gears; luggage
behind and all of Europe in front. What more could anyone ask for?
David Poole
Annapolis, Maryland