 I classify Morgan issues by the need to cure them. The most important of these will possibly save your life.
 1. empty the tank..either out the bottom if there is a drain or using the fuel pump but careful you do not let the pump run dry as it will burn out.
2. remove the bracket that holds the spare tyre.
3. remove the fuel hoses and detach the filler hoses. The filler caps thread off from big rings under the deck and that gives you the room to lift them off.
4. jack the car up...high, enough the clear the tank height below.
5. remove the nuts off the three nuts and screws that bolt through the tank side flanges and through the boards on each side.
6. remove the two bottom metal straps holding the wood plank floor together.
7. Now you have raise the wood frame above the tank. This must be moved upwards to allow you to raise the tank sufficiently to slide the floor boards out to lower rear. The frame has two screws per side. Take out the lower rearward ones. and loosen the upper frontwards ones. Then pivot the frame upward and tie it in place.
8. Slide cords under and hoist it up and tie it to the ceiling or something.
9. Slide the floor boards out in a sequence dictated by the small and large boards.
10. Lower the tank to the floor and slide it out from under the car.
See pictures HERE!
MORGAN FUEL TANK BASICS 2016 completed in 2019
by Lorne Goldman
Some background is necessary to understand my musings here. I have always believed the joy of a classic Morgan 4-wheeler stems from the era it was designed in, often referred to as the Golden Age of Automobiles (1920-1939). It was a time when the complete interaction of an owner and his machine was not only needed, it was applauded. Safety and environmental laws has yet to encroach on that interaction and manufacturers had not yet to expand the enthusiast market with technology that compensates for a lack of skill and mechanical acumen. Nothing was spared to make the best cars simple, responsive and enduring. And the undistilled feeling they provide is incredible.
On the other, there are lessons learned since that can enhance the design philosophy of 75 years ago. A 1930's design can be made simpler, with the car even more amenable to owner intervention and the components made more reliable and enduring. I am a long distance mogger. I do not want a two month vacation ruined by frequent mechanical failures, even more common now with current Morgans than they ever were. Happily, these characteristics aspects can be eliminated and be sorted out with owner minor owner skills and this Manual.
I classify Morgan issues by the need to cure them. The most important of these will possibly save your life.
After having my Morgan burn/melt under me and my wife, my attention was rudely drawn to 5 items listed below;
1. The vulnerability of the positioning of the fuel tank
2. The construction of the fuel tank
3. The inherent risk of the pre-June 1993 safety brake system
4. The dire need for an inertia switch for the fuel pump
In this article, I will deal with the classic Morgan fuel fank itself and touch on a few basics I discovered from the accident and the fuel tank fire. They are worth noting as it was VERY lucky we survived and few people come back from the dead!
The Morgan Classic Fuel Tank
i. Positioning of the Tank
Morgan
fuel tanks are placed to the rear of the axle, cantilevered. This
placement removes any protection they could have had from the
drivetrain. In effect, they are proferred to an accident and its
consequences like a supplicant with an sacrifice to the Auto Gods. As
Morgan bumpers, outside of those modified for overseas cars after 1975ish
are either non-existant or merely decorative, the presence of such
things merely directs a rear impact force upwards and INTO the tank
rear. If hit at the rear sides, the impact drives the axle also
INTO the tank front. Either type of impact will most often dislodge the
fuel filler hoses and the fuel lines, which I will deal with in another
article. The relative speed of these impacts need can be as little
as 5 mph to cause great sadness. Additionally, I have heard Morgan crash tests that show classic fuel tanks being dislodged, when full from their side straps and lurging forward at speed with a frontal impact.
| WEBMASTER NOTE: This position survived as long as it did because the three major markets for Morgans, namely the UK, Europe and the USA, did not require actual rear crash testing until the very modern era. US/UK manufacturers needed only sign an affidavit indicating a "belief" that their cars could pass the indicated rear collision standard without fail. This bizarre modus to assure consumer safety is a function of money politics. Nothing can be done. :( There are many designs that could reposition the tank forward and protect the occupants while increasing balance, storage space and fuel mileage, but this is not to be now the classic design will be eliminated. |
ii. The Construction of Morgan Fuel Tanks
can be better. The thin rusting steel used originally
(until approximately 2000) are anything but bullet proof. The
newer petrol tanks are, IIRC, made of plastic
(high-density polyethylene HDPE) as a fuel tank material of
construction. While functionally viable in the short term, HDPE has a
long term potential to become saturated with the use of fuels such
as diesel and gasoline which permeate the HDPE material and
effectively make the tanks flammable themselves. Just like the planmks
the tanks rest upon.
Dos and Don'ts if Replacing Your Fuel Tank
 A. NEVER construct a fuel tank out of aluminum unless
you intend to use merely as container for a proper foam filled racing
bladder. Aluminium tears on impact and melts/explodes at a fairly low heat,
raining a shower of shiny metal upon you. I have been quietly horrified
crewing in Europe and seeing aluminum fuel tanks on racers. The weight
saving and lower cost is not worth the significant increase
of the risk to one's life.
A. NEVER construct a fuel tank out of aluminum unless
you intend to use merely as container for a proper foam filled racing
bladder. Aluminium tears on impact and melts/explodes at a fairly low heat,
raining a shower of shiny metal upon you. I have been quietly horrified
crewing in Europe and seeing aluminum fuel tanks on racers. The weight
saving and lower cost is not worth the significant increase
of the risk to one's life.
B. Fuel Lines. If at all possible, change any hose feeds placed at the bottom of the tank to AN fittings with non-flammable but flexible lines. The upper fuel filler hoses will dislodge but that will not mean spillage unless the car is overturned in which case the fuel can soak you and any occupant. So install spring-loaded fuel entry(s) on the tank itself and a one-way air vent. These have become law and prevents leakage if the car flips. They are inexpensive and I have devised a way to make them easy to add to any tank.
C. You must secure the fuel tank in a safer fashion than you have from Morgan by either:
i. Making your
tank out of stainless steel, of a gauge that can resist
impacts and dent rather than split like
aluminum which it will surely do and the earlier thin steel will as well.
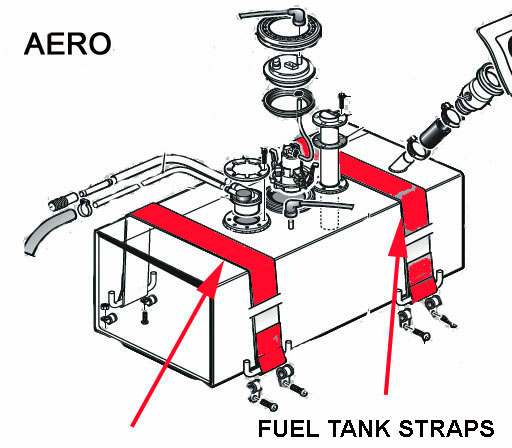
ii. By using, as they did after some early experience with the Aeros, two seat belts or metal strappings circling the tanks and holding it to the car frame.
iii By removing the boards or metal under the tank and switching to the safer and far more convenient thick steel brackets or frames made for the job. They can be made at home, or a local metal shop (do NOT tell them what they are for!), or purchasable from Mulfab. I used the latter and they are brilliant.
I
recently designed a fuel tank which I made with the local
machine/metal shop. It reflects everything I Iearned over the last 25
Morgan years and 200,000+ miles and makes life considerably easier and
safer.