Port shape and size play important roles for power and idle smoothness with engines. Cylinder head porting is an automotive machining processes that the average mechanic can do at home. Porting involves using an assortment of grinding and cutting bits to reshape or polish the cylinder head's intake and exhaust ports,. Sometimes it is used for combustion chamber roofs for increased airflow and efficiency, but that should be left to professionals. A good port job is mostly a function of having detailed information on your cylinder heads and using the right tools to work them.
| Yes! People constantly pay 1000s for bigger bore systems that, without porting, create problems they do NOT want. Installers ignore the problem, don't do this all important work and the car is degraded. The violent air flow coming out of the engine can crate a turbulent convulence with the unmatched edges of the larger exhaust manifolds and the heads' ports. That can easily be avpid by matching the heddars to the head(s). For that matter, notoriously the LR/Rovers come from the caster to your car with clumops of casting metal in the ports. Engine power is also about smooth flow of gases in and gases out. Owners fixate on the bling of shiny stainless pipes, especially their pretty branch manifolds, which discolour almost instantly with usage. They forget that the major reason to spend so much money was to improve flow, not shininess. |
| WATCHPOINT: Exhaust flow comes from the head exhaust ports which are of a certain size. They then buy exhaust manifolds that are of a different size. That has sad consequences. It creates unwanted turbulence just at the vital point you want a smooth flow. It reduces the potenital horsepower, with a Plus 8 as much as 15-25 bhp on a rolling road. Even sillier, I have seen heads ported to the shiny new BIG BORE branch manifolds and then the installer installs standard manifold gaskets to the larger ports, creating an obstructive trubulence creating ridge at every single port. The gaskets MUST match the holes (aka ports) made. INSISTS ON IT or suffer the consequences. Most installers will explain the consequential rougher running and idle is indicative of more power. It isn't. It means LESS power. |
HOW TO DO IT. (There is also plenty of youtube videos)
1. Die Grinder or Dremel: A die grinder is kind of like a high-speed, high-powered drill. However, most die grinders don't use a handle perpendicular to the bit as drills do. Your grinder can be air- or electric-powered; it all depends on what you favor and what you have to work with. Air grinders are smaller, easier to maneuver and run cooler, but require a powerful air compressor. Electric grinders are big, hot, loud and heavy but are more powerful and plug into the wall.
2. Mandrel: A mandrel is to a die grinder as an extension is to a ratchet. Mandrels are essential for reaching deep into intake and exhaust ports for re-working the top of the short-side turn radius. The short-side turn is where the port begins to curve down toward the valve, and its shape plays a role in determining airflow.
3. Lubricant: Porting is primarily a cutting operation--not a grinding one. Keeping your bits well lubricated with lightweight machine oil, or a penetrating oil like PB Blaster or Liquid Wrench, will keep the bit cool and sharp for hours of extended use. A constant flow of lubricant is essential when porting aluminum, which tends to melt and clog the bits.
4. Carbide Bits: These are your primary cutting tools. These fairly expensive but specialized bits utilize nearly diamond-hard metal to keep their edge after hundreds of hours of use, and come in a variety of shapes and sizes. The 3/8-inch diameter cylindrical, oval-tipped and tree-cut bits are the workhorses of this bunch, but you can use flame-cut and spherical bits to get into tight spaces.
5. Grinding Stones: Grinding stones are less aggressive than carbide bits and can leave a smooth finish, but they wear down fairly quickly and don't work well with aluminum. Grinding stones don't work well with oil lubricant, but without this lubricant, aluminum will quickly clog the stone's pores.
6. Cartridge Rolls: Cartridge rolls are small loops of sandpaper that fit over a "drum" on the grinder bit. They are available in a wide variety of abrasiveness (grit) and sizes, and are cheaper and quicker to replace than grinding stones. The only advantage that stones have over rolls is that stones can come in a variety of shapes to reach tight areas; cartridge rolls are cylindrical only.
7. Flapwheels: A flapwheel is comprised of dozens of small rectangles of sandpaper attached to a central hub. Flapwheels are ideal for final shaping and polishing since they have a bit of give to conform to contours and curves inside the cylinder head. Flapwheels come in a variety of grit ratings and sizes.
Porting the Intake Manifold
by Lorne Goldman
Porting and polishing an engine's intake manifold is an essential step in optimizing its performance, particularly if it is a modified engine. Porting is the process in which material on the intake manifold is removed to open up and enlarge the ports while polishing smooths out the surface. Both methods optimize air flow into the motor and thereby increase horsepower. The job is labor intensive and expensive if you pay someone to do it, but it can be done by yourself with the proper tools and knowledge.
Tools and Materials
1. Porting and polishing kit (a dremel kit)
2. Socket and ratchet
3. Liquid Wrench or another penetrating oil
4. Manifold gasket
5. Machinist's blue dye or ink
How to:
1. Remove the intake manifold from the motor. On modern cars this will usually involve removing multiple components to allow the manifold to be removed but will vary from car to car.
2. Use a manifold gasket to determine where and how much to port the manifold. Place the gasket over the surface that mates up to the engine. The material between the edge of the holes on the gasket and the edge of the holes on the manifold is what needs to be removed.
3. Mark the area to be removed with machinists dye or fasten the gasket to the manifold as a guide.
4. Remove the excess material and open up the ports with a high-speed, air-powered die grinder and a rough cutting stone. Move the cutting stone consistently around the edge of the port, taking care to not remove material that is covered by the gasket itself. Clean the manifold with WD-40 periodically to prevent the polishing tools from getting gummed up.
5. Smooth out the edges of the port once the material is removed with increasingly higher grit polishing pads and cones. Smooth the edges of the opening into the manifold to give the air a smooth, progressive passage.
6. Inspect the insides of the intake tracts for casting marks and rough areas.
7. Remove the casting marks and smooth out the bends where the manifold changes direction with a rough cutting stone on the die grinder. This will promote air flow through the manifold as it moves to the engine.
8. Polish the inside of the intake manifold with increasingly finer polishing cones. Finish the polishing with 120-grit sandpaper. NOTE: Do not polish the intake tracts until they are completely smooth, since this will inhibit fuel atomization.
9. Reinstall the intake manifold in the reverse of removal. Start the car and check for leaks between the manifold and the engine.
Porting the Heads and Intake Manifold
Tools:
1. Combination wrench set
2. Spray marking ink
3. Engine gaskets Intake manifold and exhausts
4. Die Grinder or Dremel with stones and sanding drums
5. Small cleaning brush
6. Detergent
7. Water
8. Oil
How to:
1. Bolt the intake manifold and exhaust header to the head. Spray ink into the intake manifold so that it will mark the overlapping area on the head. Be careful not to spray too heavily, which could cause runs.
2. Turn the head over and spray ink into the exhaust valve pockets to mark any overlapping sections of the header flange.
3. Remove the header and intake manifold. Be careful not to smudge the ink on the intake mounting surface.
4. Install a sanding drum in the die grinder and grind away any inked areas in the exhaust header ports. Gently smooth and round the transition into the ports. Be careful not to grind through the walls of the tubing.
5. Install a stone in the grinder and grind away the marked inked area in the intake ports of the head. Don't grind too deep, leave the last bit of material for the sanding drum.
6. Install a sanding drum in the grinder and finish matching the intake ports. Keep a straight angle into the port; do not allow any hollows to form.
7. Turn the head so that the combustion chambers face up. Install a round stone in the grinder and smooth the valve pockets without changing their basic shape. Grind down parting lines and casting flash, and make a smooth transition from the port passage to the valve seat. Be careful not to touch the valve seat or valve guide with the stone. Do not try to make a mirror finish; just eliminate the most obvious roughness.
8. Clean the ports, valve seats and guides with the brush, detergent and hot water. Allow to dry, and oil to prevent rusting if the heads of not aluminum.
9. Put an old exhaust manifold or header gasket on each cylinder head and hold it in place with two bolts. Spray ink over the gasket at the exhaust holes.
10. Remove the gasket (s)
11. Grind the inked material away with the die grinder and carbide bit until the ink is gone.
12. Smooth all ports with the die grinder and a polishing bit.
13. Put your cylinder heads in the parts washer and scrub them vigorously. Let the solvent flow over them while scrubbing to wash away any metal filings.
14. Put the old exhaust manifold or header gasket on each header or exhaust manifold and hold it in place with two bolts. Spray ink over the gasket at the exhaust holes.
15. Remove the gasket (s)
16. Grind the inked material away with the die grinder and carbide bit until the ink is gone.
17. Smooth all ports with the die grinder and a polishing bit.
18. Put your manifold or headers in the parts washer and
scrub them vigorously. Let the solvent flow over them while scrubbing to
wash away any metal filings.
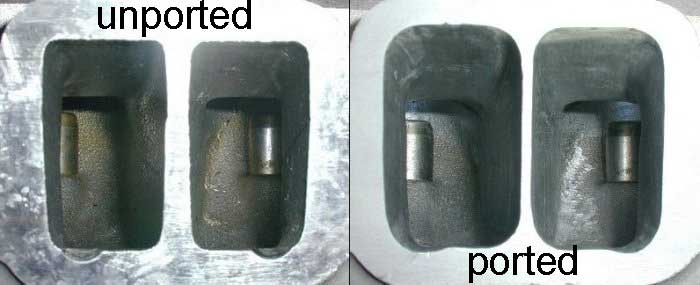
PORTING YOUR HEADS
This process matches the exhaust ports of your engine heads to your exhaust manifolds.