POLISHING YOUR MOG TO PERFECTION
Reasons for polishing
Understanding polishing
Selecting the proper polish
Evaluating your car's paint
Hand vs. machine polishing
Machine polishing techniques
Rules of Polishing
Refining the Paint Finish
In a perfect world, you wouldn't need to polish your car's
paint. Cleaning and waxing is all that's really necessary to
protect and beautify your car's finish. Unfortunately, we don't live in
a perfect world. Your car's paint is bombarded by contaminants and
assaulted by foreign objects every day.
Some automotive appearance experts suggest that it's possible
to maintain a car's paint without polishing at all. I'm not as optimistic.
I recommend polishing when it's necessary to solve a specific problem or
to achieve a desired result. I will discuss advanced uses of polish
in later chapters. For now, you can think of polish as a tool for
pre-wax cleaning and improving paint gloss. A fine polish gently removes
surface contamination and improves surface reflectivity.
Reasons to Polish Paint
Many people believe that cars come off the assembly line
with perfect paint. That's far from the case. There are many
conditions that cause minor paint flaws requiring additional finishing
work. Dust nibs (small particles that land in the paint while
it is still wet) are a good example. Most car manufacturers take care of
these problems at the factory using abrasive finishing materials. Sometimes
it is the car dealer who recognizes the flaw and fixes it.
Repairing minor paint flaws through polishing is not harmful
to the paint system unless you remove too much paint. If more
than 50% of the clearcoat finish is removed, you stand a good chance
of premature paint system failure. If more than 75% of the
clearcoat finish is removed, you will experience immediate paint system
failure. It can be a very fine dance between success and failure.
 Here's
a general rule to follow. If a scratch or other flaw can be felt
with your fingernail, it's too deep to be completely removed through
polishing. That's not to say that polishing won't help hide the flaw,
it will. If scratches run too deep into the clear coat, polishing
cannot fix the problem. However, polishing a deep scratch will hide
or lessen the appearance of the problem.
Here's
a general rule to follow. If a scratch or other flaw can be felt
with your fingernail, it's too deep to be completely removed through
polishing. That's not to say that polishing won't help hide the flaw,
it will. If scratches run too deep into the clear coat, polishing
cannot fix the problem. However, polishing a deep scratch will hide
or lessen the appearance of the problem.
Non-clearcoat finishes have the same basic rules.
You should not remove more than 50% of the top coat (color coat)
finish when repairing a scratch or other paint flaws.
It is important to understand how a polish can be used
to "hide" scratches and other micro marring. Scratches have hard
edges that run at a 30 to 60 degree downward slope. It is the hard
edge and angle of a scratch that creates a perfect opportunity for
light reflection. It is this reflection that enhances the visibility
of the scratch. A good polish rounds the edges of scratches,
reducing reflection.
Here is a list of problems that can be fixed or improved
through abrasive polishing:
Scratches - Surface abrasions that do not extend past
the first 25% of top coat material can be fully repaired by polishing.
Deeper scratches can be improved as long as they do not fully penetrate
the color coat into the primer.
Scuffs and rub marks - Scuffs are broad, shallow surface
abrasions that are easily repaired by polishing. Rub marks are commonly
caused by shoe heels (getting in and out of the car) or the bumpers
of other cars. The rub mark is generally a transfer of rubber or
other vinyl material to the paint surface. Rub
marks are easily removed by compounding and polishing.
Micro marring - Micro marring, also known as swirl marks
and spider webbing, means very small scratches in the paint's surface.
Micro marring is created by machine compounding and in everyday use and
maintenance of the vehicle. Micro marring is easily removed by compounding
and polishing.
Etching - Paint etching is a common problem caused by
hard water (tap water) or acidic water (acid rain). Bird droppings
are another common cause of paint etching. Depending on the severity
of the etching, polishing will repair or lessen the appearance of etched
spots.
Dust nibs - Small particles of dust and other foreign
material that land on the paint during the painting process create small
nibs on the surface. Wet sanding, compounding and polishing
will remove the visible portion of the nib and level the paint.
Orange peel - When a car is painted, the paint is applied
at a consistency and thickness that allows the paint to flow (briefly)
and level. If the paint is applied too heavily, sags and runs will
result. If applied too thinly, the paint does not properly flow and
level, causing an uneven surface called orange peel. If the
orange peel is not severe, abrasives can be used to level
and glaze the finish to match the rest of the vehicle.
Runs and sags - If paint is applied too heavily, sags
and runs will result. If the sag or run is in the clear coat, it
can be repaired, but not if it is in the color coat or primer. On
a non-clearcoat paint, sags and runs in the color coat can be repaired.
Fish eyes - The is is an eye-like mark on the paint surface
resulting from contaminated air in the paint booth or area...i.e. silicone
UNDERSTANDING POLISH
Before we can talk about polishing, we need to establish
a common understanding of what polish is. The word polish is
highly misused throughout the car care and appearance industry.
For our purposes, a paint polish is an abrasive lotion
or cream used to remove small amounts of the paint's surface.
The cutting ability of the polish will determine the amount of paint
removed with each hand stroke or each revolution of a buffer, as
well as the resulting finish. A fine polish will create a bright,
glassy finish, whereas a coarse polish may cloud the paint's surface.
Each polish is designed for a specific purpose (e.g., repair or refine)
and application (e.g., hand or machine). Here's how I classify
polishes:
Abrasive paper or pad - An ultra-fine grade of sandpaper
(1200 to 3000 grit) can be used effectively to level a paint finish
and remove imperfections. I mention sandpaper here because it is
an abrasive, like all polishes, and it has its place in the polishing
chain.
Compound - A compound, often called a rubbing compound,
is a cutting polish designed to remove heavy oxidation, some common
forms of paint damage and defects, and the scratches created by fine sandpaper.
Polish - A specially formulated blend of components designed
to remove minor scratches, surface imperfections, water spots, acid
rain spots, light oxidation, and the swirl marks created by compounding
with a machine.
Glaze - A very fine polish. Some glazes are safe
to use on fresh paint, as they do not seal. A glaze does not
have enough cutting power to remove imperfections, but will increase
surface gloss.
Pre-wax cleaner - A polish containing chemical cleaners
to help remove minor surface contamination and dirt not handled by
normal washing or claying.
You may be asking why I didn't mention detailing clay.
While detailing clay is an abrasive suspended in a clay or elastic
base, its purpose is to remove particles from the paint's surface
and not the paint itself.
Understand Your Car's Paint Before Polishing
Throw away everything Dad ever taught you about polishing
your car, because the rules have changed dramatically in the past
10 years. There are three important changes that have made
a significant impact on paint polishing.
First, modern car paint systems are no longer petroleum-based
coatings. All new car paint systems are water-based urethanes.
Equally important, almost all cars rolling off the assembly line
today have a multistage paint that includes a top clear coat.
Second, production of man-made micro abrasives has been
perfected. Abrasive manufacturers are making micro abrasives
engineered to an exact size and shape to produce a consistent cut.
Third, the microfiber cloth industry began producing cloth
materials specifically for polishing applications. Traditional cotton
terry cloth is not only yesterday's rag, it is also many times more likely
to scratch modern paint finishes than a quality microfiber polishing cloth.
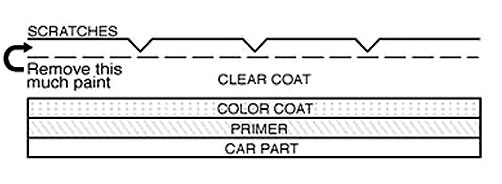
The high-tech paint systems on the modern automobile differ
from their predecessors in structure and in the care they require.
In general terms, the finish layer on all cars of the past was a pigmented,
oil-base, solid-body paint. When polishing these conventional finishes,
you work directly on the layer of paint that gives a car its color.
The modern car paint finish has a primer layer, color layer and a clear
top coat layer for added beauty and protection.
Although the modern clearcoat paint system is more tolerant
of everyday problems than conventional finishes of the past, it requires
a little more knowledge for proper care. Understanding your car's clearcoat
system is necessary to provide proper care and to facilitate repairs.
All clearcoat systems are basically the same. A
clearcoat system consists of one or more primer layers, a flat color
layer and a glossy, clear top layer. The primer is a corrosion
inhibitor and a bonding agent for the bare metal and the color layer.
It prevents corrosion and provides a stable substrate for the color
and clear coats. The color layer is applied to the primer and
is typically very thin. Its only purpose is to
provide color. The clearcoat is two to three times
the thickness of the color layer, adding to the appearance of paint depth
and offering additional protection. Many luxury car manufacturers
also use ultraviolet-light-blocking technology in their clearcoat
systems for protection against sun fading.
A clearcoat finish is somewhat forgiving. Faults
in a clearcoat finish are easily corrected compared to faults in
solid pigmented finishes, such as enamel, acrylic or lacquer. Scuffs
and scratches in pigmented paint layers are challenging to correct, because
the top layer contains the color. This is especially true if
the scratch penetrates the color layer into the primer layer.
In a clearcoat system, most minor scratches and scuffs never reach the
color or primer layer. In these cases, a quick polishing is all that's
needed to
repair a minor blemish.
How can you tell if your car has a conventional finish
or a clearcoat finish? It isn't always easy to tell.
One test is to gently rub an out-of-sight place on the finish with a
polish or fine compound. If the paint color comes off on your polishing
cloth, you have a conventional finish. Polishing on a clearcoat
finish should not reveal any color on your polishing cloth.
Polish Selection
The car care market is flooded with polishes, each promising
to work one miracle or another. Selection is difficult at best.
For the purpose of our discussion, it's necessary to create a reference.
It's important to note that polishes may be specifically
created for hand or machine use. The difference between a machine
polish and a hand polish is how the abrasive material breaks down
in use. The abrasives in most polishes break down (diminish)
into finer particles, allowing the polish to "buff out." If you use
a machine polish by hand, the particles may not break down, and the
finish will not
buff out properly. Conversely, using a hand polish
with a machine will cause the polish to break down too quickly, and
you won't get enough cutting action. A few polishes work by
hand or machine, because they don't use diminishing abrasives or they are
not temperature sensitive (buffing pads create heat).
|
Polish
|
Grade
|
Purpose
|
|
1200 - 2000 grit sanding material
|
6
|
Repairing chips and scratches, blending
repairs.
|
|
2500 - 3000 grit sanding material
|
5
|
Light color sanding and leveling.
|
|
Sonus SFX-1 Restore Polish
|
4
|
A versatile fine cut rubbing compound
used to safely remove grade 2000 or finer sanding scratches, other fine
scratches, medium oxidation, coarse swirl marks or water spots. Leaves
a fine finish ready for final polishing. Contains no waxes or silicones.
|
|
Sonus SFX-2 Enhance Polish
|
3
|
A swirl-remover polish designed to remove
fine swirl marks, cob web effect and light compound hazing. Leaves
a glazed finish ready for waxing or fine polishing. Contains no waxes
or silicones.
|
|
Sonus SFX-3 Final Finish Polish
|
2
|
A fine polish formulated to create a highly
polished finish. Contains no waxes or silicones. Leaves
a wheel-mark-free finish when applied with a foam polishing pad.
|
|
Sonus Paintwork Cleanser
|
1
|
An ultra-fine pre-wax paint cleaner and
glaze designed for hand or machine application. It is used to maintain
paint in perfect condition. This product offers very little abrasive
polishing action. Contains silicones for added gloss.
|
The chart above shows six grades of abrasive finish
material.
Evaluate Your Car's Paint for
Polishing
How do you properly evaluate your car's paint surface
for polishing? Most professionals (painters and detailers)
will tell you that paint evaluation is a combination of seeing and
feeling. What you're looking for is a surface that's flat like glass.
What you want to feel is a silky, smooth surface with very little
resistance. When perfectly polished, paint looks
like a reflecting pool and feels like fine cashmere.
Want to see what you're missing? If you're looking
for imperfections, use good fluorescent lighting. Incandescent lighting
and sunlight do not show surface imperfections as well as good fluorescent
light.
Feel for surface imperfections and roughness with your
fingertips. Use a light touch to gently glide your fingers over the
paint surface. You'll be amazed at how much you will feel once
you have trained your fingertips.
You may be wondering just how much of what you see and
feel on your paint should be polished away versus cleaned? This is
a greatly debated question. Not too many years ago, polishing would
have been the correct answer. Today we have more choices. When possible,
I recommend paint cleaning before paint polishing. The best tool
for removing heavy paint contamination is detailing clay.
If your paint is clean and free of visible defects, is
it necessary to polish before waxing? This is another question for great
debate, and there are two basic schools of thought. One methodology proposes
that polishing is not necessary, because your wax should provide the final
finish. The second methodology proposes that polishing creates the
level of gloss, and waxing increases depth and liquidity of the surface.
I propose that a combination of the two is correct. I believe
that polishing should be used to repair and
perfect paint, and waxes should be used to protect paint
and create a deep, high-gloss finish.
Evaluate Paint Thickness Before Polishing
If you plan to sand or compound a vehicle's paint to repair
or perfect the surface, you should measure the thickness of the paint
first. To do so, you will need a paint thickness gauge.
There are two basic types. An electronic (sonic) meter provides
the most precise measurement of coating thickness.
These meters are too expensive for most enthusiasts,
but should be part of every professional's tool kit. A less costly
tool is the magnetic thickness indicator, which can measure coating thickness
to within .001 inch (1 mil).
If paint thickness is less than 6 to 8 mil, it's not safe
to wet-sand or compound. If paint thickness is less than 4 or 5 mil,
it is not safe to polish with a material higher than grade 2 on the polish
chart.
Hand, Dual-action and Rotary Polishing
I get a lot of questions regarding the difference between
hand and machine polishing. My general response is, "Time."
There's not a lot you can do by machine that can't be done by hand
using the correct materials and methods. In fact, sometimes machines
work too fast, and you risk removing too much paint material.
Situations differ, so you need to learn how to read the paint surface.
Basic rules for polishing:
Polishing rule 1: Use the least aggressive tool
or polishing material necessary to get the job done. Hand polishing
is the least aggressive, followed by a dual-action (DA) polisher,
followed by a rotary buffer.
Polishing rule 2: Do not mix polishing materials.
Do not use the same polishing pad or cloth with multiple abrasive
materials.
Polishing rule 3: Work in good lighting conditions,
and frequently check your work. You will rue the day you polish through
your paint because you couldn't see what you were doing or polished
in one area too long.
Polishing with a rotary buffer requires skill and training.
We're going to discuss the proper use of this versatile tool later.
For most car appearance enthusiasts, a rotary buffer is not a necessary
tool. It is essential for professional detailers and painters,
who need to properly machine-compound a car.
Polishing with a dual-action machine is a great way for
most car appearance enthusiasts to create a perfect paint finish
without a lot of elbow grease. Although a dual-action polisher does
not have the power and speed of a rotary buffer, it also does not have
the potential liabilities.
Hand polishing is the best way to polish when time
and effort is not a concern. All polishing jobs require a final
hand polishing step to completely remove wheel marks left by machine
polishing.
Polishing Basics
No matter what method of polishing you choose (hand, dual-action
polisher or rotary buffer), the basic process is the same.
You start by removing imperfections, and gradually decrease abrasive
materials until you have achieved fully glazed paint. In this
section I'll address hand polishing specifically, but, as I have
said, the basics are the same. I'll go into machine polishing
in the next section.
Removing Imperfections
If your car's paint has minor surface scratches (micro
marring, swirl marks, etch marks, water spots), then you should start
by spot treating each imperfection with a fine compound. Never compound
the entire car unless it is absolutely necessary for problems like
these:
Severe water spots or swirl marks
Heavy oxidation due to sun and weather exposure
Heavy swirl marks or other micro marring
Poor repaint or paint repair blending
Poor surface finish (orange peel)
Heavy surface pitting from sand or road stones Sonus SFX-1
Restore Polish will remove minor scratches and scuffs by hand with very
little effort.
Most detailers I know compound by hand incorrectly.
In fact, most compound manufacturers do not give proper instructions.
Rubbing compound is nothing more than a fine sandpaper in paste form.
Compounds should be used in the same way and with the same respect as a
sandpaper.
My dad taught me to use a flat household sponge to apply
compound. This method works okay, because flat sponges are fairly
dense and remain flat on the paint surface. Today, we have a wide
variety of foam applicators. I like a dense, single-sided foam applicator
with a handle, as I believe they reduce the risk of
thin spots or rubbing through the clearcoat or top color
coat of paint. Pressure is consistent across the area of the foam
applicator, resulting in a very flat surface, which will ultimately increase
reflection and gloss.
Before compounding, you must protect all trim that you
don't want compounded with masking tape. If you don't mask off the
trim, your cleanup work will increase significantly, and you risk damaging
the trim. As an example, rubbing compound will quickly make flat
or textured black trim very shiny and smooth. So, please take the time
to do the job right, and use a little masking tape. When compounding
by hand, it's not necessary to mask off everything as you would when compounding
by machine, but you should mask the surface trim.
Apply a small dab of compound to the pad itself, not to
the car, and begin polishing a panel. Use light pressure, medium
speed, straight-line hand strokes(front to rear). Compound no more
than a 2' by 2' area at a time. If you're spot-treating small scratches,
keep the compounding to the area being treated.
Compounds work fast. Make no more than 12 to 15
passes (hand strokes) with the compound before buffing off and checking
your work. All you're trying to do is cut down a small amount of
the paint surface to remove the imperfections and level the paint.
Here are some tips for better compounding results: I have
found that lightly spraying the polishing pad with a quick shot of detailing
spray makes it much easier to apply any compound. One quick shot
will do (just enough to make it slightly damp, not wet).
Stay away from sharp edges on the body of the car.
The paint in these areas will be thin. Don't make it thinner
by compounding it.
Compound using a dense foam applicator with a handle.
It's safer, and the results will be much better.
If you're trying to remove a deep scratch (you can feel
it with your fingernail), don't try to do more than lessen its appearance.
If you compound to the full depth of the scratch, you may cause the
paint to fail. Better to be safe than sorry.
Buff away the compound residue with a quality microfiber
detailing towel. Compounding may cause your paint to haze slightly
or lose its high gloss. This is okay, because the next step is to
reglaze the paint with a grade 2 polish, like Sonus SFX-2 Enhance.
Refine the Paint Finish
If your car did not require compounding to remove surface
imperfections, that's great. You're way ahead of the game.
Let's get started on learning hand polishing techniques.
The purpose of polishing is not to fix paint imperfections.
That's what we used the fine compound for in the previous step. Polishing
is used to refine the paint surface and to begin the process of glazing.
When a paint is fully glazed, it has taken on all of the natural gloss
and reflection it can without assistance from a wax or sealant.
Just as with compounding, you need to adjust your thinking
with polishing. Many people and product manufacturers suggest using
a terry cloth towel or terry cloth applicator to apply polish. This
is no
longer the best polishing tool. Today, the best tool
for polishing is a high-quality foam applicator.
Likewise, for buffing off polish residue, do not use terry cloth or flat
cotton toweling. A good microfiber polishing cloth is far superior
and is many times less abrasive than cotton terry cloth toweling.
The procedure for polishing is not much different than
it is for compounding. The idea is to keep the polishing applicator as
flat to the paint surface as possible.
Machine Polishing
Most professional detailers use rotary buffers and dual-action
polishers to polish paint. The overwhelming reason is time.
To do the job properly by hand would be prohibitively expensive.
It's also true that some jobs will get better results with a machine in
the hands of a professional.
There are basically two kinds of polishing machines: rotary
buffers and dual-action (orbital) polishers. A professional painter's
rotary buffer is little more than a body grinder with a polishing pad in
place of the grinding disc. These are high-power, variable-speed
motors that give a professional painter or detailer a
lot of flexibility. Rotary buffers have a straight
drive to the polishing head (i.e., the polishing pad connects directly
to the shaft of the motor), whereas dual-action polishers have a special
drive head that causes the polishing disk to run in an orbital pattern
while also rotating. The following chart compares the significant
differences between a rotary buffer and a dual-action polisher.
|
Factor
|
Rotary
|
Dual-Action
|
|
Ease
of use
|
Don't
rush a rotary. Time and care are required to do it right. |
Virtually
foolproof. Just pick it up and start polishing! |
|
Learning
curve
|
Requires
extensive training and experience to master.
|
Requires
very little training and experience to be proficient. |
|
Potential
to damage paint
|
Improper
use will cause swirls, excessive paint removal or paint burns.
|
You'd
have to be an ape to damage the paint. |
|
Effectiveness
on paint with heavy oxidation or severe micro marring
|
Potentially
eliminates all superficial surface damage.
|
Paint
looks much better than it did, but may not remove all surface damage. |
|
Results
|
Highest
gloss and deepest shine possible.
|
Much
better than hand polishing, but will not compare to rotary. |
|
Amount
of polish required
|
May require
slightly more than a dual-action polisher, but not nearly as much as hand
polishing.
|
Most
efficient method. |
|
Pros
|
Absolutely
best final results. Fastest of all polishing methods.
|
Safe,
effective and easy to use. |
|
Cons
|
Much higher
potential to cause paint damage. Requires significant time investment
to master.
|
Somewhat
limited results compared to rotary polishing, but better than hand polishing. |
I often get questions like "Who should use a rotary buffer
and why?" or "What's better, a dual-action polisher or a buffer?"
This is not an easy question, because no matter what I say, there is an
opposing and equally valid response.
This is the Porter Cable random-orbit polisher.
This is a great machine, but not perfect. A good upgrade is a 6"
Velcro backing plate and Velcro-backed pads. This is the first random-orbit
polisher I've used that
has enough power to satisfy the most demanding professionals.
Rotary buffers are for trained professionals and serious
enthusiasts with experience. The possibility of ruining a paint job
with a rotary buffer is very high when a powerful, rotating machine is
put in the hands of an unskilled person. Rotary buffers spin at speeds
up to 3600 rpm. One small slip, and you'll pop off a
molding, burn a hole in your paint, or break off a windshield
wiper. I've seen each of these mishaps, so I know it can happen.
That said, the rotary buffer is my tool of choice. I put myself in
the category of a serious enthusiast with lots of experience, and I have
had two minor mishaps in 20 years. For me the result is worth the
small risk.
A good dual-action polisher can also deliver great results
on all but the worst paint finishes. For this reason alone, I think
most enthusiasts and novice detailers should invest in a dual-action polisher,
not a rotary buffer.
Polishing machines can be purchased for as little as $50
or as much as $300. The difference in capability is significant.
At the low end are low-power orbital polishers. These machines are
designed for the average car owner who wants an easier way to polish and
wax his or her car. Although they will make the job of polishing
and waxing easier, they will not improve the resulting finish of your car.
At the high end you will find multipurpose detailing machines, like the
Porter Cable 7424, that polish, buff, and scrub carpet and upholstery.
A rotary buffer in the hands of a skilled technician can
create an amazing finish. This show truck is being restored back
to top condition. Notice the use of masking tape to protect the trim.
Buffing & Polishing Pads
There are two basic pad types: cutting and polishing.
A cutting pad is used with a polish or machine cleaning compound to remove
oxidation and fine scratches. Cutting pads make quick work, but will leave
noticeable swirl marks, especially on dark finishes. After buffing
with a cutting pad, you will need to make a second pass with a polishing
pad and glaze to remove swirl marks and improve luster.
Cutting pads, also called leveling pads, should be wool.
There are a lot of synthetic "wool" pads on the market. Don't
touch them! Nothing beats lamb's wool. Nothing is safer than
lamb's wool.
Polishing pads, often called finishing or waxing pads,
are foam rubber. These are the only pads safe to use on a clearcoat
finish. Do not use a cutting pad on clearcoat finish. That
said, some expert body shops will use a cutting pad on a clearcoat finish
when blending a repair.
Compounds, Polishes & Glazes
Always use the least abrasive polish necessary to get
the job done. No matter what you might have read or seen on
TV, no single polish can do it all. You may need two, even three
products to get the desired results. Any polish you use with a buffer or
rotary polisher should state "for machine use" in the
instructions.
I know I've said it before, but I feel it's worth repeating:
Be very careful using a rubbing compound with a machine. A
rubbing compound is nothing more than sandpaper in liquid form. If
your paint needs light compounding, it's best to do it by hand.
If you must use a buffer or rotary polisher, compound flat areas only and
stay away from edges.
Next up from rubbing compounds are cleaners. Paint
cleaners are basically a fine cut compound for polishing paint with
heavy or moderate oxidation. Paint cleaner polishes will quickly
remove the top layer of dead paint, revealing paint that can be rejuvenated.
Polishes are the paint finish workhorse. Unlike
rubbing compounds and cleaners, a polish has very little cutting action.
A good machine polish will remove small blemishes and restore gloss.
A quality polish contains oils to lubricate paint surface for the best
polishing action and a high-gloss finish.
Preventing Paint Burns
Buffing or burning through your car's paint is perhaps
the greatest danger in using a machine. The risk of paint damage
can be largely diminished if you follow a few simple rules.
A paint burn is caused by heat buildup on the buffing
pad due to friction. Paint burning occurs on the edges of a
body panel, not in the middle. I cannot recall seeing a buffer
burn though paint in the middle of a hood, door or fender. It is
the small surface area of the buffing pad edge that builds heat quickly,
making a burn possible.
To prevent burns, you need to know how the rotary buffer
works. With few exceptions, buffers rotate clockwise. When
using a buffer, lift the left side of the buffer slightly (a half inch
or so). Move the buffer in smooth left to right strokes. It
is best to focus pad contact on the 12 o'clock to the 4 o'clock
quadrant (i.e., the right edge when looking at the top
of the buffer). In this way, the buffing pad will always rotate off
the edge of a panel.
The reason for lifting the left side of the buffer is
to prevent the trailing edge of the buffing pad from driving into a body
panel edge. The trailing edge of the pad driving into a body edge
creates so much friction it can rapidly burn through the finish.
By rolling the right side of the pad off the body panel edge and lifting
the left side, you can significantly reduce the risk of burning.
To further reduce the risk of burning, buff up to edges
and body ridges, not on them. When buffing raised peaks or body lines,
keep the buffing pad as flat as possible, and slow the buffer speed.
Keep the buffing machine moving at all times. If you allow the buffing
pad to spin in one spot for more than a few
seconds, you're inviting disaster. Other tricks
include opening the door, trunk or hood slightly. This gives you
an edge to roll off of when buffing. Always slow buffer speed when
approaching an edge.
The operating speed of your buffer is very important.
I highly recommend using slower speeds. Speeds between 1200 and 2000
rpm are sufficient on most modern finishes. The slower speeds can also
be used on older finishes to achieve good results. Just remember,
slower speeds create less friction, thereby reducing the chance of burns.
Machine Polishing Techniques
Safety first. Wear goggles or work glasses when
buffing. Remove all hand and wrist jewelry.
Just like polishing and waxing by hand, buff a section
at a time. Always start with the least abrasive polish you can.
Polish a section more than once if the results are not satisfactory.
If you are not getting the result you want, try a slightly more abrasive
polish. Like I said, it is unlikely that a single polish will do
it all. For example, the front of your car gets the most damage.
It may require a medium-grit polish to bring the front areas up to
par, while the remainder of the car buffs up fine with a mild polish.
To properly machine polish, you will need your polish
in a squeeze bottle. Squeeze a couple of lines (6 to 9 inches) of polish
on the panel you want to polish. Pre-lubricate your buffing pad with
a shot or two of water or detailing spray. Start the machine slowly,
with the pad on the panel to the right of the
lines of polish. Lift the left side of the pad
slightly, and slowly move into the polish. The rotating pad
will pull the polish in and begin distributing it on the paint.
If you're new to machine polishing, apply your polish
to the buffing pad, not the surface of the car.
If you're brand new to machine polishing, don't worry.
Start learning by applying a single line of polish around the edge
of the buffing pad (as shown above). Don't use too much polish, or
it will splatter everywhere and take too long to buff out.
The amount I have applied here will be enough to buff a
complete fender on a small car. Before starting
the polisher or rotary buffer, lay the pad on the paint surface to be worked
and spread the polish around.
Once the polish is distributed over the area you're working
on, you can begin to increase speed a bit. If you're using a rotary
buffer, do not run above 1500 to 1800 rpm. If you're using a Porter
Cable 7424 dual-action buffer, there's no reason to run the machine higher
than 4.5. Work the polish in well, using
overlapping left-to-right and top-to-bottom passes. There's
no need to rush, but remember to keep the pad moving.
As the polish begins to "buff out," and the shine on the
paint begins to come up, the polish and buffer have done their work.
Don't keep buffing the dry panel. It's no longer productive, and you risk
burning the paint. If you're not happy with the results, add more
polish and keep going. Remember to stay off the edges!
When working on top panels like the hood, trunk or top,
you can keep the electrical cord from rubbing on your freshly polished
paint by draping it over your shoulder. It's also best to remove
your belt or anything else you might be wearing that would damage your
paint.
Be sure to check your buffing pad periodically, as it
will become caked with polish. Use a pad spur to clean it.
Lay the buffer across the top of your leg and turn the machine on.
Gently press the pad spur into the pad, starting at the outer edge, and
run it into the center. Foam pads can be cleaned with soap and water
for end-of-day cleanup. Allow pads to drip dry.
Machine polishing is messy. The polish will fling
off about 6 feet or so. You can prevent the splatter mess on your
car by using an old sheet. Simply cover the area of the car you're
not working on. Cover the things in your garage you don't want splattered,
too.
SUMMARY
Polishing paint is a acquired skill. It can take
years to master. If you're planning to use a machine, my best advice
is to practice on older cars. Most importantly, select the correct
polish for the job. Use the chart at the beginning of the chapter
to help determine which polish grade you should be using. Once you've
selected the right polish, make sure you use the right tools.