POSITIVE TO NEGATIVE
EARTH
This article was written by Gary Durborow and appeared
in the July 1982 issue of the Tigers East/Alpines East newsletter.
Many owners of earlier models are discouraged by the hassles
associated with positive ground electrical systems. Seemingly simple tasks,
such as mounting a C.B. or tape deck, can become major projects when you
have to keep them from touching other metal parts. But unlike other problem
areas, though, this one has a solution that is actually very straightforward:
reversing the polarity of the charging system. For all models except those
with radios, electrical tachometers and clocks, there is little more to
it than reversing a few wires.
The procedure is as follows:
1. Disconnect both terminals of the battery
Lift the battery from the box and put it back in so that
the terminals are at opposite ends from the original position. Positive
will now be where negative was and vice-versa. Do not reconnect the battery
yet, but make sure the existing cables are long enough. Sometimes the positive
cable may be a bit too short, depending upon the battery in your car. Usually
though, enough extra length can be obtained by taking up some of the slack
where the cable runs under the boot.
2. Coil
Unplug the wires at the ignition coil and replace them
on the opposite posts. The wire from the distributor should now be to the
negative (-) side of the coil, and the wire from the ignition switch will
be to the positive (+) side.
3. Ammeter
For the ammeter, simply switch the two plug-on wires
as was done with the coil.
4. Radio
If your car is equipped with a radio, it must be disconnected
and removed. Depending upon the radio you have, the polarity must be changed
either by a switch on the case, or by internal wiring changes. In either
case, most radios that operate on positive ground have instructions for
polarity reversal somewhere on the case. If equipped with a switch, the
change is easy. If the reversal is internal, it is best left to a radio
repair person.
5. Electrical tachometer (series IV only) and clock
These two guages were not designed for polarity reversal
so it must be done by internal modification. Local electrical shops who
are not familiar with the changes necessary may not wish to attempt the
job. This service is available, however, from Tiger Tom for a nominal fee
of $5 per guage, plus shipping.
6. Reconnect the battery
7. Repolarizing the regulator
Use a small piece of wire and momentarily (about one
second) touch it between the regulator terminals marked "Al" and "F". It
will make a few sparks so don't think you've hurt something.
At this point, you're finished with the polarity changes.
The only thing left is to test the charging system output.
Ideal specifications are: No-load (all electrical items
off) - output should be 14.5 to 14.7 volts at 2000 to 3000 RPMs.
Loaded (all electricals on, such as wipers, heater, lights,
etc.) - output should not drop below 13 volts at 2000 or more RPMs.
If your readings do not fall into this range, the regulator
will need to be adjusted.mets in the
CHANGING THE POLARITY OF
THE GENERATOR (When changing to Negative
Ground)
by Phil Roettjer
 Whenever you are changing your car from a positive to
a negative ground you must remember to polarize the generator's field to
positive. If you don't, you can destroy your regulator. In such a
case, your ignition light will stay on because your generator can
no longer charge.
Whenever you are changing your car from a positive to
a negative ground you must remember to polarize the generator's field to
positive. If you don't, you can destroy your regulator. In such a
case, your ignition light will stay on because your generator can
no longer charge.
To polarize the generator when making change the ground
OR when you install a new generator (to make sure it is polarized correctly),
all you do is quickly swipe a wire to the field terminal (the smaller of
the two) that is connected to +12 Volts. There will be a small spark and
the job is done.
TESTING FOR YOUR CAR'S POLARITY
| WATCHPOINT: I do not advise doing this with an analog multimeter. Many of them will be destroyed by negative polarity. A reversed analog instrument will indicate
down-scale, forcing the pointer against the scale end stop and this may
damage the sensitive instrument. Use a digital multimeter instead. |
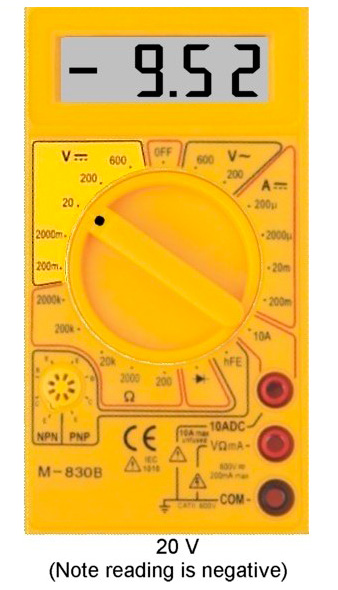
It is simple matter to check polarity with a digital multimeter. Take any powered device, power it as you would normally. Touch the multimeter probes to the negative pole of the device and the positive probe to
the positive terminal. If the polarity is negative, it will show a minus sign before the voltage reading. An on
an analog, the pointer will be forced down, rather than up. If you
reverse the probes..the negative polarity will force the reading
upwards.