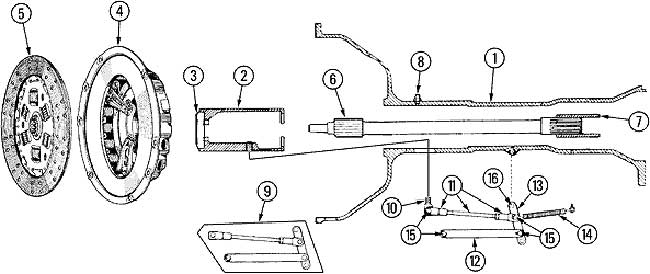
1955 PLUS 4 CLUTCH AND BELLHOUSING
|
1 BELLHOUSING REBUILT WITH SLEEVE
2 SLIDING COLLAR C/W T/O CARBON
3 T/O CARBON
4 PRESSURE PLATE
5 CLUTCH DISC
6 INPUT SHAFT C/W MUFF COUPLING
7 MUFF COUPLING
8 GREASE FITTING |
9 CLUTCH LINKAGE KIT
10 EYEBOLT
11 ADJUSTMENT ROD & ENDS
12 LINKS TO PEDAL
13 LEVER WITH 4 HOLES
14 CLUTCH RETURN SPRING
15 CLEVIS PIN SHORT
16 CLEVIS PIN LONG |
UPGRADING THE EARLY PLUS 4 CLUTCH
by Mike Miles at the eMog
Pub
A note on the original block and bellhousing for those
that haven't delved into it yet - my car had about 15 owners over a 20
year period and was far less than cared for through a lot of it.
There probably was
 not a lot of regular lubrication of the sliding block.
The sliding block grease fitting is like the rear axle grease fittings,
ya gotta know they're there, otherwise
not a lot of regular lubrication of the sliding block.
The sliding block grease fitting is like the rear axle grease fittings,
ya gotta know they're there, otherwise 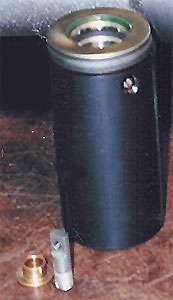 you may never find them.
I
strongly urge TR powered +4 owners that don't know the condition of these
parts on their car to check into it. The results can be dramatic.
Also check that block pin to make sure its straight.
They can bend and if they ever break then you're likely heading for a full
teardown (hence the grade 8 bolt conversion). One of our club members
spent several hours on his back in the parking lot of a hotel trying to
undo a pin that broke in the threads - to no avail. Ok, no more doom
and gloom.
My
original aluminum sliding block was actually still very true and not worn
(except the face where the carbon was - "what's that noise?") but the bellhousing
was badly worn. The housing wear was about .060" (1.5
mm) upward at the front and an equal amount downward at the back.
Not to mention the severe side wear of the pin in the slot. We had a new
sliding block machined to accept a GM (Federal Mogul) throw-out bearing
instead.
We also had my bellhousing sleeved with stainless steel,
then added a wear shoulder (similar to Fred Sissons solution) on
the slot. The sleeving is pretty 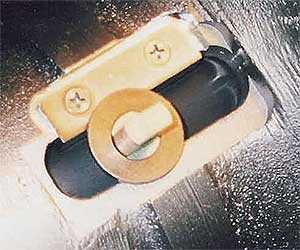 straightforward as long as you use
a shop with a very large lathe or go to an axle shop. The setup can be
very easy with a clever machinist.
straightforward as long as you use
a shop with a very large lathe or go to an axle shop. The setup can be
very easy with a clever machinist.
We also fabricated a new stud from a grade 8 bolt (probably
lost some strength but I don't think Ron Theroux will be too upset
- still stronger than the original machined part) ;-) We actually
took it one step further by putting a bronze bushing around the stud
from the sliding block but that is purely elective surgery. Even
without that I'm sure it will outlast me.
The
throw-out bearing used was Federal Mogul (BCA) #CC1705C which was a generic
Chevrolet item. Sorry that I don't have a NAPA number.
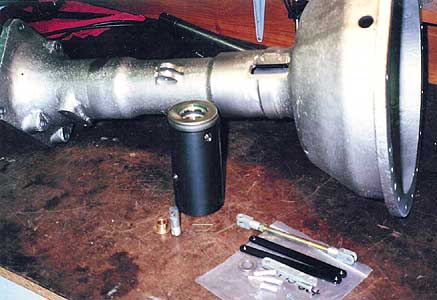
The first photo shows each of the block parts on the bench
before assembly. The material used for the sliding block was
Delrin (generic name is acetal). I was actually considering Rulon but that would have
been a $600 piece of material. The threads are
reinforced with a Heli-coil insert.
Choose Delrin for high durability and since it is sliding
on a finely polished SST sleeve, not likely to ever wear signifigantly.
Greased when inserted and the grease fitting is still on the housing but
no grooves cut on the block - highly unlikely to ever need it.
Also considered UHMW-PE but its a little less temperature
resistant.
RELEASE BEARING
by Eltron WrightI think I know Morgans pretty well,
but I missed something that there was no excuse for when I put my car
back together. I had a similar problem and tried to adjust it out but
couldn't. I was at that time only two weeks from MOG 52 in Luray and
was determined to go so Jane and I tore the clutch out of the car and
not finding much wrong other than slight wear of the clutch disc. I
nearly missed the problem again but it was found out by Jane (my wife).
We pulled the clutch release bearing out of the tube and Jane ran her
much smaller hand into the electron tube and found a ridge worn on the
inside. The release tube would sometimes cock up in the bore and not go
all the way forward to release the clutch. Because time was so short, I
bought a new bellhousing and was amazed with how little clearance there
was with new parts. So if there is any discernible play there, have
the tube bored and fitted with a sleeve to fix the problem or call Linda
at Morgan Spares for a replacement. Good luck!