Important Note:
With all the following steps appropriate safety equipment must be used, this includes but is not exclusively, axle stands, safety glasses or goggles, and personal protection equipment.
When reading these instructions Nearside (N/S) and Offside (O/S) are as follows. Standing at the rear of the vehicle and facing the front the N/S is the left side and the O/S is the right.
Pictures used also show ‘other’ Mulberry Fabrications products.
Different Variants.
Because of different variants these instructions need slight modification for 1983 to 1992 EFI cars. In the case of these cars the crossmember is fitted with the mounting lug to the O/S of the car (effectively fitting is a mirror image of the photographs) the mounting plates therefore go on the N/S spring assembly. All other instructions remain the same.
Contents list of kit.
• Panhard Crossmember, painted black
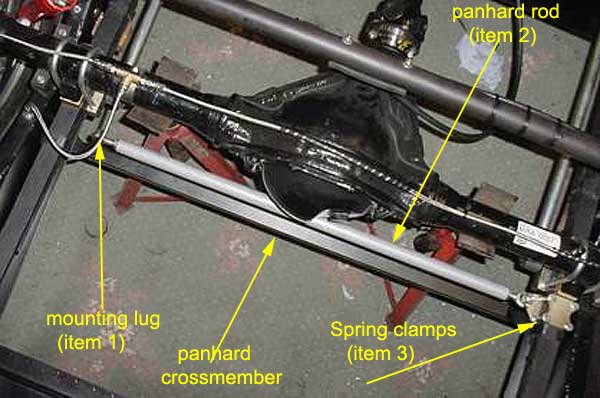
• Panhard bar with 2 rod ends and locknuts (item 2. In photos)
• 2 spring clamps (item 3. In photos)
• 4 of 5/16” UNF X 2.1/2" long bolts and nyloc nuts for spring clamp
• 8 of 5/16” UNF x 3/4" long bolts and nyloc nuts for Crossmember to chassis
• 1 of 7/16” UNF X 2" long bolt with nyloc nut, Panhard rod to spring clamp
Step 1.
Raise the rear of the vehicle to a convenient working height, place on axle stands under the rear axle and chock the front wheels. Check vehicle security on the axle stands.
Step 2.
Place the Panhard Rod crossmember temporarily in place,
clamp with either G clamps or Mole grips. The crossmember is correct
when the Panhard rod mounting lug (item 1.) is to the N/S of the vehicle
with the lug facing forward (see photo).
Step 3.
Drill through from the underside one of the 4 mounting holes at either end of the crossmember, replace the G clamps or molegrips with one of the supplied bolts nuts and washers at either end, finger tighten only.
Now drill the remaining 6 holes, 3 at either end, and fit the nuts bolts and washers. Tighten all fasteners.
Step 4.
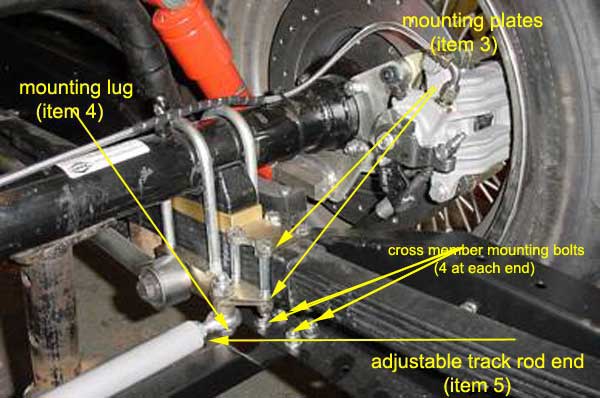
Fit the Spring Clamps (item 3.) to the O/S spring by first assembling the bolts through the upper plate and lowering it into position. Fit the lower spring clamp plate with the integral-mounting lug (item 4.) towards the centre of the vehicle, and finger tighten the supplied nuts and washers. (see photo)
Ensure the spring clamp assembly is positioned towards the front of the car so that it abuts the U-bolt spring mounting (i.e. as far forward as possible).
Tighten all fasteners.
Step 5.
Fit the non-adjustable end of the Panhard rod to the crossmember lug (item 1.) with the bolt supplied, finger tight only.
Adjust the Rod End (item 5.) until the supplied bolt will correctly align with the bolt hole in the spring clamp plate (item 3.) finger tighten.
Special Note. The Rod Ends are right hand threaded at one end and left hand threaded at the other, ensure you are turning them correctly especially when tightening the nuts.
Tighten Rod End (item 5.) nuts. Now re-check alignment of the bolt and bolt hole in the spring clamp adjust if required.
Now tighten the Panhard mounting bolts at either end location lugs.
Step 6.
Finally check all fastenings for security.
Note. After 200 miles recheck the security of ALL fasteners and mountings.
Step 7.
Carefully lower vehicle to the ground.
The Rutherford distributer, New Elms or its distributers, ,sell a number of panhard kits suited to the Morgan you have. Please state 5, 6 or 7 leaf springs (R0042/ R0043/ R0044)