 If
all this fails you have some final options;
If
all this fails you have some final options;
One of the most frustrating problems that a home mechanic is likely to come up against is freeing up rusted nuts or bolts. You have new parts to fit on the car. You have the right tools to do the originally intended job. You thought you had a specific time to get the job done. Then a stubborn nut comes along to spoil the party. Here are some tips on how to free up a rusty nut or bolt. By the way, as the end result with most of these approaches is a damaged fastening that can't be re-used, it is worth checking that you have a suitable replacement nut or bolt at hand.
STOP!!!!!!!
Sorry for that. I am trying to make a point. The consequences of encountering a rusted fitting can be anything from minor to downright deadly. The best tool you have is patience and a game plan. Alternatively, you can succumb to frustration and cause great damage. I have seen intrepid souls make a disaster of head bolts, manifolds bolts and any number of key fittings until a major component has to be replaced or an engine removed to manage a proper patch repair.
You need to slow down and think. The moments that determine success are often those at the very beginning. You must limit bolt or nut damage before you take it to the point where you have few or only ugly options.
Before doing anything drastic, clean up the bolt head and surrounding area as much as possible. If nothing else it'll be cleaner to work with, and will allow penetrating fluid to do its job better. A wire brush, either hand or powered by a drill, will do the job in no time. If it's a bolt that you're having trouble with, make sure any exposed thread is cleaned up. The wire brush usually does the trick.
Next, make sure you are using the correct size spanner or (better still) socket. NO LOOSENESS! Anything else will probably slip under load and likely as not, damage both you and the fitting at the same time. If you (hopefully) plan to replace the guilty thing, you could try tapping on a slightly undersize socket to it, but that should only be a last resort as you run a big risk of slipping.
Here are the procedures you have in your arsenal;
1. PATIENCE This one will keep you out of trouble and when in the field 9 times out of 10. Look at the factory issued manual or handbook for your car before starting work, in case there are any peculiarities specific to your vehicle that need to be taken into account when working on it.
2. TAP ON THE SIDE OF THE NUT/BOLT with a suitably sized hammer (don't go mad, a few firm taps should do) may be enough to free things up. Watch you don't damage the flats on the bolt head as you'll be wanting to get a decent spanner on it soon. Wherever possible use a ring spanner or socket of the correct size, open ended spanners can easily slip when loaded up. Try again.
3. IMPACT WRENCH If you have the room and a perfect socket, try using an impact wrench. But be careful. If the nut/bolt doesn't move, this powerful tool will round the fitting's edges in seconds. But the rapid taps of an impact wrench is much better than the slow solid muscle method.
3. TIGHTEN THE FITTING. Odd as it may sound, one way to successfully loosen a bolt/nut is to tighten it slightly. The goal with all these approaches is to break the joint that has formed between the nut and the thread it is attached to. If this can be done by tightening it, then it may then loosen without further pain..
4. HEAT THE NUT/BOLT. Apply heat from a propane torch onto the side of the nut, the idea being to heat it up enough for it to expand slightly and free itself from the threads on the stud. Take great care when waving a flame around a car as there are many combustible items around, especially under the bonnet. After 2-3 minutes of heating the nut will be HOT so remember that when you dive back in with the spanners. If you can't get a flame on it safely, you have to remove whatever component the offending fastener is attached to (if possible). For example, if a thermostat housing is proving difficult to remove, it will be safer to whip the head off and heat up the bolt or nut away from all combustible materials in the car. If you are dealing with a steel bolt into aluminum..remember that aluminum can suddenly melt. It is unnecessary to heat anything until it is red hot. This is a sure way to destroy an alloy engine with a rusted bolt.
Try again.
(Before you use heat..consider # 5 below).
5. DOUSE THE FITTING WITH PENETRATING OIL This is the solution that takes the most time and has the best record for success. Spray or douse bolt/nut with a penetrating fluid and leave it for a while..even overnight or more. The wire brushing you did earlier will let the fluid seep down the threads better than if you'd left all the dirt and rust in place. Penetrating oil keeps working and working. I have had "impossible" bolts that became amazingly cooperative only after 5 days of regular dowsing. I use Liquid Wrench. Avoid oils like WD-40. It becomes sticky when dry and doesn't help in the long run.
6. LEVERAGE Some deep corners of the engine bay are often difficult to get at with a decent size spanner. If you need some more leverage, but space is tight, you can sometimes join two spanners together to give extra leverage. The handle of a small trolley jack can also double up as a spanner extension to increase your powers of persuasion.
7. UNTHREADING If the threads are heavily rusty, and the nut is coming off but under protest, take it slow and wind the nut on and off as you go, gradually winding further and further off from the thread. Oil or penetrating fluid on the grotty threads will help things along no end.
N.B. I've always found that a combination of heating,
tapping, penetrating fluid, swearing, an assortment of quality spanners,
time and patience are required to fight these stubborn ^&%&%. Steel
bolts pass through an aluminum housing such as a thermostat housing. Steel
and aluminum react quite quickly and can make removing the bolt afterwards
a nightmare.
If
all this fails you have some final options;
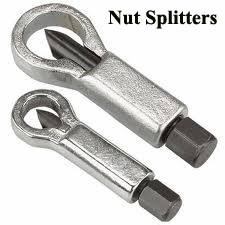
8. If it is a nut that is not playing ball, your option is a a nut splitter. These work by driving a sharp cutting edge into one flat of the nut, activated by you winding a threaded bolt that forms part of the nut splitter. Only go as far as you have to, go too far and you risk damaging the thread of the stud.
9. WELDING If a bolt is really proving to be a problem (some have very shallow heads and round off in no time), one option is to weld another nut on to the head of the bolt, and use that to swing on with a spanner - but only try this if your welding ability is top notch and you can join the two up perfectly. A splatterly bubble of weld tacking the two together will not be enough.
10. EXTRACTORS Extractors work by the fact that they turn the broken fastener in a counterclockwise direction to unscrew broken bolts and screws. Using a center punch mark and drill a hole down the center of the broken fastener. The extractor and hole size depend on the fastener, a guide is usually provided with extractor. To extract the guilty fastener the extractor is inserted in the drill hole and turned counter clockwise using a wrench.
11. LEFT HAND DRILL BITS work in the same way except that they do it in one operation. Using an electric drill that has a reverse switch simply drill the fastener out. As the drill works it way into the fastener it is constantly forcing the fastener to unscrew. This works if the fastener is not lodged too tight and can be easily screwed out.
DO NOTS
I could make a very long list of these. Avoid old wives tales like the plague. Do not use WD40, Coca Cola, exotic massage oils or yak urine. Rely on solid advice and your own patience. Beers, taken orally, are permitted.
Good Luck! If it doesn't work out consult the GoMoG NUTS
& BOLTS index under Timeserts (excellent) or Helicoil (adequate).