A Better Method
of Securing A Morgan Tailpipe
by Lorne Goldman
 The
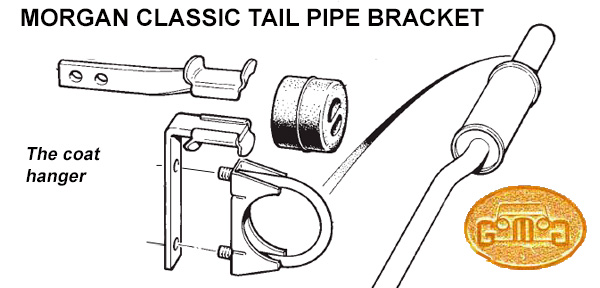
method of installing the traditional Morgan tailpipes is sadly silly. A
hanger fitting is clamped to the end of the pipe, attached to
a l-shaped bracket and then is made to interface with
a bracket attached to the chassis
through a large rubber doughnut that is forced onto both pieces. For those of you unfamilar with the system, I have
attached a diagram to the right.
The
method of installing the traditional Morgan tailpipes is sadly silly. A
hanger fitting is clamped to the end of the pipe, attached to
a l-shaped bracket and then is made to interface with
a bracket attached to the chassis
through a large rubber doughnut that is forced onto both pieces. For those of you unfamilar with the system, I have
attached a diagram to the right.
The doughnut takes the stress of the chassis flexing and that will wear
the doughnut's holes until they allow movement and begin to whack
away at the chassis, first in tight turns and then constantly. I used
to change mine every 15000-20000 miles. A right pain! If I was
mogging far
afield, (that is always when these things become intolerable) I used to
jam something in to the hole between rubber and metal
and hope it would tighten the doughnut enough to stop the banging until I was able to find these doughnuts.
It is seriously dumb..aside from being dinky and unattractive. That
being said, it is important to fit an exhaust system on a flexing car
with rubber
cushioning. That goes without saying. And the thought of hitting a
talipipe from the rear and having that impact force transferred to the
exhaust manifold bolts, most often steel into cast aluminium, is
unpleasant to contemplate.
Happily, common sense is/was common in Market Drayton, UK, the home of the restorer of one of my Plus 8s,
Kevin Vernon of Tudor Motor Body Repairs
Ltd. Kevin, like yours truly, enjoyed simple solutions. Simplicity,
reliabilty and functionality are the highest accolades for anyone who
deals with
machines, especially Morgans! 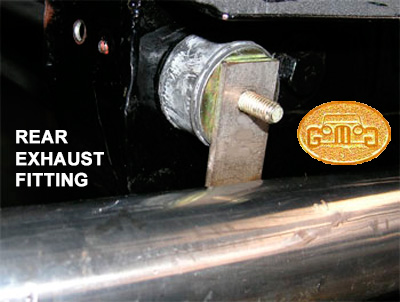 Where
other owners seem to enjoy making their Morgans more complex and less
reliable with addons, I choose to go in the other direction, upgrading
bracketry and making the car simpler, distilling its essence. After 200,000 miles of such an attitude, my Morgans finally became the most reliable vehicles I have ever known. Kevin's idea is bullet-proof, lasts forever, and is easy to
Where
other owners seem to enjoy making their Morgans more complex and less
reliable with addons, I choose to go in the other direction, upgrading
bracketry and making the car simpler, distilling its essence. After 200,000 miles of such an attitude, my Morgans finally became the most reliable vehicles I have ever known. Kevin's idea is bullet-proof, lasts forever, and is easy to 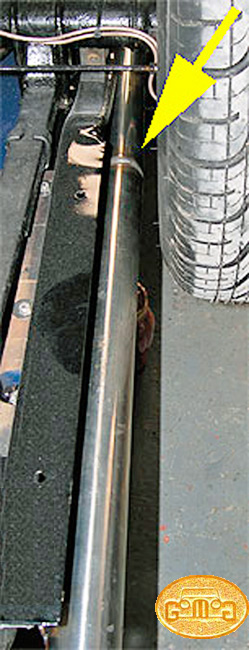 remove or install. As well,
it uses parts that can also be used in other areas of the Morgan, at the silencers and to hold the radiator. That cuts down on needed spares!
remove or install. As well,
it uses parts that can also be used in other areas of the Morgan, at the silencers and to hold the radiator. That cuts down on needed spares!
What we did was merely to weld a flange where we chose at the end of
the pipe. We holed it, and attached to the chassis side by drilling
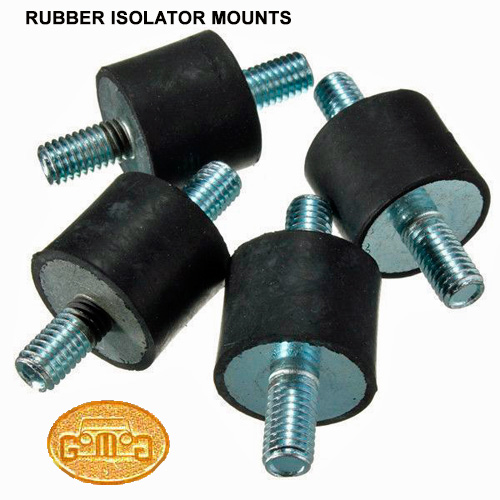
matching hole on the chassis and placing a suspension/ radiator
reel (aka "the isolator mounts"). Over the years, I have learned
to use the same reels everywhere they are called for on my Morgan,
three at the rad and 2 each on my twin exhaust system. They come
in all sizes..pick one that suits you. I fit this bracket 10
years ago..on both Plus 8s. That was a combined (all my Morgans) 60,000 miles ago. I
haven't had a problem or a replacement on the cars since.
ALIGNING YOUR TAILPIPES
by Lorne Goldman
Have you ever noticed that classic Morgan tailpipes, whether original
or the gorgeous aftermarket bespoke affairs never alighn with the
chassis? They go up or down or (shiver) outboard towards the rear?
I imagine Morgan and the aftermarket
never noticed, as the exhaust pipes are made straight but chassis
are not. So they
end up at an angle at the rear and this looks oddly splayed
with the exhaust pipes canting outboard on each side. Unworthy of a
collector car.
This can be cured by cutting
the tail pipes at the middle of the rear wheels, angling them to match the chassis,
and then re-welding, grinding, sanding and polishing them. Not as tough as it sounds. Look at the image. Note the perfect parallel between the pipe and the chassis.