POWDER COATING AT HOME I
Pretreatment:
A) Sand Blast Parts with
fine or medium grade abrasive material.
1) You do not have
to blast if parts are raw material or have been previously powder coated.
2) Heavy blasting
abrasives leaves a poor profile on the metal for painting and can
actually
cause painting defects such as pinholes.
3) For best results
in final finish lightly sand parts to knock down profile from sand
blasting.
4) If previously powder
coated, sand down lightly with 220 grit sandpaper, or give a light
texture (By Rubbing) with course steel wool. This will allow the
powder paint to adhere to the previous powder coated part.
B) Wash raw parts with Columbia
Coatings Prep & Paint or a solvent base material such as lacquer thinner,
acetone, MEK or other Non-Petroleum Solvents.
C) Spray on Prep and
Paint and rinse after 30 seconds.
If rust is on parts a second application may be required.
Our Prep and Paint Turns Rust Back into Black Metal. DO NOT LET PREP
& PAINT DRY ON PARTS!!! IF SO SAND (SCUFF) DOWN OXIDATION LEFT
BEHIND!!!
Powder Painting:
A) Make sure gun is properly
color changed to color desired for coating. With a Chicago Electric Gun
make sure you remove plastic screw at bottom of shaft of gun (Between End
Of Gun And Trigger) and blow thoroughly as the screw sometimes holds powder
and can cause cross powder contamination.
B) Make sure gun has proper
air pressure. (Refer to Powder Gun Manual). We highly recommend
putting Air Regulator on gun itself and do not rely on
compressor to regulate because of actual volume that builds in air hose
itself is more than gun requires and can cause bursting of powder at
end of gun.
C) Make sure part is properly
grounded by gun clamp or through other grounding source. You can
also ground out to hook or wire that is touching part!!!
D) We suggest preheating parts
for 375-400 Degrees for 10 minutes to help outgas parts and kill any
material such as oils that could have been missed when cleaning parts.
E) Coat parts 3 to 5 minutes after
preheating (First Recommended By Columbia Coatings Only On All Powders
Including Competitors) as this helps in getting down in the areas powder
has a hard time getting to (Cracks and Creases) with the use of less powder.
Curing:
A) Single Coats, Secondary (Final Coat), Third (Final
Coats)
1) Light Parts: 375
degrees for 10-20 minutes. (Pulleys, Brackets and other small items.)
2) Heavy Parts:
385-400 degrees for 15-25 minutes. (Wheels, Intake Manifolds, Etc.)
B) Base Coats and Secondary
Mid Coats. (Such as Chrome base for Translucent Color and or with Clear,
White Base for Fluorescents and Neon's or Our Zinc Rich Coating.)
1) Partial Cure for
10 to 15 Minutes at 375 to 400 Degrees.
2) Remember: This
is for all base and or mid-coats that is going to have a final coat such
as clear on top for exception of chrome below.
3) Chrome as a final
coat !!! Chrome must be fully cured at 375 to 400 degrees for 15-20
minutes to get full luster of the chrome. After Chrome base cools
apply Clear for the Topcoat for Optimum Protection and Appearance!!!
Click http://www.columbiacoatings.com/
POWDER COATING AT HOME II
from the eMog
Pub and Richard Norman
I worked for a commercial operation that did this and
it ain't that easy!
First: You must clean the parts thoroughly of oil, grease,
dirt, oxidation (rust!), etc.
If you do not then the paint layer WILL bubble and lift,
(worst still the metal substrate will oxidise underneath) and as has been
said before, it is hell to remove the area that HAS adhered or to fill
in the dips (gaps) and the parts just have to be chucked away! (Simply
a drip of oil left will spread when the part is baked!)
Commercially this is done by dipping the parts in several
tanks of hot liquids, degreasing, caustic, etc. These tanks get contaminated
by the substances and grease, etc. and the liquids have to be replaced
else they get gunged up and then put gunge on to clean parts! Then you
have to dry it †do not touch it as you might just put some
gunge back on and clean dry hot air only! How will you jig/hang it?
So that the area where the jig masks the powder will not be seen on the
finished product?
Next: you will need to apply an even thickness of powder
and paint all over the part(s).
How do you plan to do this? Commercially this is achieved
by giving the parts a negative charge and and then owing at it. The positively
charged paint particles (powder) in to the booth around the parts. (Best
not to be there yourself even with a mask) The paint particles are attracted
to the part and adhere under the charge. Can you do that? If not how will
you get the even thickness †an uneven thickness can be seen
in the finished product even in mat finishes! As a second issue there are
problems with maintaining the charge on e.g. steel, iron, etc.
Okay so now you have a part with some paint powder loosely
attached, you have to get it up to temperature fairly quickly! True the
metal will (sorry should) be hot, as it has just left the hot dips and
the dryer but still you need to get the temperature hot (correct for the
paint that you have purchased, for the product that you are coating and
for the thickness of layer you have or want.)
I do not want to put you off, just prepare you for the
failures that you will have in the early days. Toxic fumes and ruined ovens
will not be your worst things to contend with!
BTW hand painting also has its problems with badly mixed
paints, colour match, continual rubbing down, thin layer upon layer,
keeping brushes clean, etc.; so does spraying and it is true that PC is
a really hard finish and when/if you achieve it please can we all have
a look at the photo of you with the Cheshire cat grin on your face?
Best of luck {8-)) Richard, R1
POWDER COATING III
from the eMog
Pub and Mike Miles
Powder coating the drums black is good for radiation heat
transfer but it may not improve the overall heat transfer very much, since
it adds a lower conductivity 'skin' on the drum which slows down the ability
to transfer heat from the shoe contact surface to the outside surface.
As a really rough estimation it could reduce the overall heat transfer
by up to 10% (which means the drums stay hotter, fade happens more quickly).
While we're on the subject - when something is being cooled
by moving air (forced convection) the typical proportion of heat transferred
by radiation is fairly low (usually less than 10%) assuming it has something
to radiate to. When it is subject to natural convection (non-forced
air motion, also known as bouyancy), the radiation proportion can be as
much as 30%.
As some of you will be quick to point out - there are
exceptions due to geometry, nature of the surface, working temperatures,
etc which is all true, however as a rule of thumb, forced convection heat
transfer tends to dominate the balance.
In the situation with brake components, radiation heat
transfer is from one body (the drum) to any other bodies in direct line
of sight (wheel rim predominantly) whereas the forced convection occurs
during vehicle motion (transfer to the air passing by). When you
stop there are natural convection currents that begin to establish but
by then you've most likely zoomed off again. Again, making them black
won't add greatly to the overall efficiency - but they may LOOK like they're
doing the job...
Drum coatings:
There are (at least) two other alternatives for putting
a nice coating on the drums however. There are high-solids zinc and
high-solids stainless steel sprays (available in rattle-cans believe it
or not - Seymor and Krylon brands). They CLAIM they are 100% solids
however they are actually slightly less due to having a binder in them.
They are an enamel that helps the metal stick to the surface being sprayed
on. When you have really clean parts (drums, calipers, etc)
you can apply the coating and then bake it for about an hour at 350 °F
(180 °C). The baking drives off all the aromatics so the coating
won't discolor or flake under stress and heat.
Regarding the oven baking - a friend of mine has a second
hand oven in his shop so he can bake the parts per the above description.
It is also well ventilated with an exhaust fan beside the oven. The
odor is not overpowering but is similar to any hot plastic (but watch that
temperature! Too hot and it will start smelling charred - ask Dick
Dice about his first Cajun cooling experience sometime...). The dominant
chemicals driven off are polyester however there was a powder coating supply
company that was heavily fined in 2001 because there were trace amounts
of heavy metals in the powder (no evidence they were airborne but caution
is the watchword).
REMOVING POWDER COATING
from Format January 2013 edition
Ever wonder about that frame or car part that was power
coated and now might have a hidden crack that need attention ? Or, as we
found, a part was powder coated and it was not fully disassembled and two
pieces were then inseperable ? Well, what is needed is a method to separate
the two powder coated pieces now locked together and we found it through
the internet. The magic is not heating to over 400 deg in your home oven,
nor sanding, nor abrasive blasting - rather a small can of Permatex Gasket
Remover #80646 will do the job. Spray it on, wait 10 minutes and the powder
coating become soft and gel-like. Scrape that off and repeat 4 or 5 times.
Workes
really well and costs less than $10.00
CHROMING VERSUS POLISHING
ALUMINIUM
from the eMog
Pub and Lorne Goldman
The advantage with chrome over high gloss polishing (also
very attractive) is the reflective quality and the lack of maintenance
after. I had my valve covers chromed here some years ago. Rpi's prices
for chrome valve covers are far better than what I paid here because of
the volume they do.
 I
have only seen two chromed plenums, (both my own) though a goodly number
of polished ones. Most of the UK Agents can have the polishing done for
you. The problem with chroming a plenum is that it is a very porous cast
alloy piece. It requires much sanding and polishing to obtain a perfectly
smooth surface in order to chrome. This must go beyond the normal polishing
as EVERY flaw shows up on a chrome surface. The advantage with polishing
is that you can do it at home. Simply sand the plenum with progressively
fine sandpaper until it is satin smooth. It will take a while.
I
have only seen two chromed plenums, (both my own) though a goodly number
of polished ones. Most of the UK Agents can have the polishing done for
you. The problem with chroming a plenum is that it is a very porous cast
alloy piece. It requires much sanding and polishing to obtain a perfectly
smooth surface in order to chrome. This must go beyond the normal polishing
as EVERY flaw shows up on a chrome surface. The advantage with polishing
is that you can do it at home. Simply sand the plenum with progressively
fine sandpaper until it is satin smooth. It will take a while.
After that, there is the standard problem that alloy cannot
be directly chromed. It must be plated three times with different metals
to obtain a chrome finish. Between the sanding the polishing and the plating,
all of this is extremely costly.
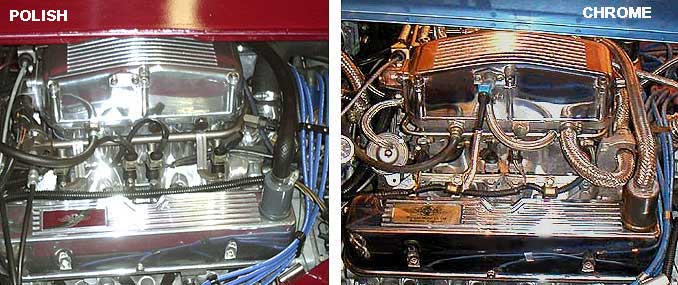
Polishing aluminum produces a shiny opaque surface while
chroming produces a mirror reflective surface (with different undertones
depending on its quality and the chromer. "Show" chrome, with black undertones
is the best.) Being virtually a mirror finish makes people think it shiny..especially
as it reflects camera flash and light. However, it is not "shiny" and much
less than you would have through polishing. Chrome doesn't diffuse light,
it reflects it. The view changes as you move around it. It seems to shine
in a photo because of the light effect. It is as hard to photograph as
a mirror. If you hold your old polished valve covers next to your new chrome
ones you will see what I mean.
As well, take a look at the photo. Photos poorly show
shiny metal but you can see the differences. The chrome shows far more
areas black. It was a kind gift from a number of friends in the UK. I can
inquire on the technique if you are interested and get back to you off-emog.