RAD FAN BYPASS SWITCH
by Lorne Goldman May 7, 1998
This is not the most elegant method but it's virtues are
simplicity, no soldering, easily removable and no altering of the existing
system. Frankly, I tried it as a temporary test and never got around to
seeing a pressing need to change it. Please forgive me for being too detailed
here but, for some, it will be a first (and wise) Morgan modification.
The principles are easy to understand...the wire delivering
power to the rad fan goes through a heat sensitive switch. This switch
turns the fan on and off by allowing the current through (or not) at preset
temperatures. The advantage with a bypass switch is that it allows you
to turn on the fan BEFORE the engine gets hot and yet leaves the original
installation in place in case you forget. To do this you must create a
second pathway for the power around the rad switch and then on to the rad
fan. This new path run through a switch YOU control and near at hand when
you are driving.
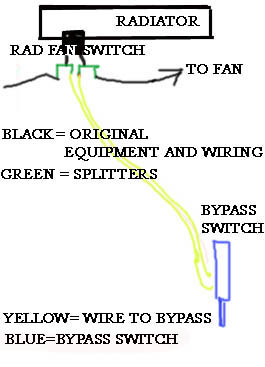
First disconnect the battery.  Now
you need a few bits to add to what is already there. Two splitter (?) fittings
(one female into two male), two female connectors, one simple on-off switch,
2 wood screws and 10 feet of two strand wiring. The rad switch is found
on my car at the bottom of the radiator. They have two prongs or male connectors
for the power going in (with a plastic covered female connector) and the
same for the power going out. I simply removed the connectors, slipped
on a splitter on each of the switch's prongs and reconnected the rad fan's
wires to one (each) of the sets of splitter prongs. So now I am back as
I was originally with a normally functioning fan with the exception that
I have an extra connection available in and out at the rad switch.
Now
you need a few bits to add to what is already there. Two splitter (?) fittings
(one female into two male), two female connectors, one simple on-off switch,
2 wood screws and 10 feet of two strand wiring. The rad switch is found
on my car at the bottom of the radiator. They have two prongs or male connectors
for the power going in (with a plastic covered female connector) and the
same for the power going out. I simply removed the connectors, slipped
on a splitter on each of the switch's prongs and reconnected the rad fan's
wires to one (each) of the sets of splitter prongs. So now I am back as
I was originally with a normally functioning fan with the exception that
I have an extra connection available in and out at the rad switch.
I then used the electrical wire in the appropriate thickness
(tell the fellow at the auto store where you buy this stuff that you hooking
up a rad fan...) I ran it from the rad fan switch up to and then along
with the other wires on the outside of the inner wing, then pushed through
the rubber grommet through on the firewall near the driver and into the
car.
 Here you have options on what and where you wish to have
your switch. Though you could use one of the unused switches on your I
would suggest you leave them alone unless you are electrically inclined..I
also have doubts that an unused rear fog lamp switch can happily take the
power of a big rad fan. I bought a small chrome push-pull switch, made
a small L-shaped bracket with three holes on one side (to wood screw it
into the wooden member under the dash and to the side of the car) and then
made a hole in the other side of the my L-bracket to put through the pull
switch and tighten it. In this place it is easy to reach, easy to wire
and still out of the way and hidden. Wire each of the ends to one of the
wire terminals on the switch .
Here you have options on what and where you wish to have
your switch. Though you could use one of the unused switches on your I
would suggest you leave them alone unless you are electrically inclined..I
also have doubts that an unused rear fog lamp switch can happily take the
power of a big rad fan. I bought a small chrome push-pull switch, made
a small L-shaped bracket with three holes on one side (to wood screw it
into the wooden member under the dash and to the side of the car) and then
made a hole in the other side of the my L-bracket to put through the pull
switch and tighten it. In this place it is easy to reach, easy to wire
and still out of the way and hidden. Wire each of the ends to one of the
wire terminals on the switch .
Now go back to the radiator, attach two female connectors
to the wires (easy to do) and plug them in to the extra male connectors
you put in. Reconnect the battery. (If you left the new switch on the fan
should come on as you are connecting the battery...turn it off).
Test the switch. Now turn the switch off and let the car
heat until the rad fan comes on by itself. If it does you are fine. Turn
everything off and affix the wires where convenient with electrical tape
so it is out of the way but not stretched.
When you turn it on, you must look casually at your passenger
and explain that you are "activating the Turbocharger".
ADDENDUM: Adding a Rad Fan Indicator
Light
by Lorne Goldman June 8, 2012
One of the more brilliant whims I had whims I had with
the Phoenix was
place little dash lights next to all my dash switches. They illuminate
when the subject device is being used. Actually, I did it to prevent me
leaving the lights on and then did the rest for aesthetic balance. It turned
out to be much more than aesthetics.
I have had a bypass for the rad fan since very early on
(see above) and, 2002, I had incorporated it in with the other switches
on the Kauffelt dashboard rather than under the dash. Ergo, this all lead
me to a prominent light that goes on when the rad fan is on. Unexpectedly,
I learned an immense amount about my engine with that light and saved myself
MANY hassles. It is fine having a bypass, but it is as vital to know that
the fan is indeed working, when and why.
I recently wired in an similar light to my UK Morgan Plus
8 (Humpty)
Depending on how you wired in your bypass..the wiring of the extra light
is easy (I had an unused yellow dash light anyway). The best way to wire
in a bypass is to add another earth source which is provided to the fan
through the bypass. The rad fan is constantly wired to power, it goes on
and off with a controlled earth, provided through the radiator's rad fan
thermo switch. The bypass simply provides another earth, easily wired to
the same earth wire anywhere between the fan side of the rad fan switch
or the fan relay (if you are using one).
By joining these two earth sources at that point, they
are both become fully earthed by either the radfan switch or the bypass
switch. Therefore the only thing necessary is to provide a warning light
at the dash with constant power and take an earth from near the bypass
switch inches away. The warning light will go on if the fan comes on, whether
that happens automatically with the radfan switch or the bypass.
Those of you in the GoMoG Bypass Gang will be very pleased!
OTTER SWITCH (aka
the old Morgan radiator fan switch)
(revisited March 2026)
by Lorne Goldman
It has been said, by those who knew him, that Maurice Owen used
travel in the prototype Plus 8 with a bottle of coolant behind the passenger's
seat. He was uncomfortable with the "plug in" rubber and spring held Otter
rad fan switch used by the Company and wanted some extra protection just
case. He also expected he could boil over. True or not, I am now aware of a number of incidents where
this switch has, in fact, badly leaked or "popped" out leading to
an almost instant draining of all coolant in the engine. I know of no aftermarket
rad makers who will drill holes in their product to provide for the Otter
rad fan switch. They simply do not trust it and neither do I.
The
wise move is to have a local machinist weld or solder
in a threaded hole (a bung) for a threaded switch. There are threaded
options from
the manufacturers of each Morgan engine but beware, most of these are
made to placed
in the hottest part of the coolant system at the top of the rad of
engine.
Most Morgans have the switch installed at the bottom of the rad, with
doubtful
wisdom, where the coolant is at its coolest. You will have to
compensate for that in your choice of temperature range OR re-wire your
fan to the ignition switich rather than directly to the battery power.
Placing a top mounted switch at the bottom of the rad
will have the rad fan come on later than it should. There is another option of moving the switch to the top of your rad.
You also want a tight range between on and off..especially
with the EFI cars which are made to run hotter. A too-wide range will have
your rad fan running on for 5-10 minutes after you stop the car and eventually, drain your battery!
After trying many, I have found that 1980-1990 BMW switches
fit the necessary criteria and also require one of the smaller standard
rad fan switch thread fittings of 15 mm. Here are the available "on temps"
and part numbers. (I have omitted to earlier carb versions 61311364272/82 [opens at 82C] 61311364272/86 [opens at 88C] and that are now hard to find.....) The range of each is about 5C.
61311364272
= 90C (when temperature is here or below fan OFF) - 95C (when temperature is here of above fan ON) (gold body and white top)
61311364273
= 95C (when temperature is here or below fan OFF) - 102C (when temperature is here of above fan ON) switch (gold body and red top)
I had my rad made with two fittings to experiment. (EFI
Plus 8). I find I am most happy with the 91C at the bottom of the rad.
For those looking for an even earlier "on" temp simply choose one if the
lower temp switches and have it placed at the top of the radiator.
WATCHPOINT: The thread of these BMW switches is M14x1,5. Please advise your radiator maker accordingly or buy an adapter. A big thank you (aka merci) to Laurent Akary from France!
|
PORTING YOUR EXHAUST

 Because
cylinder heads form most of the combustion chamber and
are final delivery point of air and fuel to the cylinder the ports
are some of the most critical areas of the engine. A well ported
cylinder head will produce vastly better air flow to the combustion
chamber and therefore increase the efficiency and power of the
engine. The best possible volume of gas flow and gas
speed through the exhaust ports should be a first goal. This
is not the case with Buick/Rover V8s (and with most Factory
made engines). In the effort to create the most volumetric
efficiency, cylinder head porting (amongst other things) is
employed.
Because
cylinder heads form most of the combustion chamber and
are final delivery point of air and fuel to the cylinder the ports
are some of the most critical areas of the engine. A well ported
cylinder head will produce vastly better air flow to the combustion
chamber and therefore increase the efficiency and power of the
engine. The best possible volume of gas flow and gas
speed through the exhaust ports should be a first goal. This
is not the case with Buick/Rover V8s (and with most Factory
made engines). In the effort to create the most volumetric
efficiency, cylinder head porting (amongst other things) is
employed.
Standard cylinder heads and manifolds contain flaws and casting
marks that are restrictive to airflow speed. As
well, exhaust manifolds (especially aftermarket manifolds installed in
hope of improving airflow), have intake ports that rarely match
the head ports! The exhaust porting process removes
these casting anomalies and the smoothes the surfaces over which
air will flow. Although this does not greatly increase the volume the
passages, it does produce better exhaust air speed and yet less
turbulence. Therefore is a first step on even mildly
tuned applications. The picture below shows the inlet ports in the initial stage of
"porting". The ports are very slightly larger than standard but
essentially they are just smoothed and polished. (note that the guides
have been removed at this stage)
BACK