 Tuning Your Carbs with an Exhaust Gas Analyzer
... from Fred Sisson's "Bedside Reader"..
wThe
MMC forgets that these cars are supposed to last forever and they manufacture cars without a body on them!!ith an EFI Addendum by Lorne Goldman
PICK A NUMBER BETWEEN ONE AND THREE HUNDRED...
Did you know that there are 354 needles listed for (the most common) .090 jet SU! To further compound the problem of choice- your particular car will probably run lousy on 40% of them, OK on 30%, feel great on 20%, run really great on 5% and really kick butt on 5%. No wonder so few people change needles. Where do you start?
Other people's recommendations, even "factory" recommendations are probably off somewhere in your driving range... maybe WAY off! Just remember "different is not the same". Different car (and EVERY one is different) - different requirements- different needles.... No one can "tell" you what is the really proper needle for your own car. No matter how experienced they are, it will only be an educated guess at best. We all know that the big-bucks racers have their engines checked on a dynamometer, simulating race conditions, with lots of very expensive instrumentation. This is a bit beyond my modest means and... expertise. Still- there is a way to sort through the haystack and find the right SU needle for your own particular car. I guarantee that it will improve your engine's performance, it is not too costly and it is very rewarding.
ARE YOUR NEEDLES CORRECT FOR YOUR ENGINE?
This is not about "thinking"- this is about "knowing". How do you know? As far as I am concerned, the ONLY way to tune SU carburetors is with an on-board exhaust analyzer ($100 bucks). This way, you can check your car while you are driving it, on your roads (or track). Anything else is groping in the dark. Many companies make exhaust analyzers today. They run somewhere around $100.00. They use an O2 sensor that fits into your exhaust system and are described in the book. Racer Wholesale now offers an analyzer that will read two sensors (and there is a decent one in the J.C. Penny catalogue for $120. GoMoG Webmaster). This is the really hot setup for twin carbs as you can exactly tune each carb (not just the resultant combined mixture of the two.)
The analyzer itself is a 'bitty thing. Mine is about 1 ½"x 2". It has a series of LEDs that instantly read the fuel/air ratio- as you drive! Real world stuff here..... I doubt that any standard carburetor will give the absolute perfect ratio at all times. However, you can get darn close and the reward for your time and effort might just be a very dramatic improvement in performance. At the very least, you will have peace-of-mind, knowing that your engine is not being hurt from the effects of a drastically rich or lean mixture.
Many of the hot sports racers have the analyzer permanently mounted in their car. They "tune for the course". Exhaust analyzers are available as in-dash instruments also. I personally use the analyzer with the temporary mount as the in-dash units are a bit out of place in a vintage car. There is also a choice of O2 sensors. I have been using the cheap kind which runs around $30.00. The 70 buck O2 sensor is better as it is electrically heated and comes to the initial readings quicker, but the cheapy works fine once it gets hot. I tape the gage to the windscreen with "racer tape" so that I can see it at all times while driving/testing. It reacts instantly so you can even use it to set the power valve for a Holley carb. Pretty neat. When I am done- remove the gauge and O2 sensor. There is a blank plug that screws into the sensor hole.
AN ADDENDUM FOR EFI (FLAPPER SYSTEMS)
by Lorne Goldman
Fred's article points to one of the inexpensive devices that the home mechanic can purchase to fine tune there engine as well or better than most roadside professional garage. An exhaust gas analyzer takes the guess work out of carburetor tuning.
It is also the only method of precisely tuning the Plus 8 Rover "flapper" EFI system that was optional between 1984 and 1986 and standard between 1986 and 1990. The later "Hotwire" system has the ability to be "hooked-up" to a diagnostic unit but the flapper does not. Tuning is done by attached a exhaust gas analyzer to the tail pipe and turning the idle air bypass screw on the airflow meter until the analyzer LED shows the correct CO2 level. (normally 1.5 to 2.5% for a Plus 8).
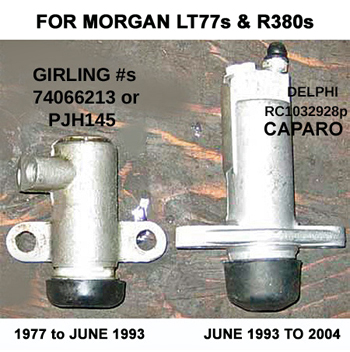
LR/ROVER PLUS 8'S CLUTCH SLAVES
1.01 the 1" bore Girling 64068329 (either 7/8 or 1" will do)
1.02 the 7/8" bore ? (checking possibly 64674336)
2. The Rover 4-Speed era 1972 to 1977
THE MOSSBOX ERAby Lorne Goldman with help/photos from Duncan Charlton, Tony McLaughlin & André Koopman
As you see above, these cars first used a 1" bore slave and then switched to a 7/8' both used by Austin. For Morgan it was only important that they fit. The "feel" difference between 1" and 7/8" should be negligible. The slaves are placed both used on Austin: The Mini and the
| From Duncan: I have always found it tricky to get the slave cylinder adequately bled on my 1971 Plus 8. The bleeder screw is not mounted at the highest point, so I connect the hose but don't mount the slave cylinder to bleed it. I clamp the piston so it can't exit the bore and then bleed while I support it so that the bleeder is now at the highest point. Only after bleeding in that position do I mount it to the car. |
 Others, who possess a lift, find access easier.
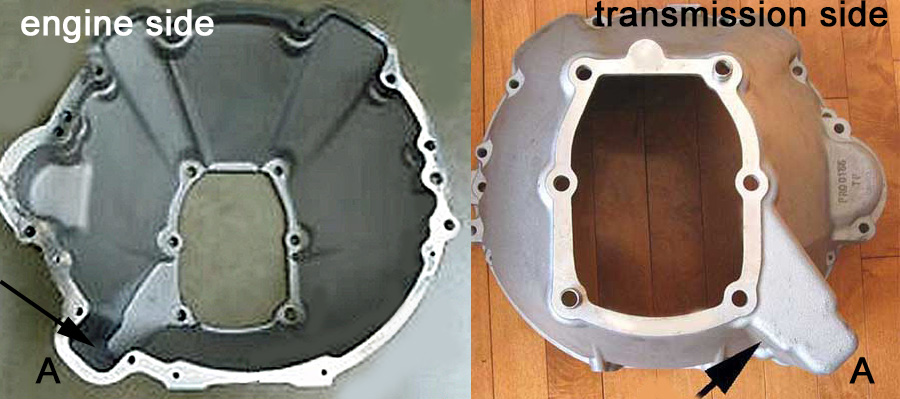 The
background is that the Sd1 bellhousing (the all-important part that
mates a transmission to the engine) used to fit the LT77 or R380
gearboxes to these cars for more than a quarter of century
(1994ish to 2004) is not compatible with a Morgan trad, frame or body. It
and/or the frame HAS to be altered. Here is the offending part of the
bellhousing. It is the part that was designed by Rover to accommodate
the clutch slave.
The
background is that the Sd1 bellhousing (the all-important part that
mates a transmission to the engine) used to fit the LT77 or R380
gearboxes to these cars for more than a quarter of century
(1994ish to 2004) is not compatible with a Morgan trad, frame or body. It
and/or the frame HAS to be altered. Here is the offending part of the
bellhousing. It is the part that was designed by Rover to accommodate
the clutch slave. 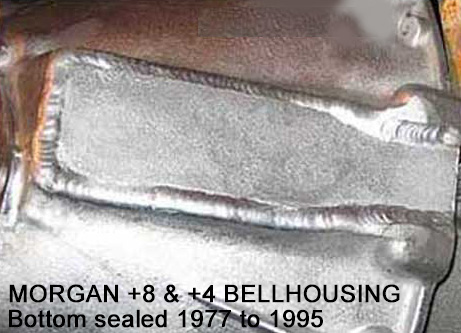 Maurice sheared the offending section for the Rover clutch slave off the
bottom of the bellhousing (left) and welded the section off (MMC metal
work shop). He then
opened the TOP of the bellhousing (right), and moved the release
bearing pivot
from its normal position on the gearbox to the top of the bellhousing.
He then found a tiny non-Rover generic much shorter clutch slave
to replace the now too
long original from Rover. Even then this clutch has to be ground down a bit at the end facing the front of the car,
or this clutch will last even less than its 12-20k miles. (eyes rolling upwards)
Maurice sheared the offending section for the Rover clutch slave off the
bottom of the bellhousing (left) and welded the section off (MMC metal
work shop). He then
opened the TOP of the bellhousing (right), and moved the release
bearing pivot
from its normal position on the gearbox to the top of the bellhousing.
He then found a tiny non-Rover generic much shorter clutch slave
to replace the now too
long original from Rover. Even then this clutch has to be ground down a bit at the end facing the front of the car,
or this clutch will last even less than its 12-20k miles. (eyes rolling upwards) | These cons makes the normal life span of this clutch slave of this configuratrion decidedly short. You can expect only 12,000 to15,000 miles and must carry an extra one with you at all times. They can be changed roadside. However, I discovered a permanent solution 20 years ago. A used slave sent to an expert to be sleeved in stainless steel lasts forever. The cost is the less than buying a new one with its limited lifespan. |
 some
badly needed room at the front and allowing the engine to be a bit and
level, meaning that it cleared the bonnet hinge and cutting the hinge
or
some
badly needed room at the front and allowing the engine to be a bit and
level, meaning that it cleared the bonnet hinge and cutting the hinge
or 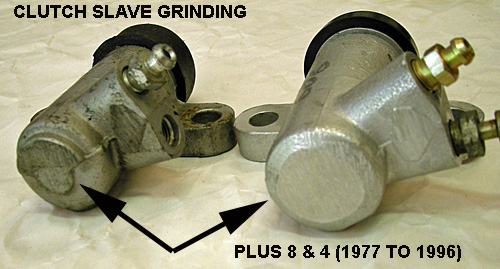 smashing down the SU air filter box was no longer necessary!
However, the outer side of the regular slave's protection had to be cut
off to allow sufficient spacing and debris easily enters these
bellhousings. On the other hand,
production was MUCH faster and the factory could save as the clutch slaves
were free with the engine/transmission purchase.
smashing down the SU air filter box was no longer necessary!
However, the outer side of the regular slave's protection had to be cut
off to allow sufficient spacing and debris easily enters these
bellhousings. On the other hand,
production was MUCH faster and the factory could save as the clutch slaves
were free with the engine/transmission purchase.
4. It is below its reservoir which increases longevity.
A. It required a modification of the crossframe piece below. The piece arcs downward eliminating precious ground clearance at this point;
B. An open
bellhousing is unwise for obvious reasons. (Though I have seen
much worse design modifications in mating bellhousings to
gearboxes!
| WATCHPOINT 1: If buying second hand, make sure you buy their "World Class" version. If buying new, all their T5s are now WCs. WATCHPOINT 2: Be very careful on who you buy the conversion bellhousing from. Many of these bellhousings will not fit a Morgan Plus 8s despite what the seller assures you. Look above. |
 Replacing the Clutch Slave (LT77 (1977 to 1994ish) and Plus 4s (1987-1994ish)
A local garage will not have an advantage over you here as this is Morgan-configuration only. Part
of the neverending odd modifications needed to keep fitting later
motors to an engine bay designed in the Thirties for a 36bhp tractor
engine. ;) That task constantly exhibits a GoMoG Law I call the Deadly
Domino Effect. In this case, the bellhousing doesn't quite fit far
enough into the car because of the:
Replacing the Clutch Slave (LT77 (1977 to 1994ish) and Plus 4s (1987-1994ish)
A local garage will not have an advantage over you here as this is Morgan-configuration only. Part
of the neverending odd modifications needed to keep fitting later
motors to an engine bay designed in the Thirties for a 36bhp tractor
engine. ;) That task constantly exhibits a GoMoG Law I call the Deadly
Domino Effect. In this case, the bellhousing doesn't quite fit far
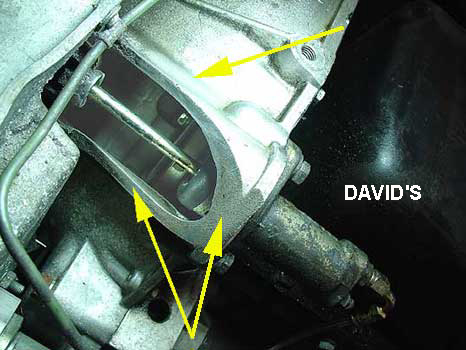
enough into the car because of the:| WATCHPOINT: the only annoying danger in this task is losing the cylinder's actuating rod...which can be a pain in the butt. What I do is grab it with a small needlenose vice grips as you are removing it then lock it the vice grips and secure the grips at the side. |
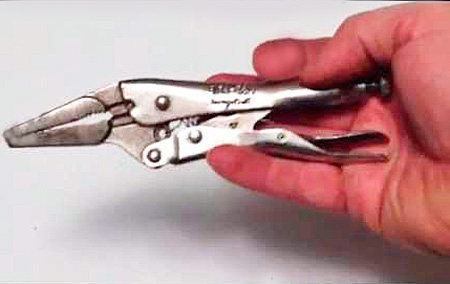 5. Once the rod is secure, remove the big bolts by hand, and
slowly draw the slave towards the engine and, if necessary, a bit
upward until it is free from its actuating rod.
5. Once the rod is secure, remove the big bolts by hand, and
slowly draw the slave towards the engine and, if necessary, a bit
upward until it is free from its actuating rod.