STEERING
ON A PLUS 4
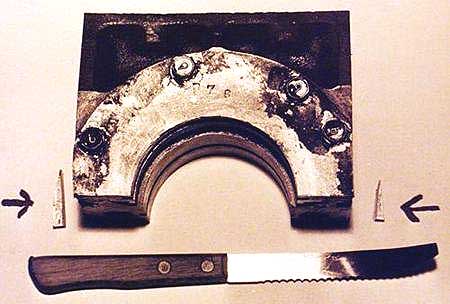
If free play in the steering wheel
of an early Plus 4 can be attributed to the steering box and not
sloppy steering components and if there is no adjustment left in the box
then replacement or rebuilding are the only acceptable options. The replacement
unit is a Gemmer box.
For a rebuild new pegs are available
and it is possible to press out the old peg and press in the new
one. The worms, the sector shafts and the bushes also wear over time.
Line bore the body of the box and install a second bushing where
the sector shaft originally ran directly on the cast body of the box.
This type of wear is usually caused by prolonged lack of lubrication.
REPLACING THE REAR MAIN
SEAL ON A PLUS 4 (Triumph Engine)
Currently there are two different
seal kits available: one from Moss Motors and one from Racetorations in
England. One can also try the bigger Morgan Agents. Reports
back indicate VERY poor success with these.
Thse who have used them have noted;
1. There could be a very sharp edge
at the back of the block and a radius on the corresponding portion of the
oil seal carrier. The sharp edge will cut into the alloy radius and
the result will be that the mounting plates will not fit properly, but
will rock back and forth. Round the sharp edge on the block with a die
grinder, and when filling the seal holders prior to assembly he applied
two narrow beads of Loctite anaerobic red cement, one line on each side
of the bolt holes.
2. The inside diameter of the seal
cavity can be .020" too large. Double pass around the bottom of the shells
with Permatex No. 3.
3. Next the oil-tightness of the
seal where it comes together. Before anything is assembled to the engine,
connect the two ends of the spring and insert the spring into the cavity
of the seal. It will require a little force. Then place the seal into the
cavities of the two halves of the alloy housing and hold the assembled
unit up to a strong light source. If triangle of light can be seen where
the seal comes together, caulk the area with Loctite anaerobic red cement.
Be sure to wipe off any excess as it will adhere to the crankshaft.
4. Be sure the alloy housing halves
fit together properly. With the crankshaft removed from the block fit the
two halves up to the block and install the rear main bolts. If they don't
fit perfectly, the edges of the housing pieces can be dressed down with
#600 sandpaper on a piece of glass. When the fit of the housing halves
is correct mark the upper half to indicate the location of the split in
the seal (after having determined its position with prior fitting of the
seal inside the housing). It is very important that the break in the seal
be straight up after the unit is assembled.
Or another method is to first assemble
the seal on the crankshaft. With the block inverted on an engine stand,
first put in the upper main bearings and lubricate the thrust washers,
then lay the crankshaft in, first rotating it so that the #2 and #3 throws
are facing upward. Have a helper start the bolts on the rear main seal
housing, with your indicator mark pointing straight down (remember,
engine is inverted).
When it comes to sealing the rear
main cap, the Payen gasket kits contain less of the felt sealing wick than
ever before. To get a good seal 3" more of this stuff is required
than supplied. Additional felt is available from most parts suppliers.
The best sealing compound for this is either Permatex #3 Aviation Cement
or Indian Head Gasket Shellac (the latter well known and loved by old timers!).
Push the cement-coated felt into the groove in the rear main bearing cap
and force it in with a punch. Make sure the cement is forced out of the
gap between block and cap all the way to the top, both inside and outside,
and wipe off the surplus. Finally place a small bead of Loctite red cement
between the edges of the alloy seal housing halves where they join. Experiments
show no harm in doing this and it may actually help sealing.
A Better Alternative to TR
Rear Rope Seals
I just learned that 'Me Mog'
is profusely leaking oil from the rear seal. I understand that there is
an improved product that can replace the original rope seal on the TR 3
engine. Do any of you know what this product consist of, and
moreover where may I find it?
The product is a conversion to a
neoprene lip seal. It can be found in Moss Motors, British Parts Northwest,
and probably any other TR source (British Frame & Engine, Victoria
British, etc).
N.B. Some eMog members
have reported problems with this seal! Ask on eMog for the very latest
wisdom.
It involves having a portion of
the crankshaft machined down to a specific diameter (included in the instructions
with the seal) and polished. The kit also includes the two steel
capture plates that hold the seal and adapt to the block.
Everyone that I know that has converted
to the seal has said it worked wonderfully. I have done it to my
'61 but it isn't on the road yet.
The cost runs between $88 (BP NW)
and $130 (Moss). I've found that BP NW has some terrific deals with
very good quality so they are always on my recommended list. Others
prefer BF&E or TRF. Moss seems to be on the high side in general
but not always.
There are some un-converted owners
that state that it isn't original and that the rope seal was good enough
back then, therefore its good enough now. That's perfectly fine,
but the lip seal means one less place to have to clean up on the garage
floor. M. Miles
TR REAR OIL SEALS IV
by Greg Solow
The main problem with the original
"slinger" threaded rear oil seal is that there is to much clearance between
the threads on the crank and the id of the threaded "seal". Taking Hardy
Prentice's lead, we have been modifying and reconditioning used, original
seals, and use them in preference to the aftermarket conversions.
The "blueprinted" stock seals (we reduce the crank to seal clearance from
the original .012" to .006") don't seem to leak a drop as long as the seal
is properly centered and the ring seal is good. The
revs must also be kept under 6,000
rpm. Above 6,000 there will be a little leakage.
We also have used a Chysler 440/383
rear main seal. We modify the original aluminum "seal" to hold the
neoprene lip seal. The threads on the crank need to be filled up
by welding and then reground to the proper size. This is the "best" seal
arrangement that we have used. It does not leak at all, even in a race
engine that uses over 7,000 rpm.
We have had the same problems that
Bill Button mentioned after using the "Racestorations" rear seal that is
sold by Moss, (Br Parts NW) et al. Every one of them has leaked to some
extent. We have been VERY CAREFUL to follow the instructions exactly, and
they still leak. I will not use this seal system again.
The standard seal works very well
on a well built engine with no "blow by" as long as the clearance between
the crank and the seal is in the .005" to .006" range and the seal is properly
centered on the centerline of the crank.
TR REAR OIL SEALS V
(can be done with engine in the car!)
by John H. Sheally II
I have built many TR engines as
I owned and raced Plus-4s for quite a few years. Here is the way I did
it with the rear Main Seal. I used the stock gasket kits for everything
but the rear main seal. Here, I threw away the felt that comes in the gasket
kits for the rear main as felt transfers oil.
 What
has worked for me was to take a plain old white cotton undershirt and cut
it into one inch by six inch strips those were then soaked in INDIAN HEAD
SHELLAC. These strips are then worked into the slots of the rear main already
torqued into place. The strips are pounded into the slots with a flat ended
punch until both sides are filled 1/4 inch shy of being filled with the
shellaced T-Shirt that is left to dry overnight. come back the next day
and fill the 1/4 inch left on each side with extra strength black RTV.
What
has worked for me was to take a plain old white cotton undershirt and cut
it into one inch by six inch strips those were then soaked in INDIAN HEAD
SHELLAC. These strips are then worked into the slots of the rear main already
torqued into place. The strips are pounded into the slots with a flat ended
punch until both sides are filled 1/4 inch shy of being filled with the
shellaced T-Shirt that is left to dry overnight. come back the next day
and fill the 1/4 inch left on each side with extra strength black RTV.
Let the RTV stand a bit proud of
the slots. Put your oil pan in place and torque down. You have at this
point a drip free rear main seal.
Here is another special tip. Because
I ran the engines hard especially in competition sometimes in the 7 to
7500 RPM range I would change the Rod and Main Bearings on a regular basis.
Remember you are dealing with a heavy (always balanced) TR crank running
on three mains. I would always do the bearing change in car so the tip
is to trim the tips off of the the main cap bolt on alloy rear main crank
seal. That is bolt the alloy rear seal half one to the block and the other
half to the main cap with the 7/16th bolts and then trim the alloy "ears"
off of the main cap. The reason to do this is that you can not remove the
main cap for a bearing change in car unless these ears are trimmed off
but you can when this is done letting you have access for the main bearing
changes.
Enjoy this "KISS" application.
Extra note from the WEBMASTER: Gerald,
When you bolt the bottom half of the two piece alloy seal onto the rear
main cap you will see that the corners (ears) of the bottom alloy half
stick out beyond the flat sides of the main cap. If you trim those pieces
even with the sides of the main cap you then will be able to remove the
bottom half of the main cap with engine in car and with transmission bolted
up to replace your main bearings (IN CAR). The front and center main caps
can be removed when the pan is removed but the rear can not unless these
"ears are cut off".
Do not pack the wide groove
on the crank with anything or any of the other groves they are are for
oil circulation and transfer. Only pack the sides of the main cap after
it is torqued into place.
After soaking your one inch
by 6 inch strips of white cotton T-shirts in shellac ( I use Indian Head
Shellac ) feed them into the sides with a drift/punch and pound them in
tight leave about a 1/8th inch in each side and fill that space with
RTV/sealer even with the end of both side of the cap and let tack up a
bit before running a bead of RTV/Sealer across the bottom of the cap and
block and bolt the pan in place. Let dry for 24 hours, add oil to
engine start and go. Sincerely, John H. Sheally II
BACK