Calibration of the VDO Speedometer with LCD Display is a relatively simple procedure, and can be accomplished in any of three ways:
1. Automatic calibration when driving on a road with the exact distance of l mile clearly defined; or on a dynamometer
2. By the input of the known pulse-per-mile (kilometer) for the vehicle and sensor being used with the speedometer...
3. Using a reference point for adjustment or fine tuning.
You gain access to the calibration functions by pressing the button on the front of the speedometer and holding it in while you turn on the ignition. As you continue to hold in
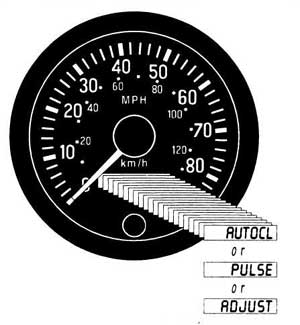
the button, the display will change ...scrolling through the three calibration methods and stopping on each one for about two seconds.
DIAGRAM
F (right)
The display lists the auto-calibrate
mode as AUTOCL; the pulse-per-mile mode as PULSE; and the reference/fine-tune
mode as ADJUST. When you see the method you wish to use, let go of the
button and that function will be enabled.
Autocalibration (AUTOCL)
To use the auto calibrate mode:
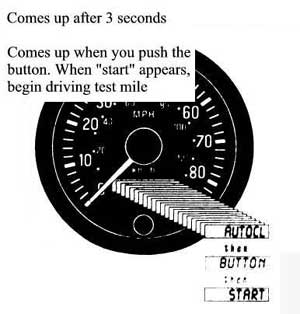
1. Press the button on the front of the speedometer, hold it in, and start the engine. Release the button when the display reads, "AUTOCL"
2. After three seconds, the word "BUTTON" will show on the display. When you are ready to begin your calibration run, press the button again. The display will now begin flashing the word "START."
3. Drive the reference distance of one mile (or 1 kilometer). NOTE: As you drive this distance, the speedometer needle will not register or move. This is a normal occurrence during the auto calibration process.
4. When you have gone exactly one mile, press the button again. If the electronic impulse rate detected by the speedometer's microprocessor is within the calibration range limits of 500 to 399,999, the rate will be shown on the LCD display. For example, your reading might be "P16000 ^ Calibration Range 16000). Such a display indicates that the impulse rate detected during the reference mile you drove exactly matches the microprocessor's programmed rate for 1 mile. That means the speedometer is now perfectly calibrated to provide the most accurate display possible of both speed and distance. The speedometer finishes its Auto calibration by moving the pointer through a full sweep, then back down to zero. However, if the speedometer detects any kind of error during your run, the LCD will display the following, "P00". This means no useable impulse was detected. In this case, simply turn off the ignition, and start the process again.
REMEMBER: During the autocalibration run, the pointer on the speedometer will not operate.
Manual Calibration with a known value (PULSE)If you know the exact calibration
value for the vehicle and type of sensor you are using (pulse-per-mile
or pulse per kilometer), you may use that value to manually calibrate the
speedometer.
To calibrate your VDO Speedometer
manually:
 1.
Press and hold in the button on the front of the speedometer as you turn
on the ignition. Hold in the button until the word "PULSE" is displayed
on the LCD readout. See DIAGRAM H left.
1.
Press and hold in the button on the front of the speedometer as you turn
on the ignition. Hold in the button until the word "PULSE" is displayed
on the LCD readout. See DIAGRAM H left.
2. As soon as you see the word "PULSE," release the button. After a few seconds, the display will start flashing a series of numbers (factory default setting) that you can change to represent the correct calibration impulse value. For example, a number like 50000 will show on the display, with each digit flashing in turn, except for the last digit on the right, which is fixed: first, the second 0 from the right; then the third 0 from the right; then, the next 0; and finally, the 5th.
3. As each number flashes, press the button to change it until the correct digit appears (that is, the number you wish to input). For example, let's say the number that represents the correct calibration value for your vehicle and sensor is"43850." When you begin the manual calibration process, the LCD displays a default value. Each digit, except the one farthest to the right, will flash, in turn, from right to left. Wait until the second digit from the right starts to flash again. When it does, press the button to start cycling through the numbers available for this digit. When the number "5" appears, release the button.
At this point, the number "5" is set, and the digit to its immediate left begins to flash. Press the button again, and hold it till the number "8" appears. Release the button. Now, the second digit from the left begins to flash. Again, hold in the button until the number "3" appears. When it does, all but the left-most digit are set. Repeat the process to set the "4" and the value in our example is set. The value"43850"should be displayed on the LCD readout.
4. When you are satisfied
you have properly entered the correct calibration value - when that value
is displayed on the LCD readout - take your finger off the button and wait.
After a few seconds, the value you have entered will be downloaded into
the speedometer's microprocessor, and the speedometer, will revert back
to normal operating mode. At this point, the manual calibration process
is complete.
In the future, you can use
this method to update the calibration value stored in the computer should
it ever become necessary. This function also allows you to manually adjust
the calibration value after you perform the automatic calibration process.
Manual Calibration (Fine Tuning) (ADJUST)
 You
can fine-tune the calibration of the speedometer's analog display (the
pointer showing miles-per-hour or kilometers-per-hour) by using speed test
equipment and the "ADJUST" function on the LCD readout. The pointer can
be repositioned anywhere within the calibration range of the speedometer.
See DIAGRAM I below. To manually calibrate the pointer on the analog
display with the car on a dyno at the specified speed):
You
can fine-tune the calibration of the speedometer's analog display (the
pointer showing miles-per-hour or kilometers-per-hour) by using speed test
equipment and the "ADJUST" function on the LCD readout. The pointer can
be repositioned anywhere within the calibration range of the speedometer.
See DIAGRAM I below. To manually calibrate the pointer on the analog
display with the car on a dyno at the specified speed):
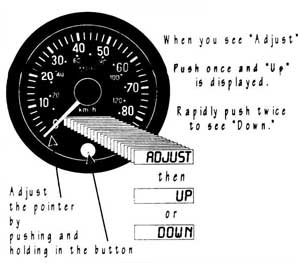
1. Press and hold in the button on the speedometer as you turn on the ignition and start the engine. Hold in the button until the word "ADJUST" shows up. When it does, release the button.
2. Press the button once, and the word "UP" will be displayed on the LCD readout. Press it twice, in rapid succession, and the word "DOWN" will be displayed.
3. When either "UP" or "DOWN" is showing, press the button again, and hold it in. If you hold the button in for just a short time, the pointer will move slowly either upwards or downwards, depending on which mode you selected. This allows for a very accurate adjustment of the pointer. Holding the button in for a longer period of time makes the pointer move faster.
4. When you have repositioned
the pointer where you want it, release the button and wait. If no further
adjustments are made within one minute, the speedometer will revert back
to the normal operating mode.
NOTE: If you move the pointer
past the upper limit of the calibration range, the LCD display will flash
and you will only be able to adjust the pointer downward. If you move the
pointer past the lower limit of the calibration range, the LCD display
will also flash, and you will only be able to adjust the pointer upward.
VDO SPEEDO ISSUE
by Lorne Goldman at
the eMog Pub (2001)
The later digital mileage
VDO speedos can certainly develop anomalies. Most often a replacement is
less frustrating and cheaper than attempted repairs. However, VDO will
check it out for you for free if you indicate that you will be purchasing
another if it turns out bad. If they find nothing, then take the
time to locate the little capacitor behind the speedometer. It is very
small and hidden in a wire shroud. This capacitor can become defective
and will have the speedo give bizarre readings. Replace it, it only costs
a few dollars.
VDO SPEEDO LCD SCREEN ISSUE