Installing
an Overdrive Into a Morgan
For
those of you who are interested at a high level how the installation
went, and its ooks, see the photos below. I got tired of the ratty old
original floor matts so I decided to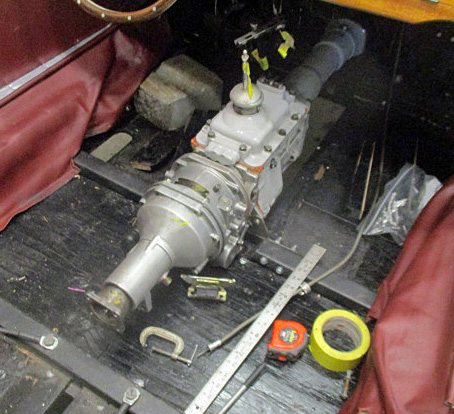 go modern and installed some
carpet. The overdrive is FANTASTIC! I’m super happy with my “fifth
gear”. And for you gear heads who are interested in the nitty
gritty “how to” read on.. and on and on and on.
go modern and installed some
carpet. The overdrive is FANTASTIC! I’m super happy with my “fifth
gear”. And for you gear heads who are interested in the nitty
gritty “how to” read on.. and on and on and on.
I
suppose like many of you, as we sit in our Plus 4s pulling the high
RPM trying to keep up to all the Plus 8’s on a run or, or just on
our own, I know I get frustrated when trying in vain to shift into a
5th gear I don't have. I know secondary roads, at normally slower
speeds are always preferred over a highway, but often it’s just not
an option for a variety of reasons. I decided last summer to get
serious about doing some research on what my options may be to get a
fifth gear of sorts. Let me rephrase that, we all know what our
options are (A 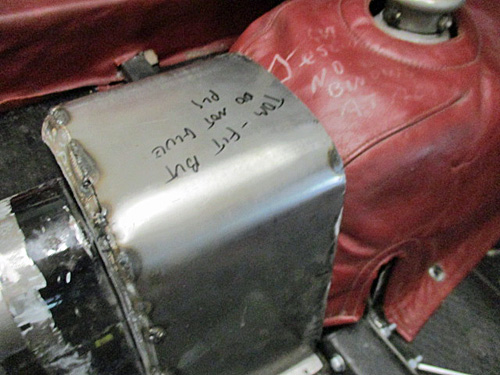 modern gearbox or an overdrive), so really my
research focused on cost, work required, feasibility and any
resultant ramifications. Such as would it affect my collector car insurance
status, can it be done and so many “what ifs”..
modern gearbox or an overdrive), so really my
research focused on cost, work required, feasibility and any
resultant ramifications. Such as would it affect my collector car insurance
status, can it be done and so many “what ifs”..
Having just
completed this project, if I was to do it again I would look more
seriously at a MOSS box out of an early Jaguar that already has an
overdrive attached (can be rather expensive). A point to note is
Jaguar made several MOSS box based gear box’s with several gear
options, so watch the prefix on the number stamped on the case. It
would be worth your time to look deeper in to perhaps a four syncro
gear box also from an older Jag with an overdrive already attached –
if you can find one that is. The problems I found right off the bat
with these ideas, is the fact that the front of the box does not have
the nose cone 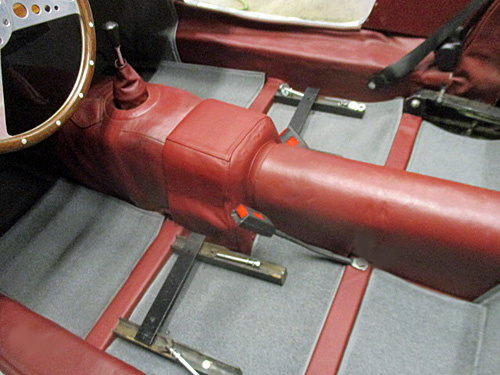 with the bearing needed to support the front of the
main shaft, but the good news is there are holes drilled in the case
to bolt one, if you can find one,
or you can have one made, at great expense I’m sure. The other
really big issue was the location of the shifter, it’s too far back
on the Jaguar box’s. However, I understand that the top of our
Morgan gear box have a really good chance of fitting the Jag box,
thus putting the shifter where it should be BUT in my research I was
never able to confirm this, I encourage you to do more digging than I
did on this. If you go this route, remember that this gear box may
need a full rebuild also adding to the cost. I knew my gear
with the bearing needed to support the front of the
main shaft, but the good news is there are holes drilled in the case
to bolt one, if you can find one,
or you can have one made, at great expense I’m sure. The other
really big issue was the location of the shifter, it’s too far back
on the Jaguar box’s. However, I understand that the top of our
Morgan gear box have a really good chance of fitting the Jag box,
thus putting the shifter where it should be BUT in my research I was
never able to confirm this, I encourage you to do more digging than I
did on this. If you go this route, remember that this gear box may
need a full rebuild also adding to the cost. I knew my gear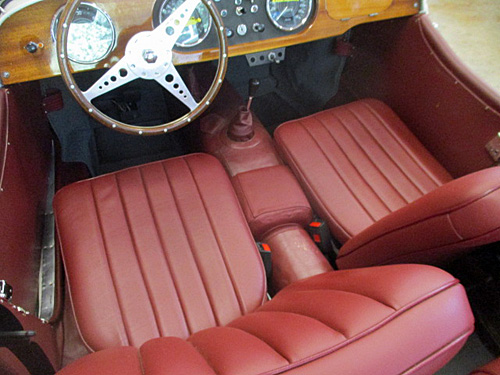 box was
good inside as it had been rebuilt when I restored the car.
box was
good inside as it had been rebuilt when I restored the car.
The research phase
proved to be way deeper subject than I gave it credit for, not to
mention at times very confusing. I could write a very long article on
what I found, but I will not bore you with this and frankly I don’t
really want to write about it either. There are two options. There is
a well known “local” Morgan parts supplier who offers a full on,
everything you need kit to install a modern gear box, a great well
put together kit worth considering if you want a fairly seamless
install, you have the money and are not concerned about collector car
status for insurance (I got official approval to add an overdrive to
my car from them). And then of course there is adding an “A” type
over drive unit to my existing gear box. As our cars use a TR4 motor,
there are several five speed converstion kit out there for the TR
motor, BUT, the the problem for us is we have a very non-standard
bell housing.
When looking in to
the options, I was helped by a fellow living in New Zealand who did
exactly what I am doing, some 30 years ago and it is still running
strong. I’ve changed a few things from what he did, mostly to
insure the car structure is still there after cutting a large chunk
out of the cross member. Okay, I know what you are thinking YOU DID
WHAT! I can assure you that I put a lot of very careful thought in to
how to reinforce the cross member, in fact I think I made it even
stronger. More later on this…I knew if Fred Sisson and my New
Zealand guy could do it, then so could I. Once again, with all that I
do to my car I decided to do up these detailed instructions in hopes
of helping others who are as crazy as I am.
REBUILDING
THE GEARBOX - attaching the OVERDRIVE
My
first step was to source the “A” type over drive (It has to
be an
“A”) and a few other various parts needed. Morgan never
used an
overdrive so they did not supply a longer main shaft that is needed,
but thankfully Jaguar does (parts ordering info at the bottom of this
thesis) and thankfully it works with the Morgan gear box guts, for
the most part that is. I had the overdrive rebuilt and mated with my
gear box before I started to rip my car apart and make changes just
in case something went wrong and I could not do what I wanted to
–
it all worked out but was a bit painful.
| NOTE:
Generally speaking the guts of a Jaguar box do not fit the Morgan box
(more info in a link at the bottom) however you can get the longer
Jaguar main shaft needed (see parts ordering info below). What I
found interesting on this as that Jaguar used a front spline with a
higher spline count than did Morgan. Yet, the main shaft I bought
(new) was “Morgan correct” In front splines, I still have not yet
puzzled this one out and the vendor never got back to me as to why,
so just an FYI to check this if ordering. |
Unless
you have a vast amount of experience rebuilding a MOSS box, don’t
do this. I’m lucky in that a Jag friend of mine in town does have
such experience. To make a long story short, he ran in to all sorts of issues
to over come and at the end he said it was a real challenge for sure,
but he did it! Below are a few issues he had, I think 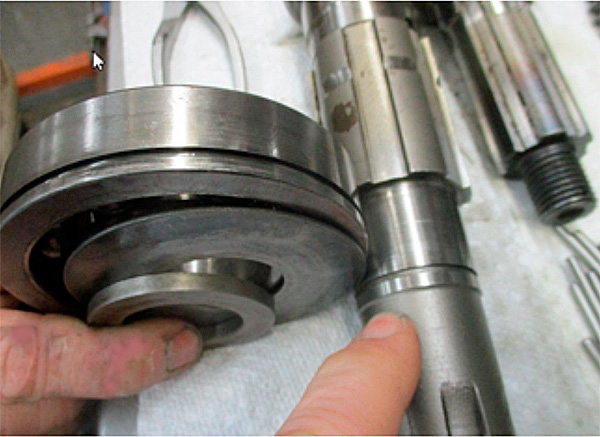 that the reason
he had these issues is the Jaguar main shaft that I got is one of
those reproduction units. And we all know how badly reproduction
parts are made or simply don’t fit like they should. If I was to do
it again, I think I’d try to find an original longer shaft with the
correct spline count in good shape – but good luck with that one.
that the reason
he had these issues is the Jaguar main shaft that I got is one of
those reproduction units. And we all know how badly reproduction
parts are made or simply don’t fit like they should. If I was to do
it again, I think I’d try to find an original longer shaft with the
correct spline count in good shape – but good luck with that one.
So
much for sourcing ALL the parts needed right at the start, once the
gearbox was apart we found out that we needed a thicker distance
piece shown below and a 1 3/8” circlip to fit in the groove I am
pointing to (these were Jag parts) The distance piece is the first
one at bottom of photo. Note that we did not use the thin washer (in
the middle) as this stops
oil from passing through the bearing, we NEED the oil to travel to
the back over drive via this bearing. The new distance piece and
cirlcip proved a bit hard to find, but in the end I did find a Jag
parts place who had them (parts info below) . In a worst case scenario,
you could make the distance piece and find a circlip somewhere). This is a part used to hold in place the gears and syncros, sort of like a
locking ring, had to be milled down several thous, it was a “shave
and fit” process, as when mine went on it jammed the gears so they
would not turn (photo below, on the left). It was not an easy task as
it is hardened steel, my builder did it on a lathe with a grinding
stone I think – slowly. This gear fits where you see the blue
grease in the photo on the right. Of course, if you do this
conversion the main shaft you use may not require this.
Installation
process
I started by removing all the floor boards and bolted the unit in place
resting it on the cross member to see exactly where things fit, or
more so did not fit, to get a better idea of the problems to over
come, and I was not disappointed.
The
first big issue, was the fact that I had to cut out a large chunk of
the crossmember, right in the middle! After much thinking, and
various ideas on how to reinforce it I contacted the fellow (Andrew)
who did all the metal work on my E type restoration in town, and who
was trained in the Morgan factory years back in metal work. He is a
top notch fabricator in anything made out of metal on a car so he
fully understands structure, support and so forth. He dropped by and
our solution was to weld on some 3/8” x ¾” solid steel bars
under/across the width of the cross member. We also replace the
forward vertical bar forming the “box” that I had cut out not
knowing how it would all sit. But, there was JUST enough room to
replace it as shown.
Next I had to put
back the gearbox supports I took away, as well as support for the
rear of the overdrive
The last step was
to have the drive-shaft cut down, if my memory is still working to
around 13.25 inches, and of course, balanced. Now that is one short
drive shaft, but it works. Sorry forgot to take a photo of it!
How to
wire it up
You
need to use a relay, the OD solenoid pulls a lot of amps very
quickly. On “normal” gear boxes that use overdrives, there is an
interrupt switch that is part of the gear box cover and only allows
the overdrive to be engaged when in either third of fourth gear. If
you engage the overdrive in reverse by mistake, it simply blows up.
I’m afraid that on the Morgan gear box top cover, there is no room
to safely install an interrupt switch.
What
I did, which is not the best option (more below) but the best for me,
was to install a master toggle switch (under/behind the dash) that
turned the power on to the push/pull
switch on the dash that operates the overdrive. I did this as a “fail
safe” so there is not constant power going to the push/pull switch
to accidentally engage the overdrive, assuming I of course turn it
off at the end of the highway section.
Below
is how I wired up the relay along with and LED idiot light beside the
push/pull switch to remind me at all times the over drive is engaged.
Or, you could use the LED light to say the master switch is on, up to
you.
Run
constant power from fuse box to the master toggle switch
Out
of the other side of the master toggle switch goes to C1 on the relay
C2 on
the relay goes to the solenoid on the overdrive.
| NOTE:
If you wish to run a LED idiot light splice one side of the light to
the wire from C2 to the overdrive solenoid and the other side to
ground. |
Run
switched power to W1 on the relay.
From
W2 on the replay run the wire to one side of the dash push/pull
switch that operates the overdrive. From the other side of the
push/pull switch, that wire goes to ground.
| Note:
Do not, run the LED light off the push/pull switch or it will for
some reason allow the whole system to ground it’s self, and mess
everything up. |
The
best option, is to use the proper interrupt switch that has to be
fitted/drilled and tapped to the gear box top cover over top of the
third and fourth selector rod. Due to a lack of flat space installing
such a switch proved daunting for a few reasons, not to mention I did
not want to take a chance on destroying my one and only top cover.
I’m know it can be done, I just decided for a variety of reasons
not to. So I used a system to activate the overdrive by way of a
master toggle switch (hidden behind the dash) and a “push/pull”
switch on the far left of the dash (not accidentally flipped such as
a toggle switch can be). I also installed a LED idiot light beside it
as a visual reminder. I think as time goes on I will look for another
Morgan gearbox top cover and play with that to see if I can get it
to fit a interrupt switch.
Interior
work to cover it all up
Because the
overdrive added another seven inches or so in length, not to mention
the width of the unit, I had to figure out how to cover it. In the
end what I did was to make what you see below. I had to cut off the
rear 2” or so of the main gear box leather cover (and have it sewn
up) as it came in to contact with the overdrive that heats up. I had
my interior guy cover this extension with somewhat matching leather.
As you can see in
the photo on the right below, I cut off the rear 2” or so of the
metal gear box cover, and added it to the back of the extended cover
you see in the photo on the left below. This gave a nice transition
to the drive shaft tunnel cover.
Thankfully the
drivers seat fit between the somewhat wide overdrive cover and outer
cill. But, I was not so lucky with the passenger seat (go figure
why). Remember way back to another article I did where I added metal
tubing to each side of the seats that better support the cushions, so
you don’t flippy flop side to side in a corner? Well, it came back
to bite me a bit. I had to cut/bend the out side tubing inwards
(bottom left of the photo) so the seat could move outboard an inch or
so to clear over overdrive cover.
More
valuable reading links
GoMoG: https://www.gomog.com/allmorgan/toyotaupgrade.html
Fred Sisson: The Morgan Bedisde Reader
GoMoG: https://www.gomog.com/allmorgan/mossgearbox.html
Parts
required and connections
The parts I have
listed below (and who I got them from) are parts that I needed, it is
reasonable to assume your gear box will be the same, but who knows.
Keep in mind that my gearbox was rebuilt a few years ago so I did
not need any gears, bearings etc, you may. If you order, verify my
part numbers!
You
will need to get a A
type over drive unit (no other will work) and an adapter plate to
join the OD unit to the back of your MOSS gear box. Morgan used the
MOSS box CASE from a Jaguar MK1 and adapted it for use on our cars.
It is VERY important to note that the Jaguar MOSS box guts are not
the same as the Morgans except for the longer main shaft you need,
the distance piece and the circlip mentioned above.. Well, I fib a
bit in some ways they are similar but it gets very very complicated,
just easier to not go there. Over drive units are not easy to come
by, but not super rare either. You will just have to do some research
on to see who has what, shop around, ask friends and so on and price
it all out, but budget around a $1,000.00 or so for a working
overdrive or a used one including rebuilding costs. There are several
repair services in the UK, Ebay Motors, Ebay Motors UK and so forth
that may have them, if my contacts below do not.
Lee
Cunningham l_cunnin@hotmail.com
is a fantastic source for an overdrive unit and
repair or full a rebuild services who lives in Vancouver BC.
Lee (a super nice guy) fully rebuilt my overdrive for about $35.00
that I found locally, and also supplied a few parts (see below). A
tip, ensure your overdrive is working before you install it and get
the car on the road! Pulling it out a second time really sucks (I
know) Lee was able to get me an adapter plate (I think, it’s from
an Austin Healey but not sure)
Quantum
Mechanics (USA) Email
john@quantumechanics.com.
Phone 203-463-8299 John
is also a good source for an over drive unit, and adapter plate or
just parts. He can also rebuild them but keep in mind shipping costs. Parts he supplied me are:
- A new main (Jaguar
3 syncro) A type OD main shaft $175.00 US (make note of the spline
count)
- Eccentric
cam $60.00 US (This pumps the oil to the overdrive to create pressure
to kick in the OD)
From Morgan
Spares (USA) morganspares@taconic.net
- Gasket kit (be
prepared to make your own, as I found these don’t fit very well)
- Reverse shaft “O”
ring part # 300-291
- Counter shaft “O”
ring part # 300-301
From British
Parts Northwest (USA) I suppose you can
also get from other places as well
- Trans/Motor mount
to support the rear of the OD unit part # 159656UR $20.00 (needed
modifying) See if you can find one that fits better
- Interrupt switch
(I put it on the fourth gear shift rod only) Part #SMB499ODTR6 (from
a TR3) $8.00. I did not use these as I could not get them to fit on
the cover, but if you can it’s a very good idea!
- Relay 142169TROD
$18.00 (From a TR3) You must use a relay due to the amps that the OD
needs to kick
From WELSH Jaguar
parts (USA) NOTE: These two parts below
I found out the hard way that I needed, after the gear box was all
over the bench! I had problem finding them, mostly no longer made,
but if needed you can take your shim and turn the ID bigger on a
lathe, and somewhere you would find the correct circlip
- Shim from a Jaguar Mk2
part number C-5983 $3.00
- 1 3/8” circlip
from a Jaguar Mk2 part number C-5685 $2.00
Billy Bellinger
info@jb-engineering.co.uk
at JB Engineering is highly recommended by Morgan experts. I did not deal with him this
time as I did not know about him, but he is the “go to” guy for
Morgan gearbox stuff and if I was to do this again he would be my
first phone call now. However, he is in the UK and often hard to reach.