Morgan Gauge Restoration
by Alan Truax
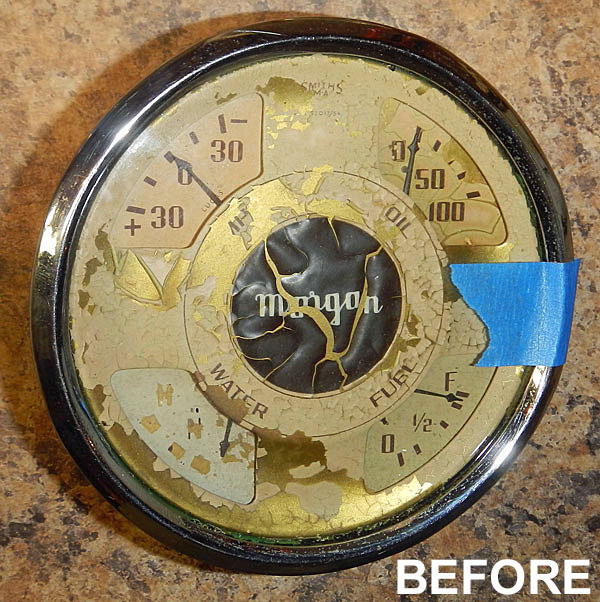 One of the new
challenges my 1954 Plus 4 transition Morgan rebuild presented was the
restoration of the dash and instruments. The 4-1 cluster gauge was
in particularly bad condition. This, I think, was caused by the
release of the mechanical temperature gauge fluids. The paint on the
gauge faces were mostly gone and the temperature gauge itself was
missing. I replaced the missing gauge with an electrical temp gauge. What
little paint remained was loose and crumbling. There was no
possibility of restoration by just touching up the instruments
face. The gauges would need a total refinish.
One of the new
challenges my 1954 Plus 4 transition Morgan rebuild presented was the
restoration of the dash and instruments. The 4-1 cluster gauge was
in particularly bad condition. This, I think, was caused by the
release of the mechanical temperature gauge fluids. The paint on the
gauge faces were mostly gone and the temperature gauge itself was
missing. I replaced the missing gauge with an electrical temp gauge. What
little paint remained was loose and crumbling. There was no
possibility of restoration by just touching up the instruments
face. The gauges would need a total refinish.
There are two
methods I considered for the restoration, Decals and Silk Screening.
Decals seemed to be the easiest method so I opted to try that method
first. I do plan to further explore silk screening for future
projects because that method should be more durable.
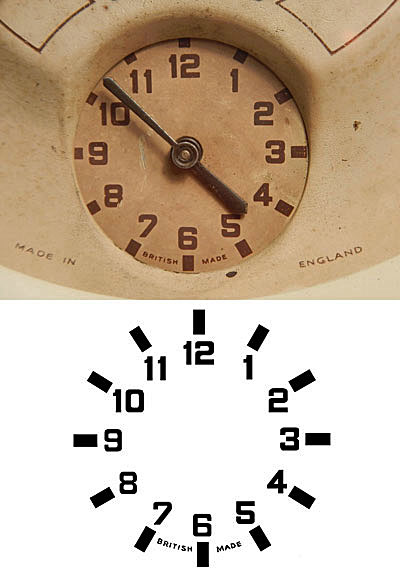
1. Documenting the graphics
The first step
is to photograph the gauges. I took several photos of each of the
four gauges and the frame. I needed these photos to first
document the location and orientation of the graphics and second, to
provide the base photos for photo-shopping the artwork to print the
decals. Next, I measured and recorded the dimensions of the
existing graphics so that I could later exactly size the decals.
It is important to have the camera directly over the gauge and
perpendicular to it so that the image isn't distorted.
2. Refinishing the background color
When I was
satisfied that I had a good record of the old graphics, I was ready to
proceed with the stripping and refinishing of the gauge faces.
The faces of each of the four gauges were removed from the bodies and
the insides were carefully cleaned and tested. The finish on all
the gauge face plates washed off easily with acetone. I found
that all gauges were polished brass except the Amp gauge which was
aluminum. The Fuel and Temp Gauges have stop pins that need to be
removed in order to apply the decals. This was carefully done to
preserve the pins for re-installation after the decals are applied and
to not distort the plates. (I later decided that punching a hole in the
decal was a better option.)
The surfaces to
be refinished were then either scuffed with 220 wet and dry paper or
bead blasted to provide a substrate that the new finish will adhere
to. I used a beige lacquer that looked to me to be a good
match of the Morgan gauge color. The script "Morgan" in the center is
printed in white. I do not have the capability to print white on
the decal so I needed to paint the center of the gauge beneath the
Morgan script white and make a decal with a transparent "Morgan"
graphic.
3. Producing the graphics
I used
Adobe Photoshop to modify the base photos to produce a decal
graphic. First I cropped the photo to just the area of the decal
and next photoshopped the following steps;
Step 1 - convert the photo to black & white
Step 2 - increase contrast
Step 3 - adjust threshold levels to decrease and eliminate unnecessary gray tones
At this point the photo is mostly pure black and pure white but still has many areas that need work.
Step 4 - fill in areas of paint loss and missing graphics
Step 5 - improve edge definition and correct any remaining flaws
Step 6 - convert back to color and fill with appropriate colors
That may sound simple, but hours of work were required to get the graphics up to a good standard. Some
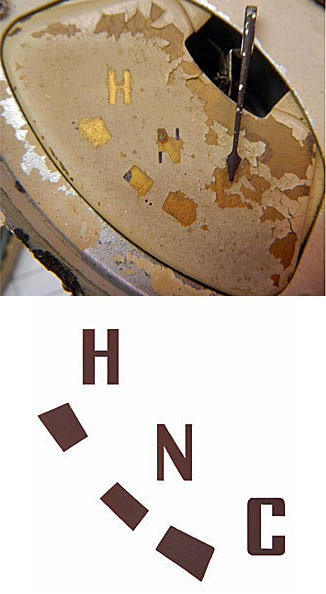
of the instrument faces had text graphics that were mostly
missing. For these I used Photoshop's text insertion methods
choosing a font that matched the damaged text. I did this by
simply using the base photo as a reference background and creating a
new Photoshop text graphic over it.
4. Scaling the graphics
Once the
graphics were deemed good enough to use, they were printed on plain
paper at a known size to compare to the recorded sizes required of the
decal. For 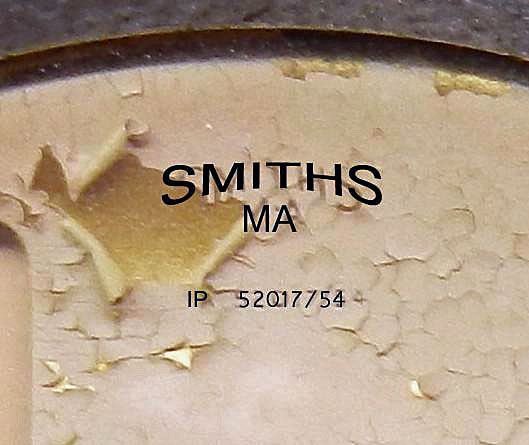 example, I might have printed the Fuel
Gauge graphic out at a 2" width and found that the measurement across
the outside edges of the O and the F was 1.3 inches and the actual
measurement of the gauge that I recorded before stripping the finish
was 0.95 inches, I would need to correct the print size to (.095/1.3)X
2".
example, I might have printed the Fuel
Gauge graphic out at a 2" width and found that the measurement across
the outside edges of the O and the F was 1.3 inches and the actual
measurement of the gauge that I recorded before stripping the finish
was 0.95 inches, I would need to correct the print size to (.095/1.3)X
2".
5. Printing the decals
I printed
sample decals using the corrected size to verify the scaling and
color. The actual color of the decal on the decal stock will
differ slightly from that printed on paper and some did require color
correction. My printer is an inkjet type and the inks used will
run when exposed to water. The solution is to coat the decals
with lacquer to seal the inks. I used two coats of a satin
lacquer to seal the ink before cutting them out to size. If you
cut to size and then lacquer, you will have difficulties in sliding
them off the paper backing. It is important that you keep the
decal stock clean and do not touch the film surface. Your
fingerprints on the film will affect the uniformity of the printed
colors.
6. Trimming the decals
The four
gauges are framed by the large round plate with the Morgan insignia in
the center. I made a template in the shape of the frames that was
slightly larger than the gauge frame and used that to outline where I
trimmed the decal to get proper positioning while having the plastic
film of the decal filling the full frame. The purpose is to hide
the edge of the decal film from view when positioned properly.
The "Smiths" , "Made in England", and "Morgan/AMPS/OIL/WATER/FUEL" for
the frame were trimmed slightly beyond the graphics and trimmed with
rounded edges avoiding sharp corners.
7. Applying the decals
 The
decals have a water soluble adhesive factory applied. The decals are
released from their paper backing by soaking in room temperature
water. If the decals are left in the water too long, the adhesive
will be lost. About 20 to 30 seconds is usually enough time
loosen the decals from their paper backing and be ready to slide them
on the gauge plates. Keep the gauges, water and decals clean
because it would be all but impossible to remove any dirt under the
decal. Slide the decal off onto the gauge plate and position it
properly by referring to your record photos. Once the decal is in
position, gently but thoroughly force out all the water and air bubbles
using a wadded paper towel. Set aside until completely dry.
The
decals have a water soluble adhesive factory applied. The decals are
released from their paper backing by soaking in room temperature
water. If the decals are left in the water too long, the adhesive
will be lost. About 20 to 30 seconds is usually enough time
loosen the decals from their paper backing and be ready to slide them
on the gauge plates. Keep the gauges, water and decals clean
because it would be all but impossible to remove any dirt under the
decal. Slide the decal off onto the gauge plate and position it
properly by referring to your record photos. Once the decal is in
position, gently but thoroughly force out all the water and air bubbles
using a wadded paper towel. Set aside until completely dry.
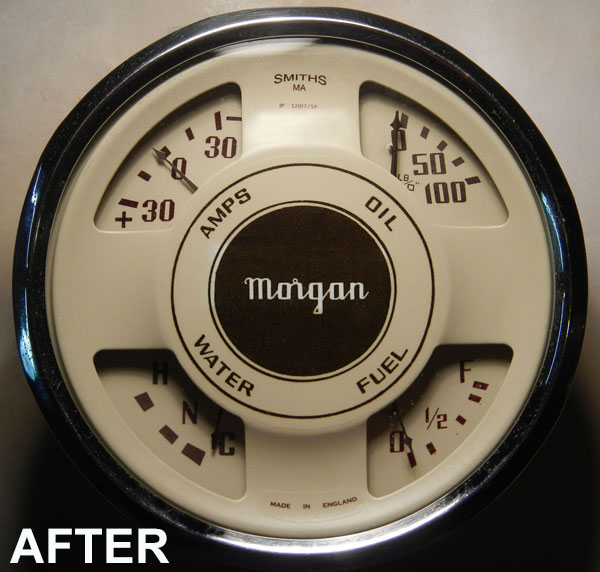
Restored 4-1 Gauge
8. Materials used:
Krylon MAXX Almond Satin spray paint
Deft Clear Wood Finish Satin Lacquer
Rust-Oleum Automotive Enamel Gloss White
World of Paper Inkjet/Clear Waterslide decal paper
9. ADDITIONAL WATCHPOINTS:
The main face surrounding the individual 4 gauges is keyed and you must maintain the orientation.
If you opt for a
white script "Morgan", I suggest that you first prime the main face
with a white lacquer primer and then mask off the area under the
"Morgan" before applying the beige lacquer. After the
lacquer is completely dry, use an abrasive pad, the type that is
used between coats of finish, to lightly smooth the transition between
the white and beige areas.
Removing the stop pins may not be necessary.
I did not use
any additional coating after applying the decals. To Improve the
durability of the restored gauges, you want to apply an additional
coating of lacquer after applying the decals. It would be prudent
to test on a sample first to be certain of material compatibility after
allowing the finishes to cure a week or two. I found that the lacquer I
used for sealing the decals was compatible with the beige lacquer only
after two weeks. Testing indicated that applying a sealing coat of that
lacquer too soon would cause the finish to lift.