Graphics & HTML formatting by John T. Blair (WA4OHZ)
Last updated: 03/31/1997
The body panels of all Morgans are 22 gauge cold rolled steel or aluminum (slightly thicker semi hard aluminum is used).
Fabricating a panel is not as difficult as one would think. The trick
is to know what the metal is going to do when hit or bent and how to make
it do only what you want it to do and nothing more. The quarter panel is
probably the easiest panel to fabricate on a Morgan, requiring no special
tools or equipment. To start you must have good solid wood. If you can
move any of the timbers more than a quarter inch movement or have loose
joints, attempting to fabricate a panel over it is fruitless. Check the
covered edge of all wood. This is the 90 degree corner which will be
covered by the sheetmetal. The edge should be sharp with very little
radius and complete. Do not assume that a one inch chip of 1/8 depth in
the edge will not make a difference. Once the sheet metal is on you will
see every imperfection in the wood beneath it.

Tools
The basic tools needed to fabricate a quarter panel are:
- Tin snips: I use the conventional scissors type as I find the
aviation type to be difficult to control. Like most tools they should be
sharpened even if bought new.
- Nibblers: Most big hardware stores will carry these in the same
area as the snips, its a hand held tool which will cut a 1/8 by 3/8 inch
rectangle out of sheet metal.
- Scribe compass: These are just like the pencil compass you had
in school but each leg ends in a sharp metal point and the legs can be
locked in place.
- Body hammer: you will need a flat faced hammer as well as a
domed face hammer.
- Dolly: I use a small "D" block dolly. Be sure to get a quality
dolly since the ones made in the far east have very large radius and are
not machined as smooth. My "D' block is shaped like a D with a flat bottom
and side and domed top. You want the 90 degree edges to be as small a
radius as possible.
- FILES: Flat and half round
- Steel Plate: I use a one ft square sheet of plate steel which is
1/4 in thick.
- "C" Clamps - Lots and lots of them (minimum 6)
- sheet steel: 22 gauge cold rolled - Six foot by four foot (4/4 s
can get by on a little less)
- Plywood: 4 ft square 3/4 or 1/2 inch
- Escutcheon Pins: (Tacks) Brass plated 5/8" X16 (available at
better hardware stores)
- Screws: # 4 X 3/4"
What we want to do is basically cut out the sheet metal to the shape and lay it up on the side of the car sandwiched between the ash and the plywood so that the edge is sticking out. With the hammer we are going to bend the edge over the ash forming the panel.
Start by rough cutting the plywood to the shape of the panel with in a inch or two over size. This will have to be done in three pieces:
- The bottom of the door sill,
- The main side panel,
- The tail.
Cut on the bright scribe mark.
Hint: The work in cutting sheet metal is not caused by the snips cutting into the metal but by the metal wanting to relieve the stress of the cut. If you cut a sheet 12 inches wide in half the stress has no where to go so it fights the snips. Cut a one inch strip along the edge and you will find the one inch strip curls into a neat cork screw shape. This curling is relieving the stress so the snips cut much easier. Try to always cut so the curl is up and with one hand roll the curl as you cut. You'll find this makes cutting much easier and you get better control (ie: make the snips go where you want them to go). Also try to cut with as little metal on the waste side as possible and always make sure the waste is smaller than the piece your cutting out. You can rough cut the panel out of the sheet but figure at least two inches of metal either side of the cut will be bent. Also you will not have any control so stay well away from your final cut line.
Take the sheet metal and spray paint the inside (light coat) (you should
 have a 50/50 chance of this being done already from the rough out) and
place it on the ash frame so an equal amount sticks out all around. Place
the plywood over this and arrange the plywood so the edge is even with the
ash frame all around.
have a 50/50 chance of this being done already from the rough out) and
place it on the ash frame so an equal amount sticks out all around. Place
the plywood over this and arrange the plywood so the edge is even with the
ash frame all around.
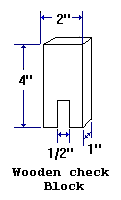
Hint: Take 2 to 4 "centering" blocks. These blocks are nothing more than a aid to seeing how everything is lining up by insuring the edges of the plywood and the edge of the ash frame are on the same plane. Think of the "blocks " as the old wood clothes pins. If you place the pin over the sheetmetal which is sticking out between the frame and plywood one leg will touch the frame and the other the plywood. If the plywood is not positioned correctly one of the legs will touch the frame or plywood and not the other.
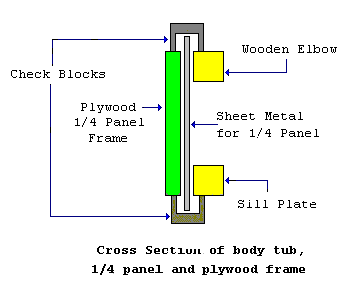
Once everything is aligned clamp it all in place with as may clamp as you have. You will not be able to clamp around the wheel arch.
Now you must mark out the Flange. The Flange is that part of the panel which bends over 90 degrees and will have the tacks driven into it. Since the size of the flange varies (from 3/8" to 1" wide) based on who was making the panels at the factory that day, you should use choose a width. Set your compass scribe at that width and scribe around the frame just as you did with the plywood. You should get two lines this time, one at the frame line and one above it which is the cut line.
The door post is 1" wide and the hidem takes its tack half way through, so it should be no more than 3/8 inch. The back panel will determine the size of the tail flange. The arch is covered by the fender so it really doesn't matter. I suggest you take it from the old panel. But remember that the corner has a radius and the bend will shrink the metal slightly. (If you measure the flange remember to subtract the thickness of the metal.) Once scribed all around remove the panel and cut out on the outside line. Try to plan your cuts so the curl is up and take it slow. Remember you can't put metal back but you can always cut again or file to the line. At this point disregard the notches for the "D" Cup and door striker on the rear door post. Just cut straight as if they weren't there.
Once cut out, remount to the frame as before. Insure the flange is evenly spaced.
Re apply all the C clamps . Now we are ready to start hammering.
Rules of Hammering
- Think about every blow before you make it! You are going
to be making several hundred blows and it can become automatic. That's
when you will make the hit which screws up the panel.
- Never hit the panel when it is unsupported. The plywood is
holding the panel to the shape you want. Don't hit the panel even lightly
on the edge unless the panel is sandwiched between the frame and the
plywood tightly. If you see a gap between the plywood and panel or the
frame and panel rearrange the c clamps. You might have to release one side
and tighten up another.
- Don't hit too hard. Think of it as persuading the metal to do what you want not forcing it.
 at a 45 degree angle. Do the same at the two corners of the rear tail
section. I usually start at the arch since it is the easiest and lets you
get a feel for the metal. Since we can't clamp around the arch you will
need to press in on the plywood during each blow. You want your first blow
to be low and close to the frame and plywood. We are trying not to bend
the metal over as much as folding it over. Consider the part of the flange
closest to the frame and plywood the base and the edge the top. We want to
start the folding at the base not the top. If you aim the first blows at
the top you will form a "?" and just like the "?", the metal will be forced
out at the base and when you hit down on the flange the metal will travel
in both directions thus you end up with a ridge and a very wide radius on
the edge.
at a 45 degree angle. Do the same at the two corners of the rear tail
section. I usually start at the arch since it is the easiest and lets you
get a feel for the metal. Since we can't clamp around the arch you will
need to press in on the plywood during each blow. You want your first blow
to be low and close to the frame and plywood. We are trying not to bend
the metal over as much as folding it over. Consider the part of the flange
closest to the frame and plywood the base and the edge the top. We want to
start the folding at the base not the top. If you aim the first blows at
the top you will form a "?" and just like the "?", the metal will be forced
out at the base and when you hit down on the flange the metal will travel
in both directions thus you end up with a ridge and a very wide radius on
the edge.
Another way to do this is to use a block of wood. Lay a one inch sq. block on the edge of the plywood, raise it about 1/16th of an inch and hit the block with a hammer. Don't try to bend the section your working on all the way. You want to bring the flange over evenly across the entire edge you are working on. Move a 6 inch section of the flange about 10 to 20 degrees and move down to the next six inch section. You can, however fold a whole side over before moving on the another side.
Where you can expect trouble is in an outside radius. The wheel arch is a inside radius while the curve above the door is an outside radius. The problem comes from the fact that as you fold the metal over the edge of the panel which is a fixed length must now conform to a shorter length. The excess metal has to go some where and what it wants to do is buckle or wave. You can't prevent it while folding on the frame, but can control it. The objective is to spread the waves as evenly as possible over the entire radius and not try to "push" then to the sides. The waves are the excess metal grouping up, later we are going to push this excess metal into itself making the metal thicker, too much metal and we will end up with folds. So as you work the upper curve over don't panic because of the waves and don't try to hammer them flat, simply work from the wave out and keep the blows working from the base up.
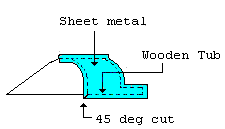
Once you have all the sides folded over take the panel off the frame. We are now going to clean up the flange, shrink the waves, tighten the radius and get the panel tight.
Here you don't have the safety of the frame and plywood to control the shape of the metal. The panel should be laid on a flat surface and fully supported. Place the steel plate under the edge of the panel you will be working on. Place the dolly on the inside edge of the flange. Hold the dolly tightly down and against the flange while hammering the flange with fairly light blows. Work your way around the panel. With a file, file the edge flat then lightly de bur the edge by drawing the file over the edge at a forty five degree angle. Fit the panel to the frame being careful no to force anything.
To form the front step (which fits under the front panel at the bottom door sill) start by placing a line 6 inches back from the rear edge of the front section. Place the panel in place and with the compass set at six inches place one leg on the line and scribe a mark on your panel with the other leg. This should be the where you need to make the cut. Remove the panel and cut the tab as on old panel.
Lay the panel on the steel plate and use a block of wood or your dolly
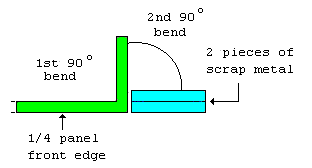 to bend the tab up 90 degrees. Place two thickness of scrape sheetmetal at
the line (90 d bend) and fold the tab back down, using the dolly to hold
the panel flat on the steel plate. This will give you the step down so the
panels are even.
to bend the tab up 90 degrees. Place two thickness of scrape sheetmetal at
the line (90 d bend) and fold the tab back down, using the dolly to hold
the panel flat on the steel plate. This will give you the step down so the
panels are even.
Use the nibblers to notch out the opening for the "D" block cup and door latch. I nibble to with in an 1/8 inch of the line then fit the panel the frame and hand file to fit.
After painting the under side, the panel is ready to be fitted to the frame. Use the plywood and clamps as before. Use a punch to make a start for a 1/16th inch hole which you drill for each of the pins (tacks). Spacing of the screw and pins are again dependent on who was paneling cars the day yours was make. When drilling the hole for the pins, only penetrate sheet metal not the wood. With a fine file dress the flange and edge.
Problems
The panel Oil cans; You hit it with out support or forced it on or off
the frame, stretching the metal. Throw it out and start over.
The panel doesn't fit tightly to the frame; Check the back panel, file to fit.
Happy Motoring
Bob Nogueira 64 Plus 4 Roadster, 62 Plus 4 DHC 4 July 1996
Return to the Index of Tech. articles