More Misc Topics
 1133 Chatmoss Dr., Va. Beach, Va. 23464; (757) 495-8229
Originally Written: Circa 1996
Last update: June 21, 2009 - Reformated page
Safety
So far I haven't talked much about safety. However, let me start
this article with a plea and some horror stories.
First the plea. When working on the Morgan, at times it is quite helpful to get the car in the air. There are two ways for most of us to get a car in the air: either drive it up a set of ramps or jack it up. A floor jack, is almost impossible to live without when playing with cars. Never, never use a bumper or scissors jack for anything but an emergency, like changing tires on the road. Even then, be very careful.
|
Don't waste your money on anything less than 2 1/2 ton floor jack. These can be
found on sale for under $100. Ramps can also very be handy. You want the
ramps to support more weight than you will put on them. If the ramps do not
have reinforcing bars tying the back vertical legs to the sides of the ramps,
install them. These will help keep the ramps from collapsing.
Now that the car is in the air, no matter how small or quick the job is, set the car down on jack stands and the jack. To get a car completely off the ground will require 2 pairs of jackstands. Please, please purchase GOOD quality heavy-duty jackstands (3 tons) which can be purchased for under $20. While 6000 pounds may be overkill for the 1400 pound Morgan, these will work for other cars that might find their way into your garage.
|
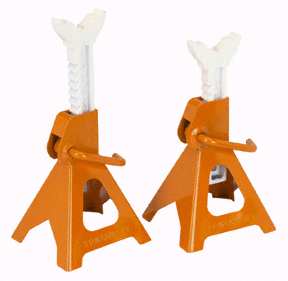 Jack Stands |
At Christmas of 1991, a friend of ours was working on his car with his son-in-law. They jacked the car up and set several cinder blocks at each corner. While the son-in-law was under the car, the cinderblocks crumbled and he was crushed. When they got the car off of him, he was still alive. After several weeks in the hospital in a coma, he passed away leaving a young pregnant wife.
So, if you haven't had your own religious experience yet, keep it
that way! Use your head, and think safety first. Then use the floor jack
and jack stands.
Installing the interior rubber matting
When I installed the ribbed rubber matting in the car, I decided to
try something different. The firewall is covered with screws coming
through it and I didn't want these screws to puncture the rubber matting.
Since I had some jute left over, I covered the back of the rubber mats with
it. The jute was held to the mats with contact cement.
I also didn't want to glue the rubber mats directly to the fire wall. So instead I glued some pieces of VELCRO to the firewall and to the rubber mats. This way I can remove the mats whenever I desire without having to mess with the glue.
Besure to read Interior FAQ for more info on the interior.
Better visibility in a 4/4
Most car clubs will let you make modifications for "safety" without
penalty in a concourse. Here are 2 mods that I think are really worth
while.
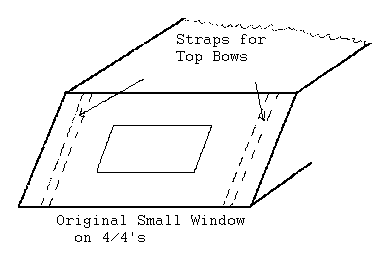 First, for owners of 4/4s Series II - V. Is your top (hood)
original? If so, you have a small rear window which really reduces rear
and side visibility. I suggest modifying the top, similar to the +4`s.
This means enlarging the rear window both vertically and horizontally. Use
the strap that holds the top stays together as a guide.
First, for owners of 4/4s Series II - V. Is your top (hood)
original? If so, you have a small rear window which really reduces rear
and side visibility. I suggest modifying the top, similar to the +4`s.
This means enlarging the rear window both vertically and horizontally. Use
the strap that holds the top stays together as a guide.
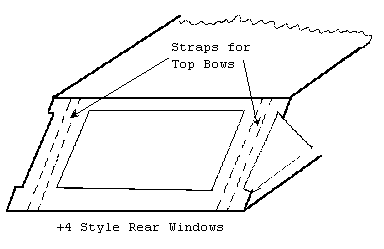 I had my rear window enlarged to 24" x 9", and had side windows installed.
These windows are triangular in shape, are below the rear most top stay
and also come to within about 1" of the outside of the stay straps.
Any good auto upholstery shop can do this for you inexpensively.
I had my rear window enlarged to 24" x 9", and had side windows installed.
These windows are triangular in shape, are below the rear most top stay
and also come to within about 1" of the outside of the stay straps.
Any good auto upholstery shop can do this for you inexpensively.
The second one deals with rear view mirrors. Back in the '60s, most sports cars came with very small (about 2 1/2 x 1 1/2 inches) rear view mirrors that screwed to the dash board, if they had one at all. My Morgan didn't have one at all. I purchased an 8" mirror with a suction cup that attached to the windshield. However, this was always falling off and spent more time in the glove box than on the windshield. In the '70s, the American cars started gluing mirrors to the windshield. Now you can get an 8" mirror that glues to the windshield for under $20. This is a worthwhile investment.
Increase the life expectancy of the brake fluid reservoir
As a rule I hate chrome. It is a pain to keep it clean and
sparkling. However, there is one part that should have been required to be
chromed: the brake fluid reservoir. These "orange juice" cans are very
expensive now, about $65 (circa 1993). Unfortunately they come painted and
brake fluid is a pretty good paint remover. When I purchased my car in '68,
the paint was peeling off the reservoir and the reservoir was starting to rust. I
had it chrome plated and I'm still using the original one on my car today.
The brake fluid will not eat the chrome off the reservoir. Consequently, it will look great for years to come. Another option is to paint it with POR-15 paint.
Fitting the top and tonneau
If you are restoring your car do not be in a hurry to install the
lift-a-dots or the twist fasteners that hold the top (hood) or tonneau to
the body.
The rationale is that when restoring the car, the car may be a fraction of an inch shorter, longer, wider, or narrower. In any event, the original locations for the fittings will probably be off. Once the car is finished, install the lift-a-dot studs on the dashboard. Attach the tonneau to them and lay the tonneau back across the car. Using the eyelet�s on the tonneau as a pattern, mark the locations for the fasteners. Now you can set the top in place and check to see that the eyelet�s align with the marks from the tonneau. Then mount the fasteners!
If you are ordering a new top or tonneau, see if you can get it without the eyelet�s installed. How is the manufacture going to know where the eyelet�s are to be install? When the item(s) arrive, let a local upholstery shop install them or simply let the upholstery shop make the top and or tonneau.
More about the windshield wiper motor
The second article I wrote was about rebuilding the windshield
wiper motor. Well, here is an update.
I rebuilt the windshield wiper motor about 2 years ago and it worked on the work bench. However, when we put it on the car and tried to start it, it blew the fuse! So Saturday, the day after the show, I started to work on it. I took it off the car and put it on the bench. It worked fine! Back on the car it went. Tried it again and still didn't work. Finally found the wiper switch was bad. Luckily there was another set of contacts on the switch that worked. But I still didn't have a good ground. Fixed that problem and it worked. I put the blades on and tried it again. The blades slammed down on the cowl. Now it appeared that the motor was going in the wrong direction. Took it off the car again and put it on the bench. I have another wiper motor so I opened it up and hooked it up to a power supply. It turned OK. Tried reversing the polarity and it still turned in the same direction. So I tried the good motor. It turned in the same direction. Well nothing wrong with the motor. So I put it back on the car. The only thing left I could think of was the wiper transmissions were on upside down. So I spent the next couple of hours trying to turn them over. That didn't work. They would bind on the wood framing for the dash. So I had to turn them back over. Now I was really puzzled and mad. I was ready to get a gun and put the poor thing out of its misery. To make a long story short, the problem was that the park switch was adjusted to turn the wipers off when they were vertical on the windshield. After trying a few different spots for the park switch it worked! Success!!!.
Headlight alignment
Most of us have taken a car for state inspection and been told that
our headlights were out of alignment. We then had the inspector adjust
them for us, only to find them point to anywhere except down the road!
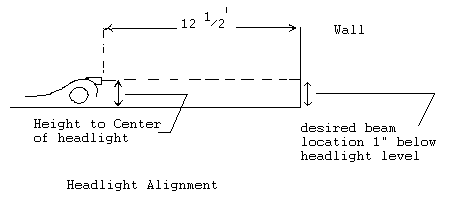
Adjusting the headlights is a very simple task. All that is needed is a screwdriver, a ruler and a clean wall in front of the car. Don't have a wall without a tool box or work bench in front of it? Try using your garage door. Back the car away from the wall about 12 1/2 feet. Try to have the front of the car as square (perpendicular) to the wall as possible. Measure the distance from the center of the headlight to the ground. Following a straight line from the headlights to the wall, mark a line on the wall the same height as the center of the headlights. (I used a couple of pieces of masking tape so as not to mess up the paint on the garage door.) Turn the headlights on to their low beams. The brightest (center) of the beam should be about 1 inch below the marks on the wall. If not, the headlights must be adjusted.
Start by removing the chrome decorative ring. This will reveal 2 adjusting screws. One will be on the side of the headlight and the other will be either above or below the headlight. Turn the screws to bring the light beam to the desired spot on the wall.
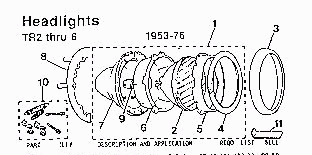 Compliments of Victoria British |
As I was getting my car ready for state inspection I knew I'd have to adjust the headlights. I was using my electric screwdriver to turn the adjusting screws and was very surprised when the headlights did not move. The culprit was the nut and the cap that holds the nut to the headlight frame. The cap had become loose over the years and the nut was allowed to turn inside the cap. To fix the problem I had to remove the headlight assembly as the cap is on the back of the headlight body. First I sprayed the adjuster bolts with WD-40 to help free them from the nuts and break up the rust. |
Cleaning chassis and other metal parts
When I was restoring my Morgan, I didn't have a sandblast cabinet or a pressure
plaster. So I was at a loss trying to clean metal parts. Then a friend showed
me what he used to clean large metal parts such the chassis, front suspension,
rear end, etc.
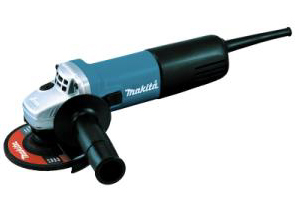 Angle Grinder |
It is a 4" disc grinder. First remove the heavy grease and dirt with a scrapper. Then clean the parts in Varasol, rinse them off with water and dry the parts. To remove any remaining paint or rust, replace the cutting discs with a high speed
knotted wire wheel or cupped brush. These grinders turn up to about 12000
rpms and really do a good job. They run between $40 and $80. I have since purchased
several, a couple being Makita units. You will want to get a "knotted wire wheel" for the grinder for cleaning parts.
|
A safety note. Spinning at 10,000 rpm and the heave knotted wire wheel, they will eat through flesh like nothing! I have the scars to prove it. So be sure to wear leather gloves, eye protection, and hearing protection when using one.
Another item to help get dirt and grease off parts, if you haven't thought of it yet, is waterless hand cleaner. I've been using the Orange GOJO. It does a pretty good job on your hands, so why shouldn't it do a good job on parts?
Painting chassis and other metal parts
My pen-pal, Dale Barry in Ca., told me about a paint that is good
for chassis, suspensions, or any part that is very susceptible to rust or
where the paint might get chipped. Then I've talked to several local
restoration shops and they say they also use the paint. It is
POR-15 Paint. It contains
a rust converter and dries very hard; in fact it is almost impossible to
chip or scratch it. The only problem with it is the cost - $25 a quart!
My dad and I decided to used it on the chassis and underpinnings of his '47 TR 1800 and have this warning. It is NOT suited for a finished surface. It appears to "outgas" as it dries and leaves minute bubbles which causes a rough surface finish. Others I've mentioned this to have not had this problem. Therefore, give it a test run on areas that are not visible such as the underside of the firewall and the inside of the quarter panels. It is also Ultra Violet sensative and will turn/fade to a whitish color if exposed to UV. So you will need to top coat it if the part is visable and or exposed to UV.
POR also make a clear top coat. I'm toying with the idea of putting this over the paint on the underside of fenders. Hopefully this will reduce the number of chips from pebbles, etc. For a catalogue check their web site.
In addition to POR-15, the Eastwood Company sells a similar paint product called Corroless for about the same price.
Has anyone used these products? If so, I'd like to hear about your results.
A shinny exhaust manifold
While on Christmas vacation, my dad and I went to a local hod rod
shop to see what they could do in the way of finishing the exhaust manifold
of his TR 1800. They have something called "hot flash" or "jet hot". This is
a coating that makes the manifold look like polished aluminum or stainless steel.
It is rather expensive, about $100 (circa 1993) just to plate the manifold.
You will have to grind the entire surface smooth or have this done at extra expense. To smooth the manifold, we used a large disk grinder to get most of the area smooth. Then we used some sanding drums (purchased from the speed shop). Unlike most sanding drums that fit over a rubber wheel, these drums are made by taking a long strip of sandpaper and rolling it into a drum. Therefore, as they clog and wear, they loose the outer layer and new sandpaper is brought to the surface. They sell for about $.50 each. In addition, there is a special 1/4" mandrel that is used which costs about $7. These sanding drums can be used in an air or electric die grinder, anything that has a 1/4" chuck, even an electric drill. However, the faster the tool turns the faster and easier the job is.
Keeping paper work clean
Have you wanted to take a copy of the wiring diagram, the vacuum
diagrams for these newer cars, etc. out to the garage? If you're like me,
you don't really want to even though it might make the job easier. Why
not? Because you'll get grease all over it, spill something on it or it'll
get torn. Right?
I purchased some of the plastic sheet protectors from a local buying club (100 protectors for $5). Now when I find an article I want to keep, I copy it then put it in the sheet protector and then file it in a 3-ring binder. I have 3 binders for the Morgan. The first contains correspondence to and from pen-pals, filed alphabetical and then chronologically. This way, I can refer to the letters whenever I need to for some information that I have either forgotten or overlooked. The second binder holds all articles and technical information. Then a third binder houses the receipts, pictures of the tear down and reassemble (for posterity and insurance purposes), and a log of the hours worked on the car.
Some of my old shop manuals have started coming loose from the bindings. So I've even started putting them in these sheet protectors. Pull all the pages out, protect them, and place them in a 3-ring binder. The only problem I've found with this technique is that I'm going broke buying 3-ring binders!
A thought on replacement tie rod ends
The tie rod ends for a Morgan are getting pretty expensive - $40 US
each. Unfortunately, I haven't been able to cross reference them to any
other car so I was stuck paying a bundle for them. Has anyone thought
about using a different tie rod end? While I was cleaning up the front
suspension of my car I decided to get new tie rod ends. I spent many days
trying to cross the tie rods to another car, to no avail. Then I
remembered the 3 TR3s I had had when I was 18. Their tie rods were quite
similar in appearance to those used on the Morgans (both have a male end
that fits to the tie rods). After several phone calls to some local TR3
owners, I found someone that had an old set of tie rods and made
arrangements to see them. It appears that they have the same taper on the
ball joint, but the threads on the male end are different. It might be
worth making two new bars for the steering linkage and using the cheaper
TR3 tie rods ends. The TR3's tie rods are about have the price of the Morgan
ones.
Has anyone found a tie rod from a domestic car that we can use? Even if you have to use a female tie rod end, making the new tie rods shouldn't be too much of a problem.
Word processing
As anyone can tell, I have a "word processor". Actually I use an
antique computer, a Radio Shack Model 3 that I bought back in about 1980.
(This was written circa 1992.) For anyone not owning a computer for word
processing, you don't have to spend big bucks.
By now (2009) I think almost everyone has a computer. If you don't, how are you
reading this on the web. :)
I keep all of my outgoing correspondence filed on disk and I file a hardcopy in my correspondence binder. Regardless of the type of computer you are using, the problem with keeping the correspondence on disk is coming up with names that indicate what the letter or article is about. To overcome this, I name all my letters sequentially. For example, all correspondence dealing with the Morgan is named MORGxxx, where xxx is a sequential number from 001 up. Each different subject gets a different name. Articles are named ARTxxx.
How do I remember what was said in a letter without anything but a number to go by? Easily, I creating another word processor file called DIRECT. Now the pertinent information about a letter, name - MORGxxx, date, addressee, and several sentences about it contents, is maintained in this DIRECT file. The DIRECT file also contains the name of the next available number for storage. The following is an extract from my DIRECT file.
Filename DIRECT/SCR                  Next:  MORG103

This is a directory of the letters pertaining to my 1965 Morgan and the
1989 restoration.

ART14     Wiring Harness

ART15     More Misc. topics

     or for letters

MORG092   John Doe, 7871 Someplace Rd., Nowhere Ca.  90045.
6 Oct 92  Response to his letter of 29 Sept. 92. polishing
          parts, hot wiring a car, compendium of tech
          articles from the SoCal club, putting the wood back
          together, Lucas shop manual, list of car clubs and
          article about rust

MORG093   Mr. M.O.G. Owner, 150 His Garage St., Hometown  Conn. 06232
11 Oct 92 Nice seeing him and wife at the Nationals and brought him up
          to date on what was going on around here.
By calling this DIRECT file into the word processor I can scan the topics or see when I last wrote someone.
Update: On Jan 17,1994 I moved up to the MS-DOS world. I still us this direct file with the word processor.
I hope some of the above items will be of help
Enjoy your Morgan.
John
Return to the Index of Tech. articles
To email me with comments or questions.