 1133 Chatmoss Dr., Va. Beach, Va. 23464; (757) 495-8229
Originally written: circa 1990
Last update:
June 8, 2009 - Reformatted page & fixed email address
The Calipers
To rebuild the calipers they must be removed from the car. Jack up
the car, and remove the wheel. Remove the flexible brake line from the
caliper and let the fluid drain into a pan. Cut and remove the safety wire
from the two bolts that hold the caliper to the axle assembly and remove
the calipers.
To remove the brake pads, using a pair of long nose pliers, pull
the two pin clips that hold the retaining pins and pull the retaining pins.
(If the pins don't want to come out easily, use a drift and tap them out a
little.
 If the piston dust covers have deteriorated they may be torn off.
To remove the pistons from the caliper, start by using compressed air at 10
psi. Insert a small piece of wood (I used a couple of wooden paint
stirring sticks) between the two pistons, to protect them if they fly out
of the caliper. Using a blow down nozzle, carefully blow air into the hole
where the brake line was connected. If the pistons don't move towards each
other, spray some WD-40 around the piston and into the brake line hole.
Again blow some compressed air into the brake line hole. If
neither piston moves, increase the air pressure to about 20psi and try
again. Usually one piston will start to move before the other one. When
this happens, use a 4 inch "C" clamp to hold the piece of wood to the
piston that is moving. This will transfer the force of the air pressure to
the other piston. Keep another paint stick between the unclamped piston
and the "C" clamp. If the piston doesn't move, soak the piston with some
more WD-40 and repeat. For pistons that are really stuck, you might want
to let them sit over night and try the next day. As a last resort, try
increasing the air pressure again. I never had to go over 20 psi on any of
my hydraulics. As soon as the unclamped piston starts to move, be very
careful. Add air pressure, then remove the blow down nozzle (to relieve
the air pressure) to slowly let the piston move out of its cylinder.
Remove the "C" clamp from the one piston and place it on the other and
repeat this procedure until the pistons are extended about 1/2 to 3/4 of an
inch out of the caliper.
If the piston dust covers have deteriorated they may be torn off.
To remove the pistons from the caliper, start by using compressed air at 10
psi. Insert a small piece of wood (I used a couple of wooden paint
stirring sticks) between the two pistons, to protect them if they fly out
of the caliper. Using a blow down nozzle, carefully blow air into the hole
where the brake line was connected. If the pistons don't move towards each
other, spray some WD-40 around the piston and into the brake line hole.
Again blow some compressed air into the brake line hole. If
neither piston moves, increase the air pressure to about 20psi and try
again. Usually one piston will start to move before the other one. When
this happens, use a 4 inch "C" clamp to hold the piece of wood to the
piston that is moving. This will transfer the force of the air pressure to
the other piston. Keep another paint stick between the unclamped piston
and the "C" clamp. If the piston doesn't move, soak the piston with some
more WD-40 and repeat. For pistons that are really stuck, you might want
to let them sit over night and try the next day. As a last resort, try
increasing the air pressure again. I never had to go over 20 psi on any of
my hydraulics. As soon as the unclamped piston starts to move, be very
careful. Add air pressure, then remove the blow down nozzle (to relieve
the air pressure) to slowly let the piston move out of its cylinder.
Remove the "C" clamp from the one piston and place it on the other and
repeat this procedure until the pistons are extended about 1/2 to 3/4 of an
inch out of the caliper.
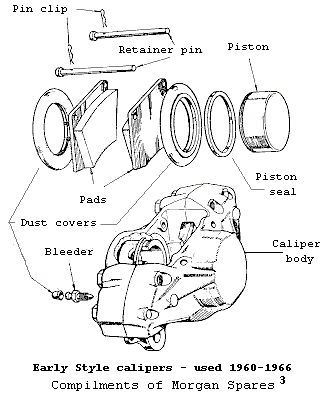
There are two different calipers used on the Morgans, one was fitted until 1966 and the other from 1966 on. Both types of calipers are "split", two halves that are bolted together. The pre 66 caliper should be a type 14. The pistons in these calipers have a small groove cut in them to hold the dust cover. If the dust cover has been cut off, the pistons can be pried out of the caliper with 2 screwdrivers. Working from the lip (that keeps the brake pads from falling out the front of the caliper) carefully place a screwdriver on each side of the piston. Gently press on both screwdrivers and the piston should come out. Repeat this for the other piston. Set the pistons on a piece of paper and indicate which side of the caliper each piston came from.
The 66 and later calipers do not have this groove cut in the
pistons. Instead, the end that sticks out of the piston is cut in just a
little and there is a spring clip that holds the dust cover to the piston.
The spring clip can be pried off using a small screwdriver and the dust
cover can be slid down the piston or torn off. To get these pistons the
rest of the way out, I would suggest the same procedure as above to get
them moving. When they are both almost out, use a pair of long nose vise
grips to clamp on the lip and pull outwards while twisting the piston.
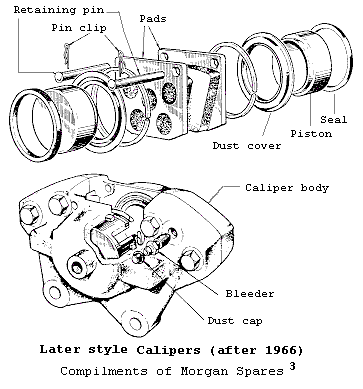
After the pistons are out, the dust cover or what remains of it can be removed. There is a little groove in the cylinder that the bottom edge of the dust cover fits into. Place your thumb and index finger on the cover and push towards the other side of the caliper. This will unseat the cover and then it can be worked out of its seat. To remove the ring seal, I used a small screwdriver to get under the bottom of the seal. Slide the screwdriver around the bottom of the ring to break any seal holding it in place. Then you can pry it out of its seat. Once you have it started, grab it with your fingers and pull it the rest of the way out.
The caliper and pistons should be cleaned and degreased. Here comes the dilemma. To hone the piston bores, the calipers must be taken apart. There is a small rubber seal between the two halves (see parts information below). If you plan to separate the calipers, be sure to have some of these seals handy. However, most books and even Lucas say do not take them apart. If you don't take them apart, you can use some 400 to 600 grit wet and dry sandpaper to clean the cylinders.
Once all the parts have been cleaned, reassembly is simple but can be time consuming. I did not separate either of my calipers and spent about 2 hours trying to find the key to replacing the seal, piston and dust cover. After I got the first side rebuilt, the second piston took about 15 minutes, the third took about 20 minutes and the fourth about 10 minutes. I would imagine that it would be easier to replace the seals, pistons and dust covers if the calipers were apart.
Here is what I found that works. First, place the new rubber parts in pan of clean brake fluid. Now choose a piston, and ensure that it fits in the cylinder. If it doesn't, try the piston in the other cylinder. You want to make sure that the pistons will fit into the cylinders before you start. Next take one of the sealing rings and start seating it in its groove in the cylinder. Lubricate the seal and the cylinder wall by sticking your finger in the pan of clean brake fluid and then wiping it all around the caliper cylinder. Now comes the real challenge, how to get the dust cover and piston in the cylinder. Start by working the bottom (inner) lip of the dust cover into its seat. As you work your way around the piston, you will have to pinch the dust cover to keep the lip extended. Once the dust cover appears to be in the grove, insert a finger in the cylinder and feel all around to ensure the dust cover is seated. Wipe off any excess brake fluid from the top of the dust cover to allow you to grip it. Lubricate the piston by wiping it with clean brake fluid. Set the piston on the dust cover. The next thing that you have to do is to get the dust cover up and on the piston. The top hole, on the dust cover, is slightly smaller than the piston. So you will have to work the dust cover out from under the piston and up onto the side wall of the piston. I found that if I started working at the front of the caliper (there is a lip to keep the pads from falling out that side) I had the best luck. Also trying to get the last part of the dust cover up and on the piston was easier if I had the extra room afforded by the back of the caliper (where the pads are inserted and pined). With one finger holding the piston in place, very carefully, insert a small screwdriver under the piston and try to pry the dust cover out from under the piston. Now hold that spot on the piston while working the screwdriver around the piston. Usually, I got the dust cover on 1/3 of the piston from either side of my finger. To get the final 1/3 of the cover from under the piston, I would work it with my fingers, gently pulling it outwards. Once the dust cover is completely on the piston, the piston must be inserted into the cylinder. To accomplish this, I placed a stir stick across the top of the piston, and used a 4 inch "C" clamp to try to center the piston. Slowly, screw the "C" clamp to push the piston into the cylinder. If you get a great deal of resistance, the stir stick will bow. This means that the piston is: not centered, hanging on the inner lip of the dust cover or hanging on the ring seal. If your lucky, the piston will slide in. If not you, will have to unscrew the "C" clamp, and wiggle the piston a little to try and center it. Try screwing the "C" clamp again. If it still will not go, you may have to remove the piston and check the dust cover and seal. Guess what? You get to practice getting the dust cover on the piston again! And so it goes, until both pistons are in each of the 2 calipers.
I have heard stories of people that could not get the pistons back into the calipers. These people placed the pistons in the freezer over night to shrink them. The next morning, they expanded the calipers by boiling them. Finally, they assembled the caliper. I don't believe the pistons are supposed to be that tight of a fit. I think their problem was, they didn't get the piston square in the cylinder. Consequently, the piston jammed.
One last item. If you are rebuilding the entire brake system at
one time, not just replacing the rear shoes, etc., be sure to clean out the
brake lines. To clean them, I poured rubbing alcohol through the lines.
Then I blew air through the lines at about 40 psi. Finally, the brakes
must be bled to remove the air.
Closing
In closing, the only real problem I had after installing the hydraulics
was trying to bleed the brakes. I opened a rear wheel cylinder to vent the
air and allow the brake fluid to fill the lines to the back of the car. It
seemed to work, but those lines were taking a lot a fluid. I finally
noticed the coupling between the rear flex line and the main line from the
distribution block was leaking. Quickly, I tightened this joint and cleaned
up the fluid. (However, I will have to remove the brace for the battery
tray and repaint it, and sand and touch up the chassis where the fluid
removed the paint.) I tightened the rear bleeder, and opened one on a
caliper. I pumped the brake pedal several times, but nothing came out the
bleeder. I drained the reservoir, pulled the brake lines, and blew them
out again. Nothing unusual. I reconnected all the brake lines, and blew
air into the hydraulic line that comes from the master cylinder to the
distribution block. The pads on the calipers started to slide. Great! So
reattach the master cylinder and reservoir. Try it again, press on the
brake pedal, nothing. I finally removed the master cylinder and took it
apart again. The only thing I noticed was I hadn't really cleaned the
spacer. There was some grime on it. Speculation: either this dirt was
keeping the valve from moving in the spacer, or when I reassembled it, the
collar on the valve was not aligned with the hole in the spacer. Any way,
when I reinstalled the master cylinder, all worked well.
For more information on parts see my parts cross-reference list in another article.
Enjoy your Morgan
John
Post Scripts
Addendum1 - Update on Caliper Rebuild kits
Addendum2 - Update on Rear Wheel Cylinders
Addendum3 - Another technique for installing Caliper/piston dust covers
Addendum4 - Spirited Driving and Brake Fading
Bibliography
1. Morgan AutoBook One, written by R. Clarke, published by Autopress
LTD, Bennett Road, Brighton BN2 5JG, England (1968), pages 123, 127 & 128
2. Ford Cortina 1967-1968 AutoBook One, written by Philip H. Smith, published by Autopress LTD, Bennett Road, Brighton BN2 5JG, England
Artwork
3. Exploded drawings copyrighted by of Bob Couch [of Morgan Spares, 225 Simons Rd; Ancram, Ny 12502; (888) 345-MOGS (6647) Orders] and not to be used with out permission.
4. Some drawings of the brakes, and master cylinder are courtesy of AutoBook.
Addendum 1 - Update on Caliper Rebuild kits
I have heard from several sources that brake calipers - Girling 14 (RH
64325237) - are no longer available, and the rebuild kits are very
expensive. I paid about $40 for a rebuild kit (over a year ago) for the
calipers on my Morgan. Recently around July 1991, I heard that the kits
were going for around $100. Over the last year, I have been trying to find
alternative sources for the brake parts.
I have written about a dozen letters to various companies looking for information on other cars that used the same calipers as the Morgan. So far, I have received an unconfirmed statement that the Lotus Cortina used the same caliper. (However, this car is at least as obscure, if not more so, than the Morgans.)
About a week ago (around 9/3/91) I received a reply from a company in Maryland in regards to the caliper rebuild kits.
Healey Surgeons Inc.
7211 Carroll Ave.
Takoma Park, Md. 20912
(301) 270-8811
is a distributor for Brake and Clutch Industries Australia Pty Ldt (PBR) who makes a rebuild kit for the calipers. The PBR number is K392S. Healey Surgeons sells it as HYD 017 for $30 per kit (a kit does both calipers) and pistons are $32 each (no part number supplied).
Today (9/11/91) I received a phone call from a company in California:
Moss Motors
P.O. Box 847
Goleta, Ca. 93116
(800) 235-6954
The assistant manager "Carlos" informed me he was unable to cross reference the caliper numbers I gave him. However, he did manage to find a Lucas part number for the caliper kits SP2504; Moss's part number is 513-212. The kit will do one caliper, and sells for $15. He said that he usually stocks these kits.
If anyone is in need of rebuild kits for the calipers, I would suggest trying either of these companies.
If anyone has any other information on the wheel cylinders and calipers on any of the Morgans, please drop me a line as I'm compiling a list of this type of information. I'm also looking for sources of Cortina engine and transmission parts.
On March 2, 1998, I received some email from Gil Grimm
I did some research in the Moss Motors Healy parts book, results.Indicating that he found the following parts cross reference information for the 60's vintage Morgan Disk brakes:
Caliper Rebuild Kit: # 513-212
Stainless Caliper Pistons: - # 021-176
Chrome Caliper Pistons: - # 021-163
GHP1 hose
Addendum 2 - Update on Rear Wheel Cylinders
Today (12/5/91) I received a letter from Fred Sessons
(and an excerpt from his book "Bedside Reader" )
about my article on the rear brake cylinders. (Based on this information, I can
only assume that the previous owner had replaced my wheel cylinders with ones
from a TR6.) The following is the quote from his book about the TR6 wheel
cylinders.
My +4, and I assume most, uses 7/8" piston. The TR unit uses a
3/4" piston. (the newest replacements for the TR's are metric .7"...
smaller yet.
Now 1/8" difference doesn't seem like much but in the brake
world... it is. Using the 3/4" cylinders will greatly reduce the braking
power of you rear wheels. What you end up with is extreme front brake
bias. You can drive it OK, and maybe get by, but, it is dangerous!!
The increased front bias means that the front wheels will skid
first under hard braking. In the wet, in a corner... you'll swap ends so
fast they you won't believe it. Good way to die.
As the old saying goes... bite the bullet. Have your old units
re-sleeved or by new. Don't substitute unless you know for sure that it is
proper. Just because it looks identical on the outside and fits, doesn't
make it a "replacement". Brakes ain't playthings..."
From: Art Hart
I used a different assembly technique for installing the pistons and dust
boot than you did and the whole job, all four pistons, only took me 10
minutes. What I did was to pull the boot up over the closed end of the
piston so that the end of the boot that goes into the piston groove is
just on the closed end by about 1/4" and the end that goes in the bore
is hanging out in the open just below the closed end. Then I lowered
the piston and boot into the bore of the housing and found that with a
little wiggling the boot finds its way into the groove in the bore all
by itself. The groove and the boot are well lubricated with silicone
brake fluid during this. Then I pushed the piston slowly into the bore
until the other end of the boot has just entered the piston groove.
Then using the wooden handle end of a small artist's brush I rubbed the
edge of the boot into the groove to be sure it was seated. The piston
should be almost bottomed in the bore at this point. All four pistons
were assembled this way with only one try for each.
If any of this is of some interest and you want to use it on your web
page, feel free to do so.
Addendum 4 - Spirited Driving and Brake Fading
From: DGreimel@aol.com
Hi again. I’ve been reading this stuff for hours and would like to contribute an
experience regarding brakes. In 1962 I purchased a spanking new +4ss (4958) and
proceeded to race it in SCCA C Production. After a quick chicane (ie, entering
the hairpin at Marlboro) the brakes required three pumps to get them to work
again. After scratching my head (and a few other body parts) for three months
I had the spindles hardness tested. They provided NO reading an a brinell
test. Six 1992 dollars worth of heat treating cured the brake problem. The
spindles had been flexing so much that the rotors pushed the pads back into
the calipers! No doubt others have discovered this problem too but I did not
see any mention of it.
Return to the Index of Tech. articles
To email me with comments or
questions.
The rear wheel cylinders on my Morgan had been replaced with ones
from a TR6. Therefore, I thought that the TR6 cylinders were correct.
"You may be tempted to use TR6 rear wheel cylinders in place of the
original (read expensive) Morgan wheel cylinders. The TR6 units look
identical. They probably are not. Check closely!
While talking with Fred about reprinting the above quote we discussed the
rear brake drums. He indicated that the Z cars drums will work on most
Morgans from 1955 on. (He has them on his 55.)
Enjoy your Morgan
John
Addendum 3 - Another technique for installing Caliper/piston dust covers
Date: Sun, 10 Jan 1999 06:48:46 EST
To: jblair@exis.net
Subject: MOG brakes