 1133 Chatmoss Dr., Va. Beach, Va. 23464; (757) 495-8229
Originally written: circa 1996
Last update: June 13, 2009 - Reformatted page
Front Wheel Vibration or shimmy is a very common
complaints by Morgan owners. Identifying which of the various
front suspension components is causing these vibrations can be very
frustrating. To try to ease some of this frustration, I will talk
you through the steps of isolating and fixing the problem.
Tires and Rims
The first and easiest check is tire pressure. It should be 16
to 18 pounds normally and add 6 pounds for high speeds driving.
However, most of us start off at about 25 pounds.
Next comes the possibility that a tire or rim is "out of round". This condition is more prevalent in the cars fitted with wire wheels but if a disk wheel has had a brush with a curb, it too can be warped.
The procedure to check the tires and wheels is similar and simple. Jack up far enough to get the desired wheel off the ground. (Do I have to remind you to use jackstands?)
To check the tire, place brick just in front of the tire. On the brick place a screwdriver (or something) to be used as a pointing device. Slide the pointer towards the tire, until it just touches. Now slowly rotate the wheel. As the tire passes the pointer watch the gap between the pointer and the tire. If there is a "hi" spot the tire will push the pointing back onto the brick. At the low spot on the tire, you will see the widest gap between the tire and the pointer. If this gap is less than 1/8" the tire is OK.
To check the rims, place the brick along side the wheel and
move the pointer so it is perpendicular to the wheel. You want the
pointer to just touch the rim where it rolls in - where the bead seats.
Again spin the wheel and watch for variations in the gap between the
pointer and the rim. If the gap is less that 1/8" the rim is OK.
If the gap is greater than 1/8" the wheel will have to be trued -
especially so for wire wheels. For disk wheels, the wheel is usually
replaced.
Ballancing
With these items checked it's time to head down to the local tire shop
and have your wheels dynamically (spin) balanced. Most shops take the
wheel and tire off the car to balance it. (Note: If you have Wire
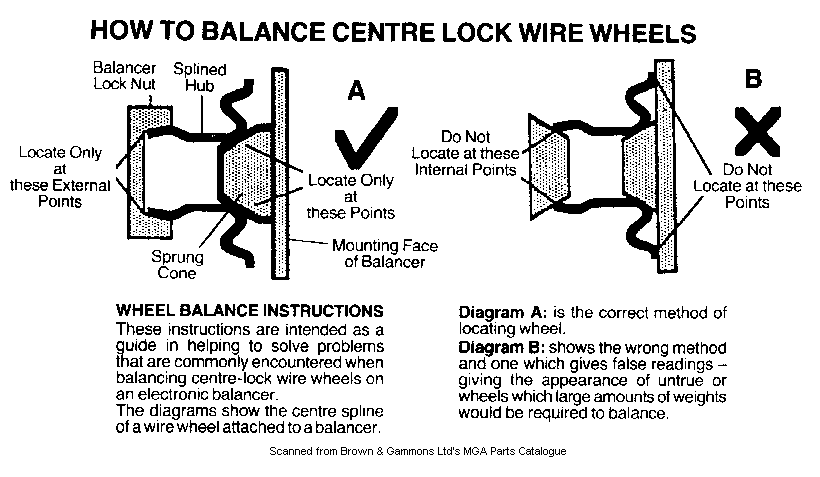
Wheels read the article on
Ballancing wire wheels. It requires a special adapter, so check
with the shop to ensure that they have the adapter.) The advantage here is that the wheel/tire unit can be moved around
to any of the 4 axles and maintain its balance.
Sometimes the suspension components can add to the balancing problems.
To try to balance the entire suspension you will have to find a shop
that can still spin balance the wheels on the car. But this seem to
have passed on to oblivion like so many other things. This method
will give you a better balance at each corner but the wheels and tires
can not be moved. When the tires are rotated, the suspension will have
to be re-balanced.
Front end alignment
The last easy item is to check the front end alignment. All the
shops with their neat whiz bang laser targeted, computer controlled
machines will really love you. Their computer won't have any idea what
to do with you. Here's were you can tell the men from the boys. The
boys don't shave yet and like to push those button on dem dar computen
things. The men on the other hand will usually need a shave, and can't
and don't want to spell dem dar computen things. They like to do it
the old fashioned way, T square, ruler, and a chalk line. Well each to
their own, we only want the job done. One word of caution here, be
sure that you stay with your car.
The only item that is readily adjustable is the toe in. This can be done by the do it yourselfer easily and can be safer then letting a shop do IT to you!
For those Do-it-yourselfers, there is a great article on
aligning the front end.
Front suspension specifications
If you take your car to an alignment shop, be sure to tell them you want
to know the Camber angle, Castor angle and the kingpin inclination.
Don't you tell what the values are supposed to be, let them tell you!
Toe in should be set to 2 degrees (or 1/8-3/16") of toe in..
Camber angle should be 2 degrees positive camber (the top of the tires slant outward like this "\ /") for all 4/4 Series II through Vs and +4s with the TR engines. I don't have any information on the post 60 vintage model 4/4s, +4s or +8s.
Castor angle should be 4 degrees for all 4/4 Series II through Vs and +4s with the TR engines.
Kingpin inclination should be 2 degrees for all 4/4 Series II through Vs and +4s with the TR engines.
These last 3 items are fixed by the design and assembly of the front suspension. While it is conceivable that they can be adjusted it is done with brute force. So stop and think about it before changing any of these settings unless the car has just been in an accident. (I would be remiss if I did not point out at this time that there is a "modification to the front suspension call a "negative camber" mod. This will change the tire stance from " \ /" to "/ \" ). However, this modification will take a little work and there is some discussion as to its applicability for street use. Fred Sisson as a nice write up about it in his book.
If none of the above has helped solve the front end vibrations, you
will have to come face to face with the mystique of the Morgan
front end.
Sliding Pillar
Most Morgan owners know about the "Sliding Pillar" designed by HFS Morgan
back in the early 1900s and that it is still used to day. This is just
one of the items that makes this car near and dear to us.
There are 3 unique items to the Morgan suspension: the bushings, the dampener blades and the one-shot oilier. Replacing the bushings will require the rebuilding of the front end. (See the article by John T. Blair - Rebuilding the Front End - here on the Morgan Web page.) The dampener blades can replaced with out totally disassembling the front suspension and the oilier doesn't really contribute to our problems.
Bob Nogueira's explanation of how the front end design can cause the front wheels to wobble and how the dampener blades help correct it is one of the best I've seen.
"The damper blades were not fitted to three wheelers I believe because the large wheels, light weight, and low speeds did not result in front wheel shimmy.As the spindle moves up the kingpin over a bump, the spring will have a twisting motion, this is relayed to the spindle and results in a slight turning of the wheel. If this occurs at a certain speed. It sets up a harmonic bounce which becomes a violent shimmy. This usually occurs at between 55 and 65 mph. The damper blade is bolted to a bronze plate fitted between the spring and spindle and, via the blade, is held fast to the chassis. Thus the spring can rub on the bronze plate and move but the plate is held still and none of the springs motion is transferred to the spindle. Since the spindle moves up and down the length of the blade can not be fixed. The blade is held to the chassis by being sandwiched between two flat bars so that the blade can move in and out. At each end of the approx. 1" by 4" bars are shims which are the same thickness and material as the blade. These are pressed up to the blade and the bolts hold them tight so the can not move fore or aft.
Both the shims and blade wear since the blade rubs on the shim everytime the wheel moves up or down. To test for wear, grab the blade and push forward and back. If a click or movement can be heard or felt the shims need to be pushed tight against the blades..There should be free movement in and out, from the center line of the car, but no movement otherwise. I check mine every time I grease the car, and adjust the slack out."
Bob Nogueira 19 Jul 1996
Most Morgan owners usually go 25,000 to 30,000 miles between front end
rebuild but some say they've found that 15,000 miles is the point where
the wear will start to cause the infamous shimmy. Other owners claim
to get 50,000 to 90,000 miles to a rebuild (but I think that's pushing
it).
One Shot oilier
Another item unique to the Morgan is the front suspension oilier system.
Most maintenance manuals suggest that the front suspension be given a
shot of oil, from the one-shot pedal, every 100 mi. There is a lot of
controversy over this. Most feel that all this does is to wash the
grease out of the bushings there by causing them to wear prematurely,
and throw oil over the under side of the car. For those with Chrome
wire wheels this keeps the chrome from rusting. Several owners have
replaced the oil lines in the top of the kingpin with a addition grease
fitting. I personally, have left my oilier intact but do not use it.
Steering components
The only remaining part of the front suspension that can contribute to
the vibrations is the steering box and the tie rods.
Borrowing a section from Fred Sisson's book (Notes from a Morgan Garage), he discusses a problem with the tie rods:
"I found a source of play on my +4 steering. It is a simple adjustment to eliminate it. The Pitman arm (on the steering gear box) transfers it's motion to the tie rod (the rod between the front wheels transverse rod) via the drag link. The ball end on the drag link fits into a clamp-on fitting on the tie rod.I noticed that the first motion of the transfer rod would twist the tie rod about 1/8 of a turn before it actually moved the tie rod. The ball tie rod ends allow this rod to twist that much.
By loosening the clamp and rotating it on the tie rod slightly, the twisting motion was eliminated, thus tightening the steering action some.
I've checked a friend's +4 and found the same problem. You might want to check your car too. Just have a friend move the steering wheel while you watch the action of the tie rod. With a little experimenting you will find a position for the clamp that will not twist the tie rod.
Fred Sisson 1992"
The Morgan has had 3 or 4 different steering arrangements. The first 4/4s were similar to that on the Trikes. They simply had a reduction gear mounted on the steering column. This was quickly change and a Burman worm and nut box was installed. This was used up until the +8s when the steering box was changed to a Gemmer box. I'm of the understanding that the factory now uses a rack and pinion system.
Note: This old Burman box is no longer available and has almost no adjustments. As it wears, it will have to be rebuilt. I do not know of any sources for parts nor have I tried to find any. It also has one very serious draw back. It does not collapse. It has the old type single shaft steering column which can impale the driver in a front end collision.
The Burman box has an adjustment for loading the worm. Also check that the bolts on the top of the steering box have not vibrated loose. To check the worm loading, jack up the car and disconnect the Pittman arm (the big heavy steel arm coming from the bottom of the box) from the drag link (cross bar that connects to the tie rod). Carefully turn the steering wheel from lock to lock. There should be just a slight (ever so slight - about 12 in. pounds) increase in the force required to move the steering wheel through center. If not, loosen the locking nut on the screw adjuster located on the top of the steering box. Turn the adjusting screw slightly, tighten the locking nut and retest. Once there is some resistance felt, no further adjustment is required.
I currently have no information on the Gemmer box other than what is
in Fred's book and no information on the rack and pinion system. From
what I've been told by some Morgan owners is that they are replacing
the old Burman steering box with the newer Gemmer box. This will
require some modifications to the steering column which is beyond the
scope of this article. I've been told the Gemmer conversion will cost
about $1,000). The other possibility is to convert to the rack and
pinion system. Again, I have not done this and have no idea what it
entails.
Bye for Now
In closing, I should make a comment about fitting new bushings to the
king pin. Once the old bushings have been removed and the new ones put
in, they will have to be mated. This will require either that you
purchase some special tools or find a machine shop that will do the
work. I had mine done at a machine shop for about $20 per axle. There
are two methods of obtaining this fit. One is to have the reamed,
the other is to have them honed. The consensus of opinion is that the
honing is preferred as a better fit can be attained. Some owners have
gone so far as to have the king pins hardened or chrome plated, and
centerless ground.
I'd like to thank all those that have contributed their ideas and experiences with this problem: Jeremy Edwards, Bill Jouris, Dave McCoy, D. L. Rotman, Lloyd Shields and especially Fred Sisson and his Notes from a Morgan Gargage, Bob Nogueira.
Enjoy your Morgan
John
Return to the Index of Tech. articles
To email me with comments or questions.