Formatted for the Morgan Web page by: John T. Blair (WA4OHZ)
Last update: June 14, 2009 - Reformatted page
 I will not attempt to go into the pros and cons of decambering your Morgan. Suffice
it to say that all of the racers do it, most people recommend it if you use radial
ply tires, and our SNOBMOG is not decambered.
I will not attempt to go into the pros and cons of decambering your Morgan. Suffice
it to say that all of the racers do it, most people recommend it if you use radial
ply tires, and our SNOBMOG is not decambered.
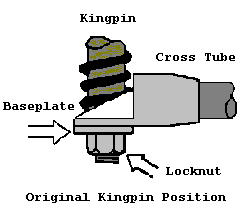
To decamber your Morgan, you must move the bottom of the kingpin outboard with
respect to the top. This can be accomplished in several ways. On the Le Mans cars,
Chris Lawrence had longer bottom tubes made for the cross-axle. The local slalom
crowd has been using "Decamber Plates". This is a replacement baseplate with the
hole for the kingpin moved 3/4" outboard. This is a very simple modification to make
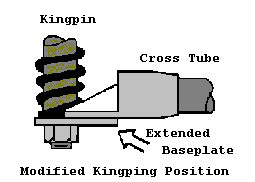 and the only drawback seems to be that a greater strain is put on the two mounting
bolts for the baseplate (because of the greater offset). Grade 5 or better bolts
should be used here and torque them to 20 lbs. feet.
and the only drawback seems to be that a greater strain is put on the two mounting
bolts for the baseplate (because of the greater offset). Grade 5 or better bolts
should be used here and torque them to 20 lbs. feet.
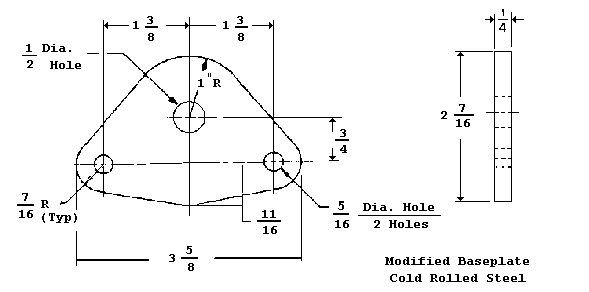
Editor's Note: I would suggest that you manufacture the new baseplate (see drawing)
before starting the following procedure.

The Procedure
- Disassemble the front suspension
Note:
- Described in the November 1982 Format article (write Jerry Willburn if you desire an additional copy. If you are only installing the decamber plate and not replace the kingpins and bushings, disregard steps 1 to 4 of the disassembly instructions.)
- Editor's Note: Also described here the Morgan Web page in Article on "Rebuilding the Front End"
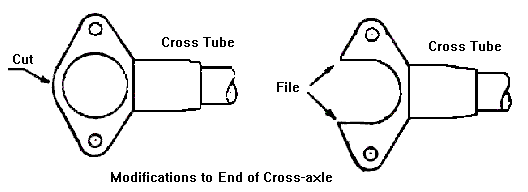
- The end of the cross-axle will have to be modified for the larger offset. If it
has not cracked already over the years, cut away the outer edge of the flange on the
cross-axle as shown.
- Mount the new baseplate to the kingpin and reassemble the suspension. Be sure to
use 5/16" grade 5 or better bolts to hold the baseplate to the cross-axle, and to
torque them to 20 foot lbs.
- The last step is to adjust the toe-in. As you have effectively increased the
distance between the two front wheels, toe in will be excessive unless the track rod
is also lengthened.
Toe-In Measurement
The easiest method that I have found (aside from taking the car to your friendly local alignment shop) for adjusting toe-in is to use a plumb-bob. Any weight, like a nut on the end of a string, will do.- First, jack up the front of the car, spin the front wheels, and mark the
approximate centerline of the tread with a piece of chalk.
- With the wheels pointed straight ahead, drop the plumb-bob from both the front and
rear centerline of each front wheel. Mark the position of the garage floor with a
piece of chalk.
- Now, measure the distance rear to rear, front to front, and the diagonals. As in
the sketch.
- The toe-in is the difference between the front and rear measurements. If the rear distance is greater you have toe-in. If the front measurement is larger, you have toe-out.
- First, jack up the front of the car, spin the front wheels, and mark the
approximate centerline of the tread with a piece of chalk.
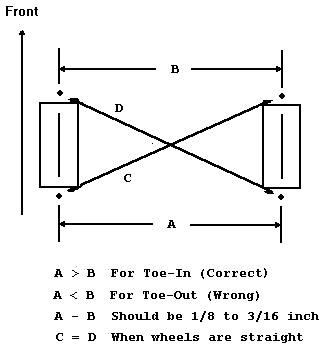 You should have 1/8 to 3/16 inch of toe-in. ie. shorter in the front.
Toe-in Adjustment
- Loosen the stop-nut(s) at the end(s) of the track rods between the front wheels
and also the clamp on the rod from the steering drop-arm to the track rod. Note the
position of the clamp on the track rod.
- Rotate the track rod to lengthen it or to shorten it as required.
Note: If the front has just been decambered, the rod should be too short and will have to be lengthened (about one inch).
- When the toe-in is correct (1/8 to 3/16 inch), tighten the jam-nut(s) on the ends
of the track rod.
- Tighten the clamp on the tie-rod in the same position that it was in before.
Enjoy your Morgan
Return to the Index of Tech. articles
To email me with comments or questions.