Starters and Starter Solenoids
©By: John T. Blair (WA4OHZ)
 1133 Chatmoss Dr., Va. Beach, Va. 23464; (757) 495-8229
Originally written: circa 1994
Last update:
March 12, 2009 - fixed email address
Lucas has 2 basic types of starters:
- The inertial starter
- The pre-engagement starter
The Lucas M418G is used on the +4s with the TR engines. There are 2 types of the M418G, the Eclipse, and the S types. The only visible difference is that the "Eclipse" has a hood over the drive mechanism (Bendix?). The drive mechanism is different for these 2 types of starters. Otherwise, it appears that allot of the parts in the casings are interchangeable, (but not the armatures). Both of these starters also require a remote starter solenoid.
The inertial type get their name, because when the solenoid applies power to the starter and it starts to spin, the inertia (no movement) of the Bendix causes it to slide down the spiral grove cut in the end shaft of the starter. The Bendix finally engage to the fly wheel and starts to turn.
These starters have been around for years and work well, but they have 2 problems:
- They have a tendency to chew up the fly wheel by not fully engaging.
- Sometimes they won't engage. When you try and start the car, the starter just spins up, but the engine will not turn.
This second problem can be caused by a couple of things:
The groves in the starter shaft get dirty, which can keep the Bendix from sliding out and engaging the flywheel. This was a constant aggravation on my '67 Spitfire. To fix it, the starter must be taken off the car and the shaft and grove cleaned with varsol or some other solvent.
Greg Solow has another cause for the problem.
Your starter has a "bonded" rubber drive that connects the drive gear on the starter to the shaft. The rubber inside the coupling comes unbonded from its housing and basically "slips". I have temporarily repaired them by taking them apart and reglueing them together with "superglue" type anaerobic adhesive. This "temporary repair has actually lasted many years. There is a replacement drive available for around $100. 00 that is a good permanent fix. I have seen brain dead electrical rebuilders weld this drive up solid in an attempt to fix it. This doesn't work as the starter needs the cushioning that the rubber provides. Without this cushioning effect, the teeth of the ring gears get sheared off when you try to start the car. Regards, Greg SolowLucas has come out with another starter to over come these problems. This type of starter is called a pre-engagement starter and has the solenoid attached to the starter. When the ignition switch is turned to "start" the solenoid fires. It has a lever attached to the plunger and a fork attached to the Bendix so it pushes the Bendix into position before the starter starts to spin up. These pre-engagement starters are available from Dave Bean Engineering. They bolt right up as did the original starters, but it takes a small modification to the wiring.
Wiring modification for pre-engagement Starter
Most of the Morgans use a Lucas 76446 which is a silver bullet looking thing with a black rubber button on top, mounted on the front of the firewall. The following instructions will allow you to keep this solenoid and add the pre-engagement starter and solenoid.
- Disconnect the ground terminal from the battery!.
- Disconnect the large (power feed) wire going to the original starter and remove the starter (held in place with 2 bolts).
- Bolt the new starter up to the engine.
- Disconnect the power feed cable from the output side of the original starter solenoid and connect it to the input side (where the cable from the battery attaches). This will in effect eliminate the original solenoid from service while still leaving the car looking original. (I purchased a new 24" power feed cable for my installation.)
- Reconnect the free end of the power feed cable to the input side of the new starter solenoid on the starter. (Note: The output side of the solenoid should already have a short heavy wire connecting it to the starter. If not, you will have to add one.)
- Disconnect the ignition lead from the original solenoid on the firewall. If you're lucky it will reach to the new solenoid. If not, you will have to make a short extension. Since there is a clip on connection on the ignition wire already, simply make an extension wire with a flat lug (to connect to the existing clip) on one end and a 1/4" clip on lug on the other end. Plug the flat lug from the extension into the clip lug on the original ignition switch wire. I suggest that this connection be covered with either electrical tape or heat shrink tubing. Connect the free end of this ignition wire to the new solenoid.
The other day, I went to replace the power feed cable, and when I removed the nut from the brass stud, the threads came with it. At this point there are 3 options:
- Try to rebuild the existing set of contacts.
- Get a replacement set of contacts
- Replace the solenoid.
The point I'm trying to make here, is that you can replace the contact set. Dave Bean sells a new set for $15. It is a pretty easy job but will require that you have will a soldering gun (140W is fine), and a solder sucker for removing the old solder. (I recommend the plunger kind. It is sort of an over grown pen looking thing. There is a plunger and a spring inside a tube. Once cocked, when the trigger is pressed, the plunger travels rapidly to the top of the cylinder and creates a vacuum, pulling the molten solder off a connection. These are readily at Radio Shack for about $10.)
To remove the solenoid:
- Disconnect the ground terminal from the battery!.
- Disconnect both of the power leads from the input and output posts on the solenoid,
- Pull the ignition wire from the lug on the solenoid.
- Remove the 2 nuts from the studs on the back of the housing on the starter.
- The solenoid can now be removed from the starter assembly. (Note: The plunger attached to the fork will stay attached to the starter.)
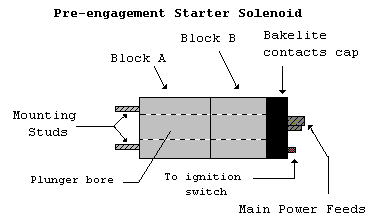
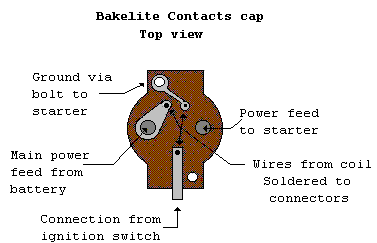
Once the solenoid is removed from the starter, the contacts cap will have to be removed. Start by removing the 2 bolts from the contact cap. The solenoid body block "A" can then be removed, but the coil and the block "B" are still attached by 3 wires soldered to the contacts cap. These 3 connections will have to be unsoldered.
For those not initiated it the realm, you heat the gun until you can
 melt solder on its tip. This is called "tinning" and will help the heat
transfer. Take the solder sucker in one hand and the solder gun in the
other. Carefully touch the hot tip to the part to be unsoldered, once it
melts, move the tip of the solder sucker over the puddle and push the
trigger. It will suck up the solder. When you reset the solder sucker,
some solder might come out - that's OK. If it is sticking out of the end,
simply pull it on out. If the wire is not free from its connection this
process might have to be repeated several times. A word of caution, don't
hold the soldering gun on the wire for a long time, it should only take a
few seconds to melt the solder. If it doesn't, clean the tip of the solder
gun. Take a damp sponge (or cloth) and run it over the tip. Once the old
oxidized solder and rosin have been removed, re-tin the tip and try again.
melt solder on its tip. This is called "tinning" and will help the heat
transfer. Take the solder sucker in one hand and the solder gun in the
other. Carefully touch the hot tip to the part to be unsoldered, once it
melts, move the tip of the solder sucker over the puddle and push the
trigger. It will suck up the solder. When you reset the solder sucker,
some solder might come out - that's OK. If it is sticking out of the end,
simply pull it on out. If the wire is not free from its connection this
process might have to be repeated several times. A word of caution, don't
hold the soldering gun on the wire for a long time, it should only take a
few seconds to melt the solder. If it doesn't, clean the tip of the solder
gun. Take a damp sponge (or cloth) and run it over the tip. Once the old
oxidized solder and rosin have been removed, re-tin the tip and try again.
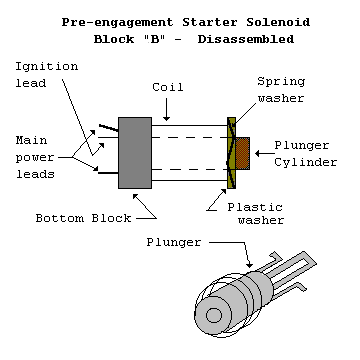
When the 3 connections have been unsoldered, the contact cap can be pulled
 from the block "B" and the solenoid's wire coil. As the cap is removed,
the movable contact and a small spring will appear. The springs job is to
keep the movable contact away from the fixed contacts when no power is
applied to the solenoid. (This is called a "Normally open contact" in
electronic terms.)
from the block "B" and the solenoid's wire coil. As the cap is removed,
the movable contact and a small spring will appear. The springs job is to
keep the movable contact away from the fixed contacts when no power is
applied to the solenoid. (This is called a "Normally open contact" in
electronic terms.)
Now that the solenoid is disassembled, the new movable contact can be
inserted into the coil of wire, the spring set into the hole in the cap,
and cap can slid onto block "B". Be sure that the 3 wires from the solenoid
align with the 3 holes in the contacts cap. Press the two pieces together.
This will require a slight effort due to the little spring inside. (You
didn't forget to put it in, did you?) While holding the block "B" and the
contacts cap together, solder the wires to the eyelet’s on the contacts cap.
Install the block "A" with the 2 bolts, and reattach the solenoid to the
starter. Hook up the power lead and the ignition wire and you're all
done. With any luck the engine will spring to life when you turn on the
ignition switch.
 Closing
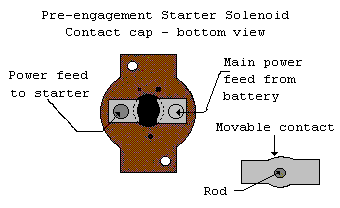
A quick explanation of how the solenoid actually works in probably in
order. When power is applied, an electromagnet is created by the current
flowing in the coil of wire. There is enough force created to overcome the
force exerted by the spring, and the movable contact is moved to contact
the fixed contact. Now the current can flow from the power input contact,
into to movable contact (which will span the air gap between the fixed
contacts) and out the output contact.
Enjoy your Morgan
John
Return to the Index of Tech. articles
To email me with comments or questions.