 1133 Chatmoss Dr., Va. Beach, Va. 23464; (757) 495-8229
Originally Written: circa 1996
Last update: July 18, 2009 - Corrected email address & reformatted page
I have restored several cars in the past including my Morgan, so let me give you a few words of warning. A Morgan restoration is like nothing you can imagine since every car is hand-built and unique. If you get a replacement part, and are lucky, it will fit. More than likely, it will not fit or the part it attaches to will not fit. Consequently, you will have to modify many of the parts in order to make them align properly.
My Morgan, after 20 some years of wear and tear, had developed a
large crack in the chassis. I decided it was better to replace it than
repair the old, rusting, fragile one. This necessitated removing
everything from the chassis. In disassembling the
car, I divided it into sections, trying to leave each section intact until
I had the time to restore it. The idea was to help limit the amount of
small parts laying around and reduce the risk of loss. As parts are
removed, you can label then with masking tape. Place small pieces and nuts
and bolts in zip lock bags with a label indicating what they are and where
they came from.
Getting started
 I wanted to remove the exterior bolt-on parts first: the
bonnet, nose, front and rear fenders, and the front inner fender wells.
Since these will be the last parts to be restored, each was cleaned with
Varsol, to remove the dirt and oil, and stored until the chassis is
reassembled. The bonnet (hood) was the first item removed by removing the
2 screws which hold each hinge in place. Next the bolts which hold the
nose to the inner fender wells were removed and the nose taken off. The
radiator was drained, the hoses disconnected, the 2 bolts attaching the
radiator to its support removed, and the radiator removed.
I wanted to remove the exterior bolt-on parts first: the
bonnet, nose, front and rear fenders, and the front inner fender wells.
Since these will be the last parts to be restored, each was cleaned with
Varsol, to remove the dirt and oil, and stored until the chassis is
reassembled. The bonnet (hood) was the first item removed by removing the
2 screws which hold each hinge in place. Next the bolts which hold the
nose to the inner fender wells were removed and the nose taken off. The
radiator was drained, the hoses disconnected, the 2 bolts attaching the
radiator to its support removed, and the radiator removed.
Before the front fenders can be removed, the aluminum sill strips and the leather upholstery covering the door sill plates must be removed. These are held in place with small nails. Once this upholstery is removed, 3 machine screws, which hold the fenders to the wood work, will be revealed. While I was at it, I removed all the interior upholstery including rear quarter panels. Both the electrical connections for the headlights and the parking lights must be disconnected and the parking lights removed. They hold the front fender to the support on the front end subframe. Finally, there are about a half dozen bolts holding the fenders to the inner fender panels.
To remove the inner fender panels, the rubber mats, which are glued and tacked to the underside of the firewall, must be removed. They cover 3 bolts which hold each inner panel to the firewall. There is a stiffener bar just behind the radiator that must be removed.
Then the 8 or so bolts which fasten the inner panels to the chassis are
removed along with the inner panels.
Second step
In preparation for pulling the engine and transmission, I removed
the transmission (propeller shaft) covers, removed the 4 bolts which hold
the propeller shaft to the differential, removed the propeller shaft,
and drained the engine and transmission oil. I attached an engine hoist to
the engine and took up the slack. I removed the bolts that hold the engine
to the transmission and the four bolts that hold the motor mounts to the
motor mount supports. The engine was then removed. Next I used the engine
hoist to remove the transmission.
Removing the body
The biggest section to be removed from the chassis was the
body. The preparation for this consists of removing the following:
1. The steering box assembly. It is held in place at 3 locations:
a) an aluminum block under the dash board,
b) an aluminum collar bracket on the front of the firewall,
c) 4 bolts that hold a mounting bracket to the front of the frame
and the front end subframe;
 2. Anything that penetrates the firewall, such as: the fuel line, the
battery cables, speedometer cable, and oil lines;
2. Anything that penetrates the firewall, such as: the fuel line, the
battery cables, speedometer cable, and oil lines;
3. The 6 carriage bolts which fasten the body to the chassis. Three are located in the rear fender well (two behind and 1 in front of the axle). The remaining three carriage bolts are along the door sill plate;
4. The 10 bolts which attach the firewall to the chassis (3 bolts on each side panel and 4 bolts across the front of the firewall). I left the firewall attached to the wood frame for strength and stability.
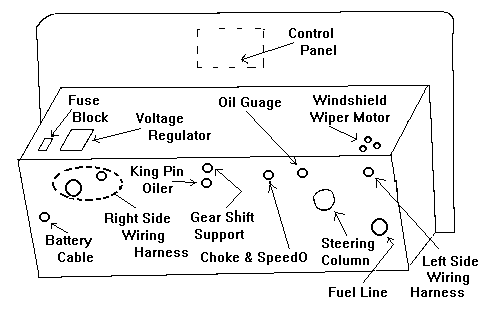
Once everything has been disconnected, the body can be separated from the chassis. A seal forms between the chassis and the body which will have to be broken. To break the seal, place a small piece of wood on a hydraulic jack. Position it parallel to the chassis (underneath the body where it overhangs the chassis) right behind the firewall. Carefully, raise the jack until the body is about 2 inches above the chassis, then slide a 2X4 between the body and the chassis. Jack up the other side of the body in the same manner. When the body is 2 inches off the chassis, slide the 2X4 the remaining way across the chassis. This will form the front lifting point. For the rear lifting point, place another 2X4 under the rear wheel arches by inserting it through the trunk opening. The body can then be lifted from the chassis using an engine hoist (or a couple of people - the more the better up to 5) and set aside. I placed it on saw horses so I could finish stripping the firewall of the fuse block, voltage regulator, windshield wiper motor, heater, wiring harness, and dashboard.
 Once the body is off, it is time to put the chassis on jack
stands to remove the remaining parts: the suspension, floor boards,
emergency brake and gas tank. When the chassis is bare, set it aside.
During the reassembly I am constantly going back to the old chassis to
check measurements and the way parts fit.
Once the body is off, it is time to put the chassis on jack
stands to remove the remaining parts: the suspension, floor boards,
emergency brake and gas tank. When the chassis is bare, set it aside.
During the reassembly I am constantly going back to the old chassis to
check measurements and the way parts fit.
I purchased the new chassis from Morgan Fab of Georgia. It came primed and the only holes that were drilled were the rear spring mounting points, the brake and clutch master-cylinder mounts, and the holes for mounting the brake and clutch pedal assembly. I proceeded to paint the chassis (Black, acrylic lacquer) before any parts are installed. This affords better protection against rust. Unfortunately it has gotten scratched during assembly, but this can be easily touched up.
Now it's time to start rehabilitating the wood and reassembling
the car. But more on this later.
Closing
Let me address some of the tools that I have used
while making new parts, rehabilitating original parts, and reassembling the
car. Fortunately, my father has built up quite a shop. While you don't
need a complete metal and wood working shop it would help. In the way of
relatively inexpensive tools, I suggest a combination square & protractor,
a carpenters square, numerous clamps, a set of dividers, and a transfer
punch set. The transfer punch set is used when trying to drill holes
from an existing pattern. You place the pattern on the new part and
insert the punch through the hole in the pattern. When the punch is taped
with a hammer, you get a mark that is the exact center for the new hole.
This made mounting the firewall and front inner fender panels easy. I
found a 1" belt/disk sander to be invaluable in cleaning the metal and wood
parts. Two expensive tools that are quite useful are a compressor for air
tools and spray painting, and an engine hoist.
Other useful tools I have used at my dads shop are a drill press, a press, band saw, table saw and a milling machine. Before you start to restore your car try to make some arrangements to have access to this type of equipment. You might check with members of the local car clubs or local Vocational Technical Institutes or Community Colleges. You might be able to talk an instructor into letting some of the students work on "real world" projects.
I'd like to thank:
- John Sheally for all his help and answering my many questions.
- John A. Blair (my dad) for his help when an additional head or strong back is needed and the use of his machine shop.
- Mary Ann Cole (MAC) my lovely and extremely understanding wife for her patience with me and the Morgan. We started dating in May of 1972 and she got to drive the Morgan around the block in November of 1988 for the 1st time!
Enjoy your Morgan
John
Return to the Index of Technical articles
To email me with comments or questions.