|
Painting and Body work ©By: John T. Blair (WA4OHZ)  1133 Chatmoss Dr., Va. Beach, Va. 23464; (757) 495-8229
Originally written: circa 1992
In restoring my Morgan, the most expensive single purchase I have made was the new chassis, for around $900. However, I haven't replaced the chrome wire wheels which will cost about $1500. But the cost of paint supplies has exceeded $1200 and I haven't painted the body yet!. Here is some of what I have used so far:
     2 gallons of paint stripper @ $11 each                       $ 22
     2 gallons of West System Epoxy and 2 quarts of hardener      $150
     4 gallons of Du Pont 30S lacquer primer @ $33 ea.            $132
    14 gallons of Du Pont 3602 lacquer thinner @ $12 ea.          $170
     2 gallons of Du Pont 99A Pitch Black enamel @ $47 ea         $ 94
     2 gallons of Du Pont 8022 Mid  temp reducer (60-75) @ $12 ea $ 24
     1 gallon  of Du Pont 8093 High temp reducer (70-90) @ $12 ea $ 12
     2 pints   of Du Pont 793S Hardener  @ $31 ea                 $ 62
     2 gallons of Bodyman plastic filler @ $11 ea                 $ 22
     2 100 pound bags of sandblasting sand @ $8 ea                $ 16
                                                                ---------
                                                                  $704
This excludes literally hundreds of sheets of sandpaper (@ .55 per
sheet), several cans of spray paint, and other misc. items. The point here
is to give you some idea of the cost of paint and supplies. I strongly
suggest that you try to do some of the painting and body work yourself.
The way I look at it, anything I can do to reduce the cost is worth doing.
Even if a body shop puts on the top or finish coat of paint, the cost has
been drastically reduced. Painting is not very difficult but it is time
consuming. The nice thing about painting is, if you make a mistake, you
sand it off and shoot another coat over it. It helps to keep a couple cans
of spray primer and maybe some gloss black around for small parts. While
you can do a lot with these spray cans, they get quite expensive. Here are
some of the tools and supplies you will need for painting:
air compressor, paint guns, air mask (the ones with the canisters, not just the paper dust masks), body hammers and dollies, body files, sanding block, body putty, paint, thinner and reducer, some squeegees, an electric drill with a wire wheel, and a large supply and selection of sand paper. |
||||
|
The most important item is an air compressor. I would not
recommend one smaller than a 4hp compressor with a 20 gallon accumulator.
Mine is 5 hp with a 30 gallon tank. (The rule of thumb is the "bigger the
better", but your pocket book will rule.) Compressors of 4hp and less use
115V while the 5hp and larger use 220V. If you opt for a larger one, you
might have to run a new power line from your service panel. In addition to
the compressor, you might want to build a radiator, to help condense the
water vapor and trap it.
I found that connecting the dryer directly to the compressor didn't pull much moisture out of the air. It was too close to the compressor and there just wasn't enough time for the moisture to condense. I had planed on building the radiator, using some 1/2" copper tubing used for plumbing. I had been saving the cat food cans to use as fins by soldering them to the tubing to help vent the heat. |
 Typical Air Compressor |
The radiator will be U shaped
and suspended from the garage ceiling. A nice addition to the radiator
is to run several taps for the air around the shop. This can be with
copper tubing. DO NOT USE PVC!!! (There are a lot of horror
stories about air systems plumbed with PVC exploding.) Simply tap into
the radiator and run the tubing to various work areas.
Instead of building this fancy radiator, I ended up taking a piece of soft copper tubing and wrapping it around a plastic 2 liter Coke bottle. I connect this to my compressor with a short length of air hose and compression fittings. I also connect it to my dryer the same way. I keep this coil in a bucket. So on very humid days, I can fill the bucket with water to help cool the air and draw the moisture out. After you get the moisture out of the air, you might want to heat the air before it goes to the air line. To do this, again use some soft copper tubing and wrap it around the cooling fins of the compressor. This way the heat generated by the compressor can be used to reheat the air.
|
||
 Gravity Feed HVLP Spray Gun |
Next, you will need some paint guns. Since the primer is
relatively thick, a "pressure feed" gun is used. This type gun lets the
compressed air into the paint tank to pressurize it, thereby forcing the
paint out. You can skimp on the cost of this gun as the primer will get
sanded and smoothed. For painting the top (color) coats a "siphon feed"
gun is used. These guns let the air blow past the pickup tube, creating a
vacuum and sucking or siphoning up the paint. These guns are more
expensive; mine is a SEARS and cost about $70. A professional gun like a
Binks can start at about $150.
There are now High Volume Low Pressure (HVLP) gun available. I've switched to a gravity feed HVLP gun (shown). This is a Harbor Freight gun and costs about $60. These supposedly have less overspray and use less paint. When looking for one, try and find one with 2 needles, one larger one for shooting primer and one smaller one for shooting color or top coats.
|
|||
|
In addition, there are myriad of air tools (sanders, impact wrenches, ratchets, and chisel) you can buy for your compressor. For body work you'll need an You'll also want a Dual Action, DA, sander also. These can be used for small or large jobs.
|
|
|||
|
While not truely used for body work, but for taking things apart, I do recommend a 1/2 drive impact wrench, a 3/8 drive ratchet. These can be real time and knuckle savers. The impact wrench is used to break stuck or highly torqued nuts and bolts loose. The air ratchet is used for unscrewing and screwing nuts and bolt quickly. Do NOT use the ratchet on bolts that haven't been broken loose, or you will distroy the gears in the
ratchet.
|
|||
|
For knocking out dents, you will need a body hammer and a couple of
dollies. A starter set can be purchased for about $30. They usually
consist of several hammers and dollies. The dollies are for backing
the metal when you tap the metal with the hammers. Body work is not
like building a wall. You aren't trying to drive the nail, or in our
case - knock out the dent with one blow. Lightly and slowly is the key.
Gently tap on the sheet metal.
|
 Body Hammer and Dolly set |
|||
|
After the sheet metal has been worked with the hammer and dolly, or to cover
weld seams you want to use some form of body filler. The two basic types are:
a fiberglass based filler or a polyester resin product. Both of these materials
require a hardener or catalyst be mixed in to cause it to harden. I usually use
a scrap piece of cardboard as a mixing pallet, and a putty knife to mix the filler.
You might want to check out How to Work With Bondo Body Filler For Auto Body Repair for more information on working with filler.
|
||||
 Bondo Spreaders |
Once mixed the filler is applied with plastic spreader. You'll have about 5 to 10
minutes of working time before the filler flashes (starts to harden). So don't
mix too much. I'd rather have to mix several batches than have to throw away
a glob of filler that has hardened on my pallet.
Before the filler is applied, you want to make sure that the metal is clean and free of oils and waxes. DuPont makes a product called PrepSol for this purpose. After the metal is cleaned, it will have a tendency to get surface rust. To kill the rust and etched the metal a phosophoric acid treatment like DuPonts 5717 Metal Conditioner or Ospho should be used.
|
|||
| Finally, when you're ready to apply the paint, you'll want to lightly swipe a tac-cloth across the work area to remove any remaining dust. Notice I said lightly swipe, this is because the tac-cloths contain bee's wax. Remember we wanted to get rid of the oils and wax? I was in a body class (it's a long story - but my youngest son kissed a gard rail and dented the entire side of his car. I said, no problem, you wrecked it, you fix it. So I enrolled us in an evening body shop class at the local Vocational Technical Education center.) and a fellow wanted to paint his motor cycle. So after taking all the pieces off, and sanding them, he was ready for the paint booth. The instructor told him to "wipe the parts off with a tac rag". So he did. He really rubbed all the parts down very well! Then he shot the paint. As it dried there were fish eyes (ring holes of paint) all over the parts. He'd rubbed the parts so hard he transfered the bee's wax from the tac-rag to the part. He got to sand them all down again and re-shoot then. So lightly swipe the work area, don't rub it! | ||||
|
About 15 to 30 minutes after applying the body filler, it will be ready for smoothing and shaping. This will require the use of some body files and sand paper with some type of backing. For fast, initial shaping of the bondo, body files are used. They come in two types: the newer ones, Surform, are like "cheese graters" and the older ones are very coarse metal files called either English files or Mill Cut body files and are about 14inches long. Both type files come in flat and curved versions.
I prefer the English files, especially the curved ones, but they are getting harder to find and cost about $20 each. Which ever type of file you choose, you really should get both a flat and a curved one. Sanding the primer and body putty requires the use of a backing for the sand paper. For large flat areas you want to use a sanding board. For small and curved areas a rubber sanding block can be used. Both of these are quite inexpensive. This is called "blocking" or block sanding and will flatten the bondo or paint and help eliminate the rippling or waviness in the finished paint job.
|
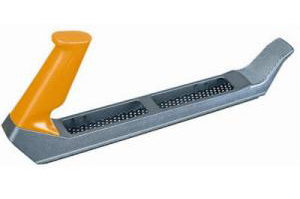 Cheese Grater type body file  Example of teeth of an English File |
|||
 Sanding Board  Sanding Block |
For sanding/shaping bondo, you'll want to use between 80 and 150 grit sandpaper. For
knocking down the 1st coat of bondo, use the coarser 80 grit. Then as the work area
is shaped and smoothed, you'll want to move to finer grits. Don't go much finer
than about 300 grit as this leaves very nice scratches what the primer coat can
really get into and bit (hold).
When it comes to preparing a painted piece of metal for painting, there are two schools of thought:
Why bother? It's the only way to really tell what shape the metal is in. If the original paint is bubbling, this is usually an indication of rust from underneath and the paint should be stripped. If the body putty is cracking (which on a Morgan occurs quite often around the headlights and on the front fenders), the paint and all the putty in that area should be removed.
|
|||
|
I feel that when restoring a car, every piece of metal should be
stripped down to bare metal. This is especially true for structural
pieces, like the upper and lower tubes on the front end, and hard to get at
pieces. To strip a part, start by cleaning it in VARSOL to remove the
dirt, grease and tar. VARSOL has gotten quite expensive, about $3.50 per
gallon, so try to recycle as much of it as possible by either making a
cleaning tank or clean the parts in a large pan.
I DO NOT recommend using gasoline: it is just too volatile. If you plan to use it, DO NOT use it in the garage! Take the parts, pans, and gasoline about 20 feet from any building, and DO NOT smoke around it. This is the safest way to use it. To clean off the VARSOL (or gasoline), wash the part in water. Then wipe it dry with a towel, and blow dry with compressed air. Another thing that works well when cleaning parts is "gojo" hand cleaner. Simply put a dab on you hands and rub it all over the part. Then rinse the gojo off with water.
|
||||
| The part is now ready to have the paint stripped. I've found that the semi-paste paint strippers work best for me. Pour a little paint stripper in a shallow can, (a peanut or cat food can work great), then apply the stripper using a cheap 1" paint brush. When working with the stripper, wear rubber gloves. Also keep a bucket of water handy so that if any of the paint stripper gets on your skin and starts to burn, you can wash it off. Don't try to work a very large area as the paint stripper will dry before it can be scrapped off and can impregnate the metal. | 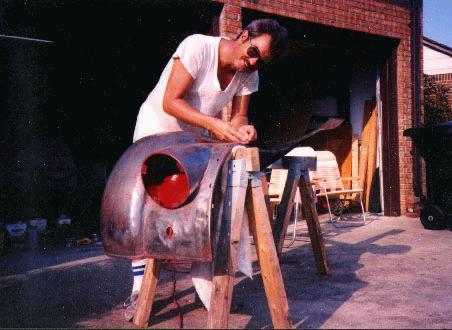 Me Stripping Fender |
|||
|
If
this happens, when the primer is applied the imbedded stripper will keep
the paint from adhering to the metal. When the old paint starts to bubble,
it can be scrapped off. I found that a single sided razor blade scrapper
like those used for scrapping windows works very well. It might take
several applications of stripper to get most of the old paint off of a
part.
For the stubborn areas, you can try using steel wool dipped in paint stripper. I used a wire wheel on an electric drill. Be very careful if you try this, as the paint stripper will get flung all over. Protect your eyes and wear goggles! Never return the left over stripper to the original can. This could contaminate it and reduce its effectiveness. After the paint is removed, the metal should be cleaned thoroughly to remove any remaining paint stripper. For this, I wet sand the part using 240 grit wet or dry sandpaper. For wet sanding, I fill a bucket with water and squirt some liquid soap to help keep the sandpaper from clogging. Dry the part with a towel and blow dry with compressed air. For really stubborn painted areas or some areas of rust, now is the time to consider sandblasting the part. Again, I usually wet sand the part again with 240 grit wet or dry sandpaper to remove the very fine layer of dust and sand particles. After the part dries, it should have an etchant and a rust inhibitor applied (I use Du Pont's 5717S metal conditioner). This conditioner will render minor rust inert, retard rust from forming and etch the metal to help the primer adhere. Since this metal conditioner contains phosphoric acid, you should wear rubber gloves when using this product. To apply the conditioner to a part, I use a sponge with the green scrubby stuff on the back and scrub the part with the green side. Don't let the conditioner dry on the metal; keep it wet until you are ready to remove it, then wipe it off with a dry cloth or paper towel and let the part air dry for about 10 minutes. If you have to use any body filler, now is the time to apply the 1st coat. I used Bodyman Plastic filler (carried by my local Du Pont dealer), which is ready to be filed in 15 to 20 minutes. I started collecting cardboard boxes and cutting them into squares about 12" on a side. This is a large supply of cheap pallets for mixing the body putty. The two mistakes most OFTEN made using body putty are:
When you're ready to quite for the day, you may want to spray on the first coat of primer to help seal the metal and keep it from rusting. For priming the parts, I use Du Pont's 30S primer and 3602 Lacquer thinner and about 40 pounds per square inch of air pressure. This will work as a base for either lacquer or enamel top coats. I do not mix the primer in my paint gun tank. I always mix paint in a separate container. I mix the primer 1 part primer to 2 parts thinner and no more than a quart at a time. The mixed primer may last up to 2 weeks in a sealed container. If you don't use all of the paint, put it in tight container (jar) until you are ready to paint again. (Remember, try to use it within a week.) (Note: 2009 - Remember this article was originally written circa 1990. Since then there have been a lot of changes in paints. Not to mention that lacquer has been outlawed in many areas. There are a lot of newer primers on the market. Working on my 75 Bricklin, I have used some of the newer "2K" [2 part or hardened primers] like EverCoat's Feather Fill polyester primer and PPG's K36 primer. This is a high build primer and sands easily.) I believe in painting every piece before the parts are assembled. To hold the large parts, I set up a pair of saw horses to hold the parts. For small parts, cut up wire coat hangers into varying lengths and bend the pieces into a S shape. You will also need a place to hang the parts. I used an old garage door rail and suspended it across the back of the garage door rails. Do not try to use a piece of rope: it will sag in the middle and the parts will slide towards the middle and hit each other. Here are a few tricks it took me a long time to figure out:
Start the sanding process by working the areas with body putty on them. However, instead of using sand paper, use the body files. They will quickly cut down the body putty. When the files stop cutting, you must determine whether it is because the area is smooth, or because there isn't enough putty. If you can see or feel that the area with the putty is lower than the surrounding metal then you must add more body putty. If you can't tell, shoot another coat of primer on the part, then try to sand it. If you cut through the primer in some places and not in others, the areas that remain painted are low. If you sand the paint off the entire area about the same time, the area is level with the metal. As you sand the body putty or primer, it should "feather" or fade into the metal or other paint at the edges of the work area. If it doesn't, if it appears to peel off, then either the putty was not mixed correctly, or there was some oil, sweat, etc. on the metal to stop the putty from adhering. Every area that was filled with that batch of putty should be sanded to completely remove that batch of putty. Then the metal should be degreased with some lacquer thinner or degreaser. After cleaning the area, another batch of putty can be mixed and applied. As the body putty is leveled into the plane of the metal the files usually stop cutting. Now we must switch to sandpaper. This is where the sanding boards and sanding blocks come into play. I small or tight areas I use a trick an old friend showed me many moons ago. When you bought your paint supplies, did you get a bunch of wooden paint stirrers? Well, they make a great backing for trying to block sand an area. If I am still trying to quickly cut down the body putty, I'll wrap some 36 grit sandpaper around the stirrers and sand with this. Check the area for low spots and apply more body filler as necessary. After it has had a chance to harden it can be primed again or sanded. This step is repeated until there is no more need to add body filler. Depending on your pocket book, a cute trick is to apply 2 or 3 coats of a gray primer, then shoot 1 coat of a dark red colored primer. Now as you sand the top coat, you can easily tell high and low spots. (If the gray was the first couple of coats and red is the top coat, the high spots will be gray, and the low spots will be red.) The sanding is not over yet. The rest of the part must be block sanded (blocked) perfectly smooth. Start this process by lightly wet sanding with 240 grit sandpaper on your sanding block. For large flat surfaces, use the flat side of the block; for smaller areas or curved surfaces, use the curved side. After some EXPERIENCE, you'll develop a feel or preference for which side of the sanding block to use. Try not to sand through the primer to the metal. If only a small metal spot shows, this is a high spot. You could use the body hammer and "pick" down this spot. Now, shoot another coat or two of primer on the part, then examine it very closely. You will be looking for scratch marks from the files and coarse sandpaper, little pits in the primer, anything that is not perfectly flat. To fill very small imperfections or pin holes in the primer we used to use a lacquer based spotting putty called Unistain. It is almost like an uncut primer in a tube. Squeeze a drop on a squeegee and apply a thin coat over the trouble spots. The spotting putty will be ready to sand in about 10 minutes. (Note: Today (circa 2006) there is a new product called icing. This is a lot more expensive than the old spotting putty and is mixed like bondo. When I was in the body shop class, the instructor didn't like either icing or the spotting putty.) One more time! Check for any imperfections, apply bondo or spotting putty as necessary, and shoot another coat of primer. If no spotting putty had to be applied, you can start blocking with 600 grit. Otherwise, use the 400, then switch to the 600 grit. You may have to repeat this procedure several times, but after sanding a part with 600 grit, the part should be ready for the top coat! This preceding process is about 85% of a quality paint job. The more time spent here the better the final results will be. (Note: 2006 - The lacquer paints I was using eat into the existing coat of lacquer paint. So the bondo and lacquer primer can be sanded with very fine paper 400 to 600 grit. Not so with the newer paints. The don't eat into each other and require something grab onto. Consiquently don't sand the newer primers with anything much finer than 300 grit.) In the past I have used Du Pont's acrylic lacquer for the color coats. After talking to several people, I decided to go with their Centari acrylic enamel. The enamel is more flexible and durable than the lacquer. I had the chassis all painted with the lacquer. However, when I started painting the wood, I was so impressed with the gloss that I repainted the chassis and all of the parts that I had already painted black (some with lacquer, others with Krylon spray cans) with the Centari. I should mention that there is a difference between painting lacquer and enamel. Lacquer is supposed to go on wet, it will glisten and actually look wet. If it looks flat or dull, then the spray gun needs to be adjusted to deliver more paint or you are moving the gun to fast, slow down a little. Enamel doesn't spray on looking as "wet"! In fact, I have had trouble trying to get it to LOOK wet. I have found that when it "looks" wet (or as wet as lacquer) your in for a BIG RUN. Sometimes you can reduce a run by lightly blotting it with either masking tape or a paper towel. For me it is usually to late for this, I don't see the run until after the paint starts to harden. Once you have a run with the enamel paint you will have to let it dry for at least 2 hours before you can start to fix it. Start by block sanding the area with 200ish wet and dry sandpaper until there is no trace of the run. Here again is a difference between the enamel paint with the hardener and lacquer paints. The enamels are harder to sand and it tends to ball up and clogs the sandpaper. Be sure to clean the sandpaper frequently, by dipping it in water. Also wash the area that is being sanded to remove any of these paint nodules. When sanding the run, be sure to go a couple of inches past the area to attempt to "feather" the paint. After the run has been sanded out, change to 320 grit wet and dry and reblock the area. This will remove most of the scratches from the 220 sandpaper. Now the area is ready to be sprayed again. Another problem with enamel paints is called fish eying. This is when some grease, oil, or wax is left on the work. When painted the grease will repell the paint leaving a little ring with a slight ridge at the edges. To help prevent this, fish eye remover is added to the paint. Enamel also is more prone to orange peeling. The paint will appear dull and if you really look at the dryed paint it will have dimples in it, just like an orange peel. This is caused by the paint starting to dry before it has a chance to flow out. To correct this, you can try to use a slower drying reducer, slow down the rate you are moving the spray gun, or try to increase the flow of paint from the gun. But these steps will lead to a greater chance of a run. The usual solution is to wet sand (or color sand) the finished paint job with 1500 and 2000 grit wet sandpaper. Then buff the paint to bring back the shine. As I said earlier, I do not mix my paint in the spray gun tank. When I purchased the paint for the color coats, I purchased an extra, empty, 1 gallon paint can. The directions for the Centari paint said to cut the paint 2 parts paint to 1 part reducer. So I fill a plastic quart container (left over form the last Chinese dinner we had) with the color and pour it into the empty gallon can. I do the same with the reducer. Then stir the 1 to 1 mixture. This reduced paint mixture will last indefinitely. Before you are ready to paint, you must add the hardener and fisheye remover. But, before this I go over a checklist:
When I finish painting I clean the gun by: pouring out any unused paint in the gun. Remember, if this is the enamel with the hardener you CANNOT save it. Then pouring some cleaning grade lacquer thinner in to the gun and spraying it through the gun to clean the inside of it. Pour the remaining thinner into a small container and run some new thinner through gun again and pour the excess into the container. Then disassemble the gun, and using the discarded thinner, clean each part of the gun. Be sure to clean the air hole in the top that covers the paint tank and the outside of the gun. After the gun is cleaned and reassembled, pour some clean thinner in the gun and spray a little of it, to do a final cleaning of the internals of the gun. Then leave the remaining thinner in the gun until the gun is needed. To test the gun, I attach the air hose, and pull the trigger enough to allow the air to blow, but none of the thinner that is in the gun. The air pressure gauge on the output side of the compressor should read between 40 and 50 psi. Now pull the trigger all the way back to ensure that the gun is not clogged. The thinner should shot out of the gun. If the thinner has evaporated, pour a little thinner into the gun and spray it until it is all gone. Now that everything is working, the paint can be mixed. I take a quart measuring jar (my old Chinese dinner container) and pour in 1/4 of an ounce of fisheye remover and 2 ounces of hardener ( 4 oz per 1 quart of unreduced paint), then pour in the reduced paint. DO NOT PUT THE HARDENER INTO THE 1 GALLON CAN because once the hardener is added the life of the mix is 3 hours. Only make as much as you expect to use. If I am painting several large areas, I will mix a quart. On the other hand, you have 5 fingers. Ha! Ha! If I'm going to work several small areas or parts, I only mix 1/2 quart and reduce the amount of hardener and fisheye remover. Be careful when working with the hardener and the mixed paint, and wear your face mask. It contains aliphatic polyisocynate, which is very toxic. The total mixture can now be filtered (using a paper strainer which you should have gotten when you bought you paint supplies) into the spray gun tank. The part to be painted must now be cleaned one last time before the paint is sprayed on. Pour some degreaser (if all else fails, you can use the enamel reducer) on a rag or paper towel and rub down the part. Finally, wipe down the part with a tac rag to remove any remaining dirt or lint. Now you are ready to shoot the paint. You have probably wondered where I paint? Usually outside; however occasionally I will paint in the garage. Don't you have a lot of problems with dirt and bugs getting into the paint? Not many, but you might want to have a good pair of tweezers to remove on hand, just in case, more on this in a minute. A friend of mine told me how he made a very inexpensive paint booth in his garage. He tacked a sheet of plastic over the back door, then cut an X in the bottom of the plastic so he could set a large box fan in it. The flaps of the plastic were then taped to the fan. Finally, he removed a pane of glass from the garage door, made a frame that would fit in the hole in the window and placed a air filter (like is used for the heater in a house) in the frame. Here is an article on building a "temporary paint booth". Hopefully, the only flaws now in a paint are small dust particles and bugs. The part should have been wiped down with a "tack rag" to remove the dust before the part was painted. If so, then the dust has landed on top of the paint. To remove the dust and small bugs, sand the entire part with 1,500 and 2,000 grit wet and dry sandpaper. (That's right 1,500 grit!.) After the paint has had time to harden for at least 2 days, the paint can be buffed with "Finesse-it Finishing Material" to restore the shine. There you have it, the fundamentals of painting a car. Now all it takes is time, a little money, practice and patience. In closing, I would be remiss if I did not indicate that there are some newer products on the market. To replace the metal conditioner and lacquer primer I used, Du Pont has product, 615S VARIPRIME which is a self-etching primer. It is supposed to adhere better than the older primer. In addition, it can be directly applied to steel, galvanized steel, zinc-coated metals, fiberglass, many aluminums and cured enamel topcoats. Du Pont then recommends using their 1120S primer-filler. This will easily fill 80-grit scratch. These new products will cost a little more than the older ones I have described here. You could ask your local paint suppliers for more information about these products.
An addendum - some miscellaneous items
Return to the Index of Tech. articles
To email me with comments or
questions.
|
||||
 Enjoy your Morgan