 1133 Chatmoss Dr., Va. Beach, Va. 23464; (757) 495-8229
Originally Written: May 28, 2008
Last Update: July 2, 2013 - Cleaned up some HTML tags
(Note: This article was originally written about my Bricklin and published in "The Brickline", the quarterly magazine of Bricklin International. I have modified it, by removing Bricklin specific information, to be a little more general in nature, as all the theory, and parts are applicable to virtually every car.)
(Thanks to Bob Daley and Jim Kelliher for their help with this article.)
It must be summer, because there has been a lot of talk about various older cars overheating.
Many people don’t realize how complicated the cooling system is as there are so few parts.
It’s basically a radiator and a water pump, right? Yes, but there is more to it than that, and I’ll try to explain.
Lets start by figuring out where the heat comes from. That’s simple, running the engine! As the spark plug fires and burns the fuel/air mixture - that creates heat. Only about 33% of the energy from burning the fuel/air mixture is used productively, about 33% is unused and goes out the exhaust pipe, and the remaining 33% is heat that must be removed from the engine. So the combustion process generates a lot of heat and the harder an engine has to work the more heat it generates. If this heat is not removed the engine oil will thin and not be able to do its job of lubricating moving parts. If you’re lucky you will blow a head gasket. If you’re not so lucky you can really damage the engine, and parts can seize: the connecting rod bearings, crankshaft bearings, cam shaft bearings or all of the above. Needless to say, that will get expensive.
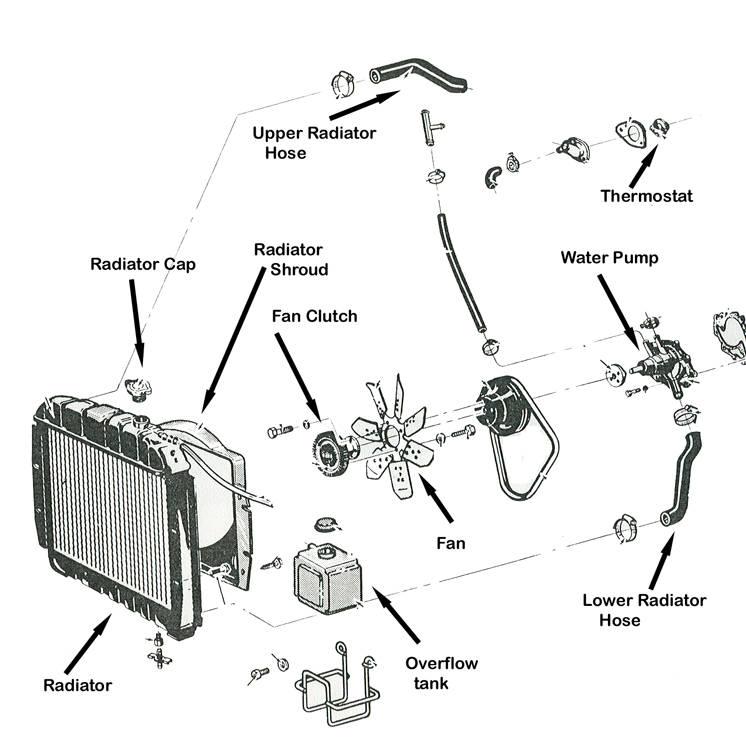
Typical Cooling System
To get rid of that heat there is a water jacket built into the engine. The water jacket is basically tubes or voids throughout the engine’s block and heads. Coolant is circulated through these tubes / voids in the engine by the water pump. As the coolant flows through the engine it absorbs heat from the metal parts, and the coolant gets very hot.
Enter the radiator. The coolant is pumped from the engine to the top of the radiator where it flows through all the little tubes that comprise the radiator. These tubes have lots of little “cooling” fins on them to help dissipate the heat. When the coolant leaves the bottom of the radiator it should be a lot cooler than when it came in to the radiator. After leaving the radiator the coolant is pumped back through the engine to pick up more heat and the cycle continues.
So the cooling system appears to be very simple but lets take a little deeper look at it.
Coolant:
The coolant can be pure water. In fact, pure water has the best heat absorbing ability you can get. However, the water pump needs something besides pure water to lubricate it. Also water freezes at 32° Fahrenheit and boils at 212° Fahrenheit.
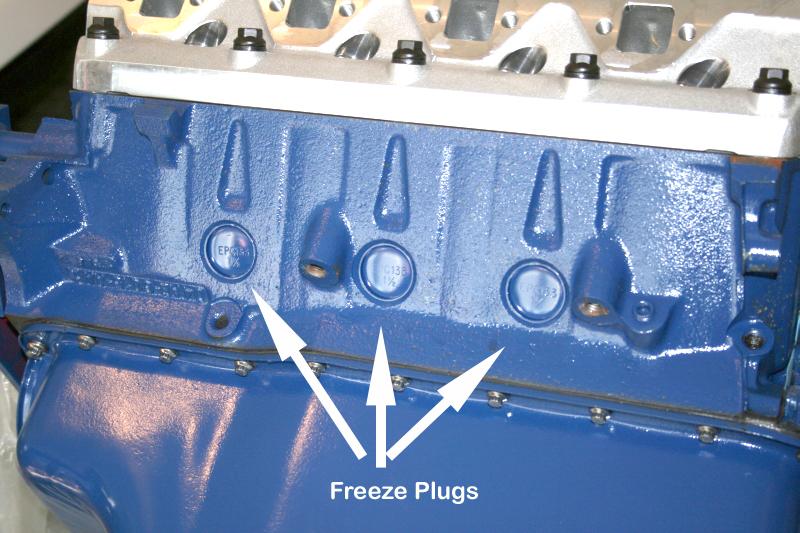
Freeze Plugs in block
Water boils at 212° F. at sea level (or 14.7 pounds per square inch - psi). However, the higher you go in elevation the lower the boiling temperature becomes. The temperature at which the water boils can be raised by adding some impurities, like salt.
Enter Antifreeze. This is a specially formulated liquid that contains lubricants for the water pump and other chemicals, such as Ethylene Glycol, to increase the boiling point of water. The more antifreeze you add to the water, the lower the freezing point and the higher the boiling point will be, to a point. The optimum is about a 50%/50% solution of pure (distilled) water and antifreeze.
A note of caution here - Ethylene Glycol is very toxic. As little as a spoonful can kill most pets!
So the antifreeze will allow the engine to run at coolant temperatures in excess of 212° F. without too much trouble. But how much higher? In reality, I don’t know. I was looking for some simple scale to share, but most of the information I found was from Chemistry labs using the metric system and probably more than most people would want to know. It is based on the relative volumes of both the water and the antifreeze.
One final not on antifreeze. There are several newer types besides ethylene glycol, the old green fluid. Do not mix them! If you do, there is a strong possiblity that there will be a chemical reaction and they can restrict the cooling system.
The radiator is nothing more than a heat exchanger. It has a TOP TANK, where the hot coolant enters via the upper or INLET port. The main part or CORE of the radiator is a series of thin metal tubes with cooling fins (thin metal sheets) attached. The BOTTOM TANK has the lower or OUTLET port where coolant flows out of the radiator.
This is the old style of radiator, called a “waterfall” radiator because the coolant falls through the tubes vertically to the bottom. As the hot coolant flows through these tubes, the heat is given up to the air and the coolant temperature lowers. Air flow (from the car moving and/or the fan) helps this process. The coolant then exits the lower port and is pumped back through the engine to pick up some more heat.
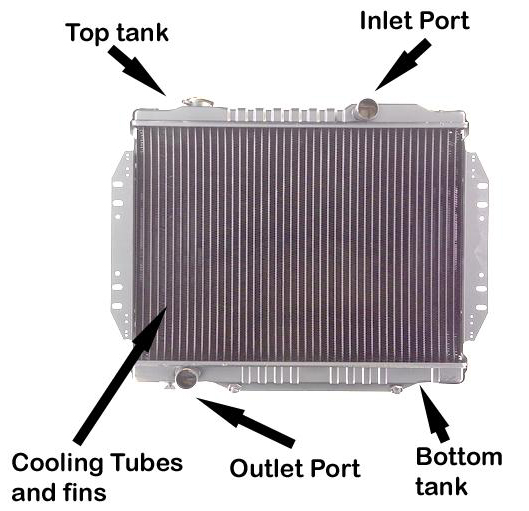
Typical Radiator
The newer radiators are called “cross flow”. The coolant enters at the top but instead of just falling down, it travels from one side to the other and back as it falls. The back and forth travel while falling down the height of the radiator allows for better heat extraction from the coolant.
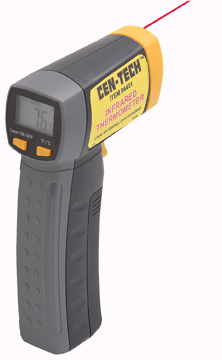
Non-Contact IR Thermometer
Typically a radiator will drop the coolant temperature about 25 deg. You can use a non-contact Inferred Thermometer and take a reading at the top of the radiator and at the bottom. You should see a drop in temperature. If you have a waterfall type radiator, you can also scan across the radiator, looking for cooler spots. This means the tubes are blocked and that section of the radiator is not doing its job.
Radiator Cap:
Most older radiators have a radiator cap which closes the cooling system, and is where the coolant is added. Some new radiators do not have this cap. While at first glance the cap looks simple it is actually a pretty complicated part, and performs several jobs:
1. Provides a way to close off the radiator (exactly like a cap on a jar), so the coolant doesn’t just spill out as you start and stop the car. Just under the metal cap is a rubber seat to seal against the top rim of the radiator fill opening.
To prevent this there is a pressure valve in the cap. At a certain pressure the valve will open and allow coolant to flow from the radiator into the overflow tank. There are several different pressure ratings for these caps, typical are 7 and 14 psi.
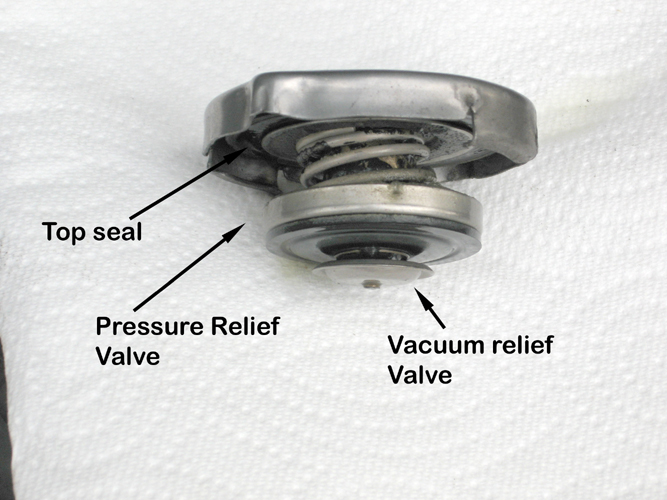
Typical Radiator Cap
If you look at a radiator cap you will notice a metal spring attached to a rubber seal. This is the pressure relief valve. As the pressure in the radiator increases, the water pushes on the large rubber and metal seal. When the pressure in the radiator is greater than the pressure of the spring, the valve is lifted off its seat inside the radiator filler neck and coolant is allowed to pass above this valve to the overflow tube in the filler neck.
3. Now that some coolant has been expelled from the radiator, it is stored in the overflow tank. But the coolant has to get back into the radiator, or the cooling system will be low on coolant and more likely to overheat. This is the job of the vacuum relief valve - the little metal tab on the bottom of the radiator cap. When the coolant in the radiator cools, it creates a partial vacuum allowing the valve to open and the coolant to be pushed (by atmospheric pressure) from the overflow tank back into the radiator.
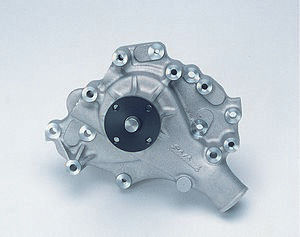
Typical Water Pump
The engine coolant has to circulate through the engine to absorb heat then flow through the radiator to give up the heat to the air. This is the job of the water pump.
The water pump is basically a bunch of paddles that push the coolant through the water jacket and radiator. These paddles are formed on a metal disk (an impeller) that is mounted to a shaft that extends through a seal to the outside of the pump. A pulley mounted on the pump shaft is turned by a belt that usually rides on the crankshaft pulley (harmonic balancer).
a. The bearing on the pump will wear. This will cause the shaft to wiggle, you may have to remove the fan belt and try to wiggle the shaft to check. As the bearing starts to fail, it can make a loud whining noise. To check this, use a mechanics stethoscope (or a very long screwdriver held to your ear) to listen to the pump (be very careful of the fan!). If it is making a lot louder noise than it should, the bearing is failing. To get some references as to what it should sound like, place the stethoscope on the alternator, or the air conditioner idler pulley. If the bearing fully disintegrates then the fan can shift (as the shaft moves) and go through the radiator.
b. The shaft has a packing around it, inside the pump. As the pump and packing age, the packing can fail. This will lead to coolant leaking from the front of the pump through a weep hole. Look for a line of discoloration on the pump and going down to the pan.
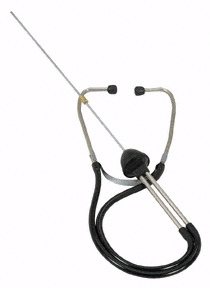
Mechanic’s Stethoscope
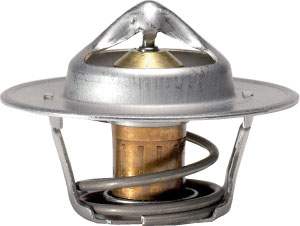
Thermostat
The thermostat is a device used to restrict the flow of coolant through the cooling system. By restricting the flow of coolant (thermostat closed) the engine gets up to normal operating temperature quicker than if the coolant were flowing through the radiator and being cooled.
Once the coolant is at operating temperature, the thermostat will open and be less restrictive of the coolant flow. This keeps the coolant from flowing too quickly through the radiator. If the coolant flows too quickly through the radiator it will not have enough time to give off enough of its heat and the engine can overheat.
As the coolant circulates, if its temperature goes below the design specification of the thermostat, the thermostat will start to close. This slows the coolant flow, increasing the time it is in the engine, allowing the engine temperature to increase.
The job of the fan is to pull air across the radiator when the car is sitting still with the engine running, like at a stop light. Why? Because with no air moving across the radiator, the radiator cannot give off its heat efficiently and the engine will over heat.
Cars that were built before about 1965 had fans connected directly to the water pump. Consequently, any time the engine was turning the fan turned. While this was ok, it made for a noisy engine when the car was doing 60 mph down the highway. So some time in the mid ‘60’s the manufacturers added a fan clutch. This clutch fits between the water pump and the fan and is temperature sensitive.
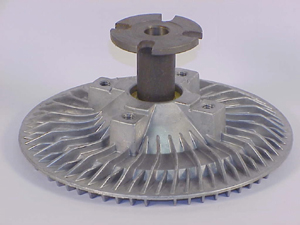
Fan Clutch
When the car is moving say 25 mph or higher there is enough air being forced across the radiator that the fan is not usually needed.
Now that we understand more than the simple view of the first paragraph, we can look at what causes overheating in an engine.
Overheating:
An overheating engine can cause a lot of damage, from a warped head to the engine seizing. But how do we know if the engine is overheating? Most cars have either an idiot light that comes on if the engine temperature gets above some preset value, or the car is equipped with a temperature gauge.
Temperature gauge and sender:
If the car is equipped with an idiot light or a temperature gauge, there will be a sensor that controls turning on the light or the reading on the temperature gauge. This sensor is a specially built resistor. It’s value will change as the engine temperature goes up causing the light to come on or the reading on the gauge to change.
To check the temperature gauge and sending unit, you can use the IR thermometer to read the temperature at the base of the sending unit and compare it the reading on the temperature gauge.
What is hot?
As was stated earlier, the engine should have antifreeze and a radiator pressure cap. Both of these help to raise the boiling point of water. At what temperature does water boil? At sea level (1 atmosphere - 14.7 psi) water boils at 212, but we’ve increased it to something in the neighbor hood of 240 to 250° F. So just because the temperature gauge is reading 215 you don’t need to panic. However, if it starts getting to 235 (or the red zone if so marked) you need to pull over and let the engine cool off. Once the engine temperature has come down (you’ve sat on the side of the road with the engine off for some 30 minutes to an hour) you can check the amount of coolant in the radiator and try to resume your trip.
Caution - the coolant is under pressure! Do not try to open the radiator cap when the engine is hot. If you do, the coolant will be blow out of the radiator into the air and there is the definate possibility that you will get scalded.
I should mention again, it’s not uncommon for a radiator to overflow after the engine has been stopped, especially on hot days. When the engine is turned off the coolant stops circulating and the engine “heat soaks” - that is, the coolant (initially) gets a lot hotter than when the engine was running. This will cause the coolant to expand and overflow the radiator. That’s why manufacturers install overflow bottles for the radiator, to catch this overflow. Then as the engine cools down, a partial vacuum is created and the coolant should be sucked back into the radiator.
Does the radiator/overflow bottle continually lose water? If so, this could be caused by:
a. A blown head gasket (more on this later).
b. A leaking freeze plug (discussed earlier).
c. Of a leaking water pump (discussed earlier). d. A leaking radiator. e. A leaking overflow bottle.
Simple things:
Let’s assume that the temperature gauge is really reading high. What is normal for your car? Once you know the normal temperature for your car you will know when the temperature gauge is reading abnormally high.
1. Many cars have a shroud around the fan. This is usually a large black plastic piece attached to the back side of the radiator and the fan sits in. Its purpose is to help the fan pull air through the radiator, and not from around the back sides of the radiator. If it’s missing, you will have to try to find or make one.
2. You should check to see that there is some coolant in the overflow tank. Then when the radiator is cool to the touch, you want to remove the radiator cap and ensure that the radiator is full of coolant also.
If the fluid level appears OK and the engine was overheating, you may have to start replacing parts - but first, let’s check a few more things.
Air pockets can form when the cooling system is refilled after a coolant change. To alleviate this a lot of newer cars have a bleed nipple attached to the highest point in the cooling system. Opening this valve allows you to get any trapped air out of the system.
Any area where there is an air pocket is insulated from engine cooling. This means that less heat is absorbed by the coolant and removed from the engine. Consequently, when the temperature of the uncooled area gets hotter than the boiling point of the coolant, steam is created.
One place that is prone to getting air pockets is the heater core. If there is little or no heat output from the heater, chances are there’s an air pocket. So try turning on the heater with the engine running and up to temperature.
Unfortunately, most older cars (pre 1980) don’t have the air bleed valve. So you need to find a way to do the same thing. You want to find a high point in the system. Try disconnecting a heater hose. I should mention that you are probably giong to loose some coolant, so you might want to have a pan under the car, and some rags to catch the wayward coolant. Then recheck the level in the radiator, start the engine, drive the car around the block to bring it back up to temperature. Shut the engine off, let it cool and then recheck the radiator to see that it is full. If not, fill to the rim of the filler neck. Also make sure the overflow bottle is at least 1/3 full of coolant.
3. There is one other inexpensive thing to try: flushing the radiator. It’s possible that some of the cooling tubes are blocked by deposits from the engine or that the engine has some deposits built up in it’s water jacket. Go to your local auto parts store and get some radiator flush. Pour it in the radiator and follow its directions. Usually drive the car around for a little while and then drain the fluid.
Be sure to collect the coolant in a pan and dispose of it properly. Check with local shops to see if they won’t let you dispose of the used coolant there. (I know locally, there is a Firestone store that will let me dispose of my used antifreeze there.) Remember, IT’S TOXIC!
Once the coolant has been drained, you might want to disconnect the upper and lower radiator hoses from the radiator. Then take a garden hose and shoot water into the lower hose at the engine, and into the top of the radiator. Let it run until the water coming out of the engine and radiator is clear. Refill with a 50/50 mixture of water (preferably distilled water) and antifreeze.
If you are still having problems, it has been recommended that every summer, the cooling system be drained and filled with water and “water wetter”. (It is made by Red Line, and should be available at most auto parts stores.) Several people have reported a 20 deg lower gauge reading. Then in the fall, drain and refill with a 50/50 mix of water and antifreeze.
4. You may have a bad temperature sensor, or the electrical wire to it may be disconnected. You can check the wire connection and be sure it’s connected to the sending unit. You may even want to try and clean the connector and connection point on the sender with some emery paper or sandpaper.
The Parts Game:
Now we play the parts game.
If you are new owner of the car and don’t know the maintenance history of your car, (don’t know if or when these parts have been replaced) then the parts should be replaced. These parts are rather inexpensive so it’s usually worth the time and effort to replace them together, especially if you are not doing the work yourself.
1. Replace the radiator cap.
2. Replace the thermostat.
3. Replace the radiator hoses. If they are old they may be deteriorating inside and partially blocking coolant flow.
4. Replace the temperature sensor.
5. The last relatively inexpensive part is the fan clutch. So try replacing that. They are typically about $30. Here is a good article on testing the fan clutch.
Recap:
So all the main components of the cooling system have been replaced, and you’re still overheating. Now what?
The Expensive stuff:
Now we are down to the expensive and pain in the neck jobs. I would suggest that you pull the radiator and change the water pump.
When you change the water pump, you might want to see if you can find a high flow or high performance water pump.
Send the radiator to radiator shop and have it cleaned and flow tested now. They can tell you if you need a new one (or a rebuild of yours). This can be quite expensive. For common late model cars, you can get a radiator for around $150 to $200. For antique or exotic cars it will be more like $1,000. Here again, if you were really having problems with the car overheating you might want to think about one of the newer Aluminum custom made radiator like one from: Griffin Radiators (100 Hurricane Creek Road, Piedmont, SC 29673; (864) 845-5000 or (800) 722-3723).
Last Ditch Effort or Grasping At Straws:
Everything has now been checked and or replaced. But the car is still overheating. Now what. There are a couple of other things that may cause the engine to overheat.
1. There may be too much back pressure from the muffler. We had that problem with my Dad’s ‘48 TR1800. After we restored it (including rebuilding the engine and replacing the exhaust system), she ran very hot. We couldn’t figure it out. Finally, in desperation, dad replaced the muffler and that solved the problem. So if the muffler has recently been changed and the problem just started, suspect a muffler problem.
Heat Riser
The heat riser is usually attached between the exhaust manifold and the header pipe for the exhaust system. They have a flapper valve internally, and usually have a counter weight and a thermospring to control the valves position. When the engine is cold the spring will increase it's tension and close off the exhaust. As the engine heats up, the spring tension decreases, and the counter weight will open the valve. Some cars use a little vacuum servo to control the valves position.
If you have one of the IR thermometers, try reading the temperature on the exhaust pipes just behind the exhaust manifold. Start the car, drive it around the block to warm it up. Then measure the temperature of both exhaust pipes and manifolds. If they are pretty close to the same your valve is probably open - but is it working (opening and closing)? To check that let the engine cool for several hours and start it. Then going back and forth (to both sides of the engine) check the manifolds / exhaust pipe temperatures One side should heat up faster than the other side. If not, then the valve is most likely stuck open.
The best approach is to drop the header pipe and look at the flapper to be sure it actually moves with the shaft. On my ‘75 Bricklin and my dad's '40 Packard, they was all messed up. The shaft was rusted in one position, and the flapper valve was broken and frozen in the closed position. On my Bricklin, when I had a new exhaust system made, we couldn’t find a new heat riser assembly so we deleted it from my car. On dad's Packard, the heat riser is part of the exhaust manifold, so we simply removed the flapper from the shaft so it is open all the time. We will have some problems with idling and rough running when the engine is cold (especially on cold days) until the engine warms up. But I figure that is better than the problems this valve can cause when not functioning properly - overheating, percolating fuel in the carburetor and in the case of a Bricklin - burning the firewall.
3. Check the engine timing. If it is off quite a bit, it can cause the engine to overheat (but you should notice this in engine performance also!) You will need a timing light to check the timing. If you have a vacuum advance on the distributor you’ll need to disconnect the vacuum hose to it and plug the hose with something like a screw or a golf tee (to prevent a vacuum leak and the engine running poorly). Check the specifications for idle speed and the timing for your engine. To change the timing, you’ll need to loosen the clamp that locks the distributor in place. Then start the engine and be sure it’s up to temperature. Adjust the idle to the proper speed, connect the timing light to #1 spark plug, and while watching the timing light, turn the distributor, a little, in either direction. You’ll see the timing mark move. When it’s set correctly, tighten the distributor locking bolt.
Before you start to set the timing, you might want to clean the crankshaft pulley (harmonic dampener) and timing plate so you can see the timing marks easier. You might also want to put some white paint (or whiteout, or nail polish) on the marks on the crankshaft pulley and on the correct mark on the timing plate. This will make the marks a lot easier to see.
The more advance you give it the cooler it will run, within limits.
The old school (shade tree mechanic) method is to advance the distributor until you have the fastest idle. Then drive the car and see if it pings under load, like going up a hill, or if a manual transmission - trying to accelerate from about 25mph in 4th gear. If it pings (sounds like you are shaking a can of spray paint) then you’ll need to retard the timing a little and try again.
4. If the engine overheats very quickly after startup, check for a blown head gasket. This allows hot gases (from the combustion of the fuel/air mixture) to get into the water jacket. This does a couple of things - first the gases are quite hot so it really heats up the coolant, and second it forces air bubbles into the system.
To test for a blown head gasket look at the oil on the dip stick. Is it a milky chocolate color? Is it kind of foamy, not a thin coat of fluid on the dipstick? If so, this is a classic indication of a blown head gasket. But not absolute proof. What about the coolant in the radiator? Is it a clear greenish, or orangeish color or is it discolored and foamy?
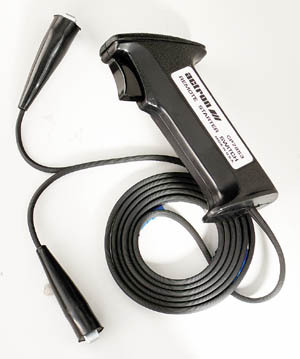
"Actron Remote Starter Switch
Extreme measures:
You’ve tried everything above and still think the engine is running too hot.
1. If you are driving and can’t really do much at the moment, try turning the heater on to maximum heat and full speed fan. This acts as if you have another radiator, which you do, all be it small. This is only a temporary measure.
2. If your car doesn't have a fan shroud you might want to look at making one. Or try making a scoop to force air on to the radiator. My Morgan has a small radiator, no shroud, and has a large air gap all the way around the radiator in the nose shell. So I've made a scoop to scoop air from under the front bumper and direct it to the radiator. This scoop also seals the sides of the radiator. This still leaves a large air gap around the top of the radiator. To seal that, I want to get some water pipe insulation or other foam rubber and stuff it between the radiator and the nose shell to seal the radiator and force all the air through the radiator. The fan also sits quite a ways back from the radiator, allowing air to be pulled from anyplace other than through the radiator. So I may have to try and make a shroud out of cardboard or aluminum.
3. The engine oil also helps to cool the engine. As the oil is pumped through the engine, it absorbs heat. When the oil is returned to the oil pan the heat in the oil can be dissipated to the oil reserve in the pan, then to the metal pan and finally to the air. So you might want to think about adding an oil cooler to help cool the oil.
4. You can add an additional radiator, such as a heater core, somplace in the engine bay. Again the more surface area to disapate the heat the better.
5. In the summer drain the antifreeze and install distilled water and "water wetter".
6. Jacques LeClainche (from the Bricklin community and owner of VIN 2121) is thinking about installing a Gano coolant filter. They make a “Clear Hi-temperature polymer” (all sizes). This product creates a window into your cooling system. Approximately 2.75” long, it requires two inches of the hoses to be removed. With the engine running, turbulence in the coolant flow can be observed. The velocity of the flow can indicate the proper operation of the thermostat and water pump. Bubbles in the coolant could suggest cavitation from the water pump or leaking head gasket and over heating. With the engine stopped, an empty filter would indicate low coolant. The latter feature is especially useful when the engine is hot and removal of the radiator cap could be dangerous.”
There you have it, a lot better understanding of the cooling system and what can cause overheating, and ways to try and cure it. Good luck! Hopefully you can get the temperature down.
Return to the Index of Tech. articles
To email me with comments or questions.