RESTORING A MORGAN - page
five
by Lorne Goldman
 10. The new silencers and the rest of the exhaust
must be fit. This is a straight forward job but it must be done well to
avoid unnecessary strain
10. The new silencers and the rest of the exhaust
must be fit. This is a straight forward job but it must be done well to
avoid unnecessary strain 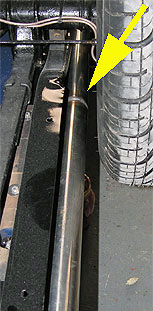 on the fittings. As well, the original methods
can always be improved
upon..after great thought. Kevin uses his own brackets..they're better.
Stainless fittings throughout.
on the fittings. As well, the original methods
can always be improved
upon..after great thought. Kevin uses his own brackets..they're better.
Stainless fittings throughout.
We addressed two issues. Morgan frames are angled slightly
towards the rear. As the pipes are straight, they
end up at a mild angle at their arrival at the rear and this looks splayed
with the exhaust angle outboard on each side. This was cured by cutting
the pipes at the middle of the rear wheels, angling them to match the frames,
and then re-welding grinding and sanding them.
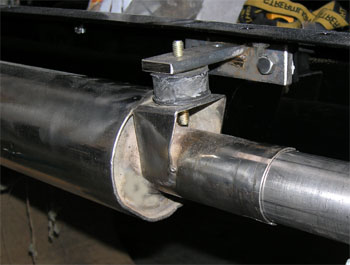
The second issue was the rear hanger fitting. This stock
system allows considerable flexibility at the rear, but
leaves the pipes askew often and touching the rear wheels. The rubber must
be change often. The trick is to find a simple method that allows a bit
of movement, but keeps the pipes close to the frame side without touching
it. This is accomplished by the use of a small flange attached near the
end of the pipe which is used to hold the pipe to the frame with an intervening
rubber bobbin, the items used to held exhaust and radiators.
After the fitting and mods, the pipes and silencers are
sent to the polishers for a mirror shine. When finally fitted, they will
be finished off with polished stainless exhaust tips and proper exhaust clamps. N.B. There will be NO rear resonators. They
serve no useful purpose beyond taming your thunder. (smile)
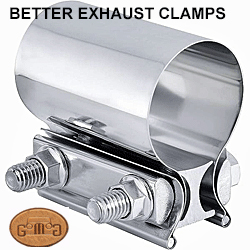 The exhaust clamps shown to the left are common in the USA. The prevent the damage standard clamps cause (warping) and prevent the sniffling leaks common to other clamps. They are also
pretty and inexpensive. I prefer the aesthetics with the
tightening clamps hidden, so I install them upside down.
The exhaust clamps shown to the left are common in the USA. The prevent the damage standard clamps cause (warping) and prevent the sniffling leaks common to other clamps. They are also
pretty and inexpensive. I prefer the aesthetics with the
tightening clamps hidden, so I install them upside down.
As these last images hint at, the sagas with the chassis
and other components have being progressing simultaneously and many parts
are finished!! I have missed showing hundreds of small but necessary tasks
already but it is time to move on to Stage 3.
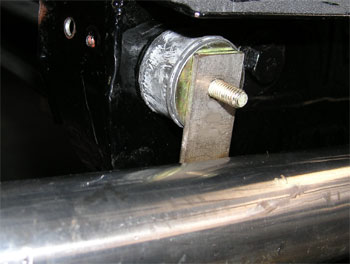
At the rear,
after 100,000 miles, I got tired of the silly coat hangers and
rubber doughnuts that stretch so easily and knock at the rear for years
before owners realize what is happening. I moved to a smarter system
displayed to the right, an idea of Kevin's he wanted to try..
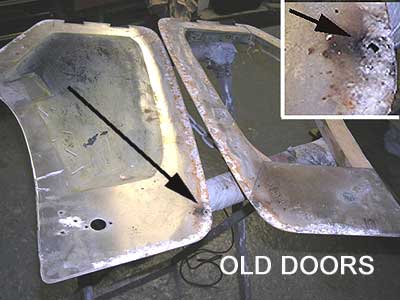
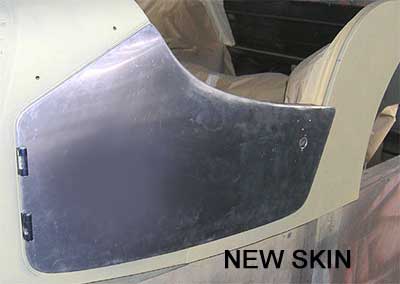
11. The doors are found to be
wanting. Poor original sealing has allowed water entry and finally corrosion
has created holes. There are a number of solutions, many of the simple,
but the very best solution is the most difficult..to re-skin the doors.
However, one of the advantages of dealing with a knowledgeable expert is
that you can benefit from the fact there is NO learning curve and the "difficult"
has long away become familiar and easy for him.
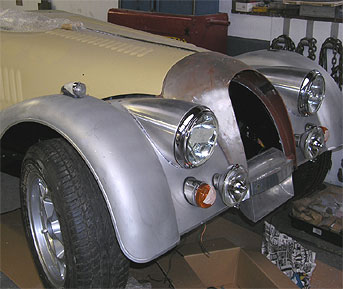
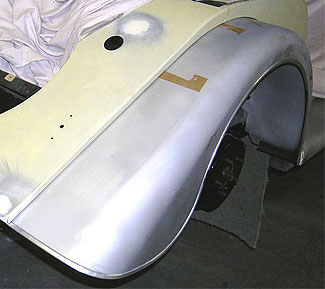
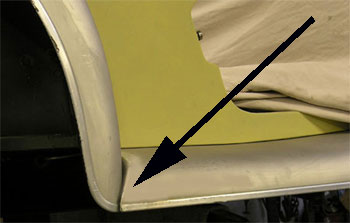
12. The new wings are fit. This
is a long nerve-racking task for most....wrapped in long legends of magic
hands and mysterious MMC mantras...but not so at Tudor. The job is done
quickly. There are some interesting watchpoints however...often overlooked
by others.
i. The shape of the Superform wings do not marry with
the original (mild steel) cowls of the age. Today's cowls (now in alloy)
have a mildly 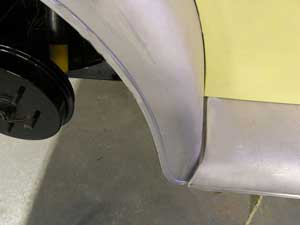 different curvature to better fit with the mildly different
shape of the Superforms. To be perfect, the old cowl should be cut and
reshaped. This is done.
different curvature to better fit with the mildly different
shape of the Superforms. To be perfect, the old cowl should be cut and
reshaped. This is done.
 ii. At the rear of the front wings, where they meet the
rear wings, a space is formed between the two at the
Factory as the front wings are cut straight where the rear wings are curving
back. As all Morgan owners know, the space created is open to road debris
and the paint
is quickly ground off. Rather than finishing the wings thusly, we work
harder than they and cut a curve to the front wings to match the curvature
of the rear wings and close the space. The result is both aesthetically
pleasing and effective. The little mod has allowed this Morgan's rear wing
paint to remain whole.
ii. At the rear of the front wings, where they meet the
rear wings, a space is formed between the two at the
Factory as the front wings are cut straight where the rear wings are curving
back. As all Morgan owners know, the space created is open to road debris
and the paint
is quickly ground off. Rather than finishing the wings thusly, we work
harder than they and cut a curve to the front wings to match the curvature
of the rear wings and close the space. The result is both aesthetically
pleasing and effective. The little mod has allowed this Morgan's rear wing
paint to remain whole.
iii. I like fog lamps. I also prefer to put them on the
wings rather than hanging them on bumpers or badge bars. Normally, the
weaker alloy wings require some stiffening to take the lamps without cracking
the wings. An advantage of Superforms is their hardness. Coupled with plinths
to spread the load, there is no need for an extra stiffening plate.
PAGE 6