In a previous article, I discussed reassembling the wooden sub frame and checking that the body panels basically fit. Once I had it assembled, I was able to drill the mounting holes in the chassis. At that time, I had finished epoxying the parts and had to get them to fit again. After a little cleaning of the epoxy from the corners, where it tended to sag and form fill-its, the wooden parts were fitted together. This was where the article left off. Since then, I have disassembled and painted all the wooden parts and painted all of the metal body parts.
Now it is time to start putting the skin back on the wood. This should be a fairly easy task, I thought. It turned out to be more of a chore than I imagined. Before I start describing how I did it, let me pass along a couple of tips I discovered too late in the game.
1. When trying to smooth a piece of wood (epoxied or not) I should have used a belt sander. I had been using an orbital sander which just couldn't take off enough material (either wood or epoxy) fast enough. Consequently, I ended up with little dents in the wood and epoxy. However, since most of the wood is not seen, I didn't loose a lot of sleep over it.
2. I had planned to paint all the wooden parts. But after I had painted the passengers side fender arch, I just wasn't happy with its looks. It was pretty rough, there was a crack that I had tried to fill with epoxy and numerous dents. I decided to try something. I applied a layer of body putty to the arch, sanded it smooth, and repainted it. It sure looks a lot better. I almost wish I had thought of this earlier.
3. I planned to paint each of the body parts separately before attaching them to the car. This would ensure the entire part, inside and out, was painted. When I started stripping the body parts I started with the front fenders since they were going to take the most time. The last body parts I stripped and painted were: the cowl over the dash board, the rear quarter panels and the rear deck. These should have been the 1st body parts worked over as they would be the first to be reinstalled. Also if these parts were finished when the weather turns bad (ie. winter arrives), the necessary parts are ready to start fitting to the wood sub frame. When doing the body work, the dimples created by the nail and screw holes, in the edges of the sheet metal, must be flattened. For some of this, I used 2 small pieces of 1/4" steel bar stock (about 4" long). The bar stock was placed on each side of the metal lips, then pressed together using a 4" C clamp. For others dimples, I used a body hammer and dolly. (If you don't have any body tools - Harbor Freight Tools, 3491 Mission Oaks Blvd. Camarillo, Ca 93011-6010, (800) 423-2567 - has a good 7 pc set - 3 hammers and 4 dollies - for about $15. This is the best price I've found.)
4. When trying to fit the wood sub frame to the chassis: the cowl, quarter panels and rear deck should also be fitted. This will ensure a total alignment of the wood sub frame and the sheet metal. The mounting of the wood sub frame to the chassis is not as critical as is the fit of the sheet metal to the wooden sub frame.
I had previously fit the firewall, the sill plates, the door hinge posts, and the dashboard framing to the chassis. It was finally time to bolt the rear fender arches to the chassis. "The best laid plans of mice and men .....", for some reason things no longer fit. When I got ready to insert the 2 carriage bolts that attach this rear section to the chassis I noticed that the front edges of the rear mounting blocks (on both sides of the car) were about 1/4" above the chassis. However, the rear edges of the mounting block (on both sides of the car) were touching the chassis. It was time to call in the reinforcements. DAAAD HELLLP! My dad came over and we pondered the problem for a while. It appears that when the chassis was made and the welded round down for the rear end cooled, it pulled the rear of the chassis up slightly. I should have placed a straight edge along the chassis to check for this. To overcome the problem, we arrived at three possible solutions:
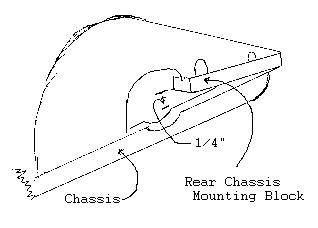
5. Placing some shimming material in the channel of the mounting block to force the front of the mounting block down.
6. Modifying the channel (in the mounting block) so that
its depth formed the required wedge.
We decided to opt for the 3rd method, cutting a wedge
in the channel so that it was the required 1/4" deeper in the rear. This
would allow the mounting block to lay flat on the chassis.
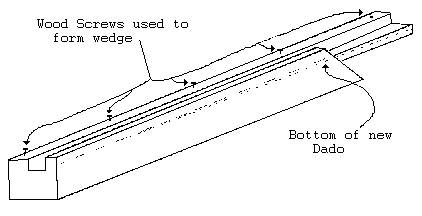
To make the wedge cut in the channel, we used a table saw. However, a table saw cuts a constant depth and we needed to cut a wedge. Therefore, we would have to jack the wooden mounting block up at the front to prevent it from being cut. To jack the mounting block up, we installed some small wood screws every 3", starting at the rear of the mounting block, on both sides of the channel. The screws at the rear were screwed all the way in (the deepest part of the cut). While the screws at the front were screwed in until their head was 1/4" higher than the rear screws. Now a straight edge was placed on the screw heads as a guide for adjusting the rest of the screws.
Next, the height of the blade on the table saw had to be set. The saw blade was adjusted until it just barely touched the front of the mounting block (where we did not want to cut away any of the wood). To cut the entire width of the channel, several cuts were required. Between each cut, the rip fence was moved 1/8". When the entire channel had been cut, a chisel was used to clean up the small irregularities. After this modification to each mounting block, the fender arches were reassembled and set on the chassis. Both mounting blocks fit quite nicely now. At this point I should mention that we decided to modify the rear-most wooden cross member that attaches to the two rear mounting blocks. Originally the cross brace was screwed to the two mounting blocks (forming a U) from the top, before they were attached to the inner fender panels. This U was very fragile and had to be removed from the fender panels before it could be disassembled. While the rear fender arches were off the car, the rear mounting blocks were screwed in place. The cross brace was set in place, and mounting holes were drilled from the bottom! Now all the cross bracing could be installed after the fender arches were set on the chassis.
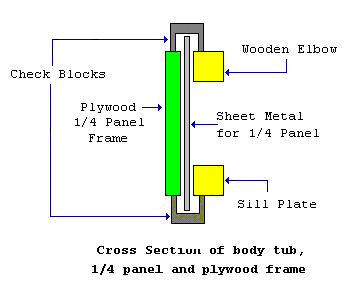
Those problems solved, it was time to move on to fitting the driver's side quarter panel. We started by holding the quarter panel to the fender arch, and fitting the panel at the lower back edge (where it makes a 90 degree. turn to start up the fender arch). The elbow stuck out 1/8" beyond the quarter panel at the striker plate and about 1/16" across the top of the elbow. We unscrewed the elbow from the sill plate and knocked it out of the notch. It sprang back the 1/8" inch we needed. Apparently, I had the sill plates 1/8" too long (probably because of the epoxy and paint). I had used the original mounting holes in the fender arch to mount the elbow and the stiffener that attaches to the elbow and the fender arches. When everything was screwed together, the elbow was pulled forward 1/8" to fit in the notch of the sill plate. However, now it would not fit into the notch. Instead of opening the notch in the sill plate, we chiseled a notch in the rear of the lower part of the elbow. To lower the top of the elbow, we sanded the curved part of the elbow, where it meets the fender arch.
To be sure we hadn't messed up the door frame, we mounted the doors, the latch and the striker plate. Everything still fit. The gap that was left in the notch in the sill plate was filled by gluing a couple of popsicle sticks together and gluing them in place. Now the front part of the quarter panel, that goes forward under the door, did not fit. In working the panel to fit the elbow and fender arch, the front had rocked down 1/16". To fix this, we sanded the top of the lower door frame down with a drum sander in a drill. Once the panel fit on to the door frame and the sill plate, we used a belt sander to smooth the entire width of the door frame. This process was repeated on the passenger side. To finish the job, a thin layer of epoxy was brushed on the bare wood and then I touched up the paint. Nothing works like a little friendly persuasion!
Next the rear deck was set in place. The rear of the deck (where it wraps around the rear cross brace) was pressed forward to seat on the rear cross brace. Then the deck was clamped to the fender arches by placing a paint stirrer on top of the deck and under the fender arch and holding everything in place with a 4" C clamp. Next the top rear cross brace was set in place. The rear deck was about 1/4" in front of this brace. To fix this, the cross brace was set up on the elbows and pulled forward to meet the front of the deck. Using an awl, a line was marked on the elbows. The deck was removed, and 1/4" was carefully sawed off the back of the elbows. After plugging the old mounting holes, new ones were drilled and the brace was screwed into place.
Before the cowl over the dash board can be installed, the little triangular pieces that go between the sill plate and the lower door frame must be in place. Actually, I goofed. These triangular pieces should have been put on before the firewall was installed. Originally, there were 2 nails that held the front of these pieces to the wooden firewall frame. The bottom screw in the firewall also holds it in place. Since my firewall was already in place, I just let the one screw hold the triangular piece in place at the front. The only problem I had fitting the cowl was getting it over the outer support for the dash (this also forms the upper part of the door frame). I got one side in place, then really had to pull on the cowl to get it over the other side of the framing. Once that was done, the cowl fit quite nicely.
Closing
In closing, I found that all the edges on the wood were
very sharp 90 degree bends, partially because of the epoxy. Sanding the
corners slightly round seemed to help some. To fasten the skin to the wood,
the factory used nails. Someone told me that they should be Brass so they
don't rust. When I was talking to Dale Barry (a pen pal restoring a 56
+4, 4 seater), he said that Ron Naida had suggested using small brass screws.
That way it is easier to remove the skin in the future if necessary.
Last updated: 03/31/1997
The body panels of all Morgans are 22 gauge cold rolled steel or aluminum (slightly thicker semi hard aluminum is used).
Fabricating a panel is not as difficult as one would think. The trick is to know what the metal is going to do when hit or bent and how to make it do only what you want it to do and nothing more. The quarter panel is probably the easiest panel to fabricate on a Morgan, requiring no special tools or equipment. To start you must have good solid wood. If you can move any of the timbers more than a quarter inch movement or have loose joints, attempting to fabricate a panel over it is fruitless. Check the covered edge of all wood. This is the 90 degree corner which will be covered by the sheet metal. The edge should be sharp with very little radius and complete. Do not assume that a one inch chip of 1/8 depth in the edge will not make a difference. Once the sheet metal is on you will see every imperfection in the wood beneath it.
The basic tools needed to fabricate a quarter panel are:
What we want to do is basically cut out the sheet metal to the shape and lay it up on the side of the car sandwiched between the ash and the plywood so that the edge is sticking out. With the hammer we are going to bend the edge over the ash forming the panel.
Start by rough cutting the plywood to the shape of the panel with in a inch or two over size. This will have to be done in three pieces:
1.The bottom of the door sill,
2. The main side panel,
3. The tail.
Clamp the plywood to the ash frame and with a pencil run a line around the edge. Since we want the line to follow the actual pattern of the ash I suggest you put the sharpened pencil to the grinder and grind away half the width of the pencil.. This gives you a flat surface (with half the lead exposed) to lay on the ash and will transfer the outline to the plywood without the chance of the pencil point dipping into the crack between the plywood and ash frame.) Cut out the pattern and you should have three pieces of plywood which exactly cover side of the body tub. Now using the plywood as a rough pattern cut out the sheet metal. (Be sure that what ever you are laying the sheet metal on is clean, a tiny stone will dent the metal.) A simple way to do this is to lay the plywood panels on the sheet metal with something very heavy on top of the plywood to keep them from moving. Take a 1" X 4" piece of wood and drill a hole one inch from the end. The hole should be just thick enough to press a nail though. Spray the sheet metal with a light coat of spray paint (or if you want to be professionally correct use machinists layout fluid). Place the block against the edge of the plywood so the nail is one inch out. Now slide the block along the edge of the plywood while pressing down on the nail. You should have a bright line where the nail scratched the paint and a panel one inch bigger (more or less) than you need.
Cut on the bright scribe mark.
Hint: The work in cutting sheet metal is not caused by the snips cutting into the metal but by the metal wanting to relieve the stress of the cut. If you cut a sheet 12 inches wide in half the stress has no where to go so it fights the snips. Cut a one inch strip along the edge and you will find the one inch strip curls into a neat cork screw shape. This curling is relieving the stress so the snips cut much easier. Try to always cut so the curl is up and with one hand roll the curl as you cut. You'll find this makes cutting much easier and you get better control (ie: make the snips go where you want them to go). Also try to cut with as little metal on the waste side as possible and always make sure the waste is smaller than the piece your cutting out. You can rough cut the panel out of the sheet but figure at least two inches of metal either side of the cut will be bent. Also you will not have any control so stay well away from your final cut line.Take the sheet metal and spray paint the inside (light coat) (you should have a 50/50 chance of this being done already from the rough out) and place it on the ash frame so an equal amount sticks out all around. Place the plywood over this and arrange the plywood so the edge is even with the ash frame all around.
Hint: Take 2 to 4 "centering" blocks. These blocks are nothing more than a aid to seeing how everything is lining up by insuring the edges of the plywood and the edge of the ash frame are on the same plane. Think of the "blocks " as the old wood clothes pins. If you place the pin over the sheet metal which is sticking out between the frame and plywood one leg will touch the frame and the other the plywood. If the plywood is not positioned correctly one of the legs will touch the frame or plywood and not the other.
Once everything is aligned clamp it all in place with as may clamp as you have. You will not be able to clamp around the wheel arch.
Now you must mark out the Flange. The Flange is that part of the panel which bends over 90 degrees and will have the tacks driven into it. Since the size of the flange varies (from 3/8" to 1" wide) based on who was making the panels at the factory that day, you should use choose a width. Set your compass scribe at that width and scribe around the frame just as you did with the plywood. You should get two lines this time, one at the frame line and one above it which is the cut line.
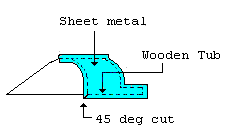
The door post is 1" wide and the hidem takes its tack half way through, so it should be no more than 3/8 inch. The back panel will determine the size of the tail flange. The arch is covered by the fender so it really doesn't matter. I suggest you take it from the old panel. But remember that the corner has a radius and the bend will shrink the metal slightly. (If you measure the flange remember to subtract the thickness of the metal.) Once scribed all around remove the panel and cut out on the outside line. Try to plan your cuts so the curl is up and take it slow. Remember you can't put metal back but you can always cut again or file to the line. At this point disregard the notches for the "D" Cup and door striker on the rear door post. Just cut straight as if they weren't there.
Once cut out, remount to the frame as before. Insure the flange is evenly spaced.
Re apply all the C clamps . Now we are ready to start hammering.
1. Think about every blow before you make it! You are going to be making several hundred blows and it can become automatic. That's when you will make the hit which screws up the panel.
2. Never hit the panel when it is unsupported. The plywood is holding the panel to the shape you want. Don't hit the panel even lightly on the edge unless the panel is sandwiched between the frame and the plywood tightly. If you see a gap between the plywood and panel or the frame and panel rearrange the c clamps. You might have to release one side and tighten up another.
3. Don't hit too hard. Think of it as persuading the metal to do what you want not forcing it.
Once in place take your snips and cut the front corner of the wheel arch at a 45 degree angle. Do the same at the two corners of the rear tail section. I usually start at the arch since it is the easiest and lets you get a feel for the metal. Since we can't clamp around the arch you will need to press in on the plywood during each blow. You want your first blow to be low and close to the frame and plywood. We are trying not to bend the metal over as much as folding it over. Consider the part of the flange closest to the frame and plywood the base and the edge the top. We want to start the folding at the base not the top. If you aim the first blows at the top you will form a "?" and just like the "?", the metal will be forced out at the base and when you hit down on the flange the metal will travel in both directions thus you end up with a ridge and a very wide radius on the edge.
Where you can expect trouble is in an outside radius. The wheel arch is a inside radius while the curve above the door is an outside radius. The problem comes from the fact that as you fold the metal over the edge of the panel which is a fixed length must now conform to a shorter length. The excess metal has to go some where and what it wants to do is buckle or wave. You can't prevent it while folding on the frame, but can control it. The objective is to spread the waves as evenly as possible over the entire radius and not try to "push" then to the sides. The waves are the excess metal grouping up, later we are going to push this excess metal into itself making the metal thicker, too much metal and we will end up with folds. So as you work the upper curve over don't panic because of the waves and don't try to hammer them flat, simply work from the wave out and keep the blows working from the base up.
Once you have all the sides folded over take the panel off the frame. We are now going to clean up the flange, shrink the waves, tighten the radius and get the panel tight.
Here you don't have the safety of the frame and plywood to control the shape of the metal. The panel should be laid on a flat surface and fully supported. Place the steel plate under the edge of the panel you will be working on. Place the dolly on the inside edge of the flange. Hold the dolly tightly down and against the flange while hammering the flange with fairly light blows. Work your way around the panel. With a file, file the edge flat then lightly de bur the edge by drawing the file over the edge at a forty five degree angle. Fit the panel to the frame being careful no to force anything.
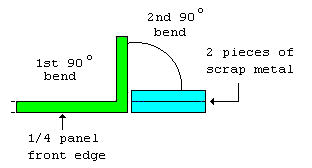
To form the front step (which fits under the front panel at the bottom door sill) start by placing a line 6 inches back from the rear edge of the front section. Place the panel in place and with the compass set at six inches place one leg on the line and scribe a mark on your panel with the other leg. This should be the where you need to make the cut. Remove the panel and cut the tab as on old panel.
Lay the panel on the steel plate and use a block of wood or your dolly to bend the tab up 90 degrees. Place two thickness of scrape sheet metal at the line (90 d bend) and fold the tab back down, using the dolly to hold the panel flat on the steel plate. This will give you the step down so the panels are even.
Use the nibblers to notch out the opening for the "D" block cup and door latch. I nibble to with in an 1/8 inch of the line then fit the panel the frame and hand file to fit.
After painting the under side, the panel is ready to be fitted to the frame. Use the plywood and clamps as before. Use a punch to make a start for a 1/16th inch hole which you drill for each of the pins (tacks). Spacing of the screw and pins are again dependent on who was paneling cars the day yours was make. When drilling the hole for the pins, only penetrate sheet metal not the wood. With a fine file dress the flange and edge.
The panel Oil cans; You hit it with out support or forced it on or off the frame, stretching the metal. Throw it out and start over.
The panel doesn't fit tightly to the frame; Check the back panel, file to fit.