 (Webmaster : J.W.Taylor, is a Morgan owner himself
and designed and produces this item. Has received a good number of recommendations
from the Morgan owners' community. ) http://www.morganhoods.com/
(Webmaster : J.W.Taylor, is a Morgan owner himself
and designed and produces this item. Has received a good number of recommendations
from the Morgan owners' community. ) http://www.morganhoods.com/
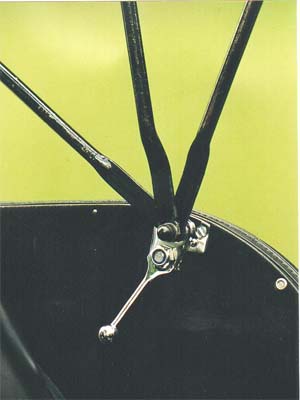
A simple and effective method to help install the hood with ease without bruised fingers, broken windscreen, torn hood or expressing certain expletives. Fastening the hood all round pressing down the swivel levers and the hood is evenly tensioned with a satisfying "clunk". To fit, simply remove the existing hood frame pivots and replace with the new quality "Swivel Pivots" using the same screw holes. No need to drill extra holes or modify the frames.
The kit comprises a pair of ‘Swivel Pivots’, stainless steel fixing screws and full fitting instructions. When the hood is required simply secure the hood to all the rear fixings as normal,turn the levers to lower the hood frame and secure the hood onto the windscreen with ease. Making sure the frame is in the fully extended position,turn the levers to the over centre locking position and the hood is tensioned and safely installed. A "Doddle", no more pulling on the hood and risking a broken screen. Precision high-pressure brass diecasting.
A testimonial from the eMOG archives
I've got to share this with you; erecting the hood on LULU ('93 +4, 4-str) is normally one of the lesser-known Labours of Hercules - last time, working on my own, it took me 3 HOURS; a pair of engineers pliers; a book of spells; a swearing dictionary; a box of Elastoplast and a vatful of touch-up paint to repair the skags on the rear wings when the pliers lost their grip (catapulting me into the flower bed in the process). Normally with the Rivenhood at full stretch there is at least an 1 1/2" gap between the hood's leading edge lift-the-dot connectors and the windscreen posts - and on cold days, it might as well be 18" (and yes, I have tried starting at the front - with identical results). The neighbours used to invite their friends round to watch me and make cheery, helpful suggestions. Oh how we all laughed. (sad sigh)
I was a sad little Morganeer with mangled fingers and thumbs and in consequence I had just about decided to mortgage She-Who-Must-Be-Obeyed and the brats to purchase a Simmonds conversion when I saw John Taylor's advert in 'Miscellany' this month; his four-seater conversion kit consists of a pair of nicely-finished cranked levers, a swinging latch and ALL the bits and pieces needed to do the job (thoughtfully even including drills and an Allen key). The instructions are also comprehensible to the mechanically- bewildered (putting me in charge of an electric drill is like putting Herod in charge of a children's home).
The job took me about an hour to complete (most of the time taken up in carefully drilling out a rivet on each side of the hood frame). No problems were encountered (apart from breaking a pilot drill bit - TIP: Remember to set the drill to NON-hammer action before you start...) and the result? Working on my own, I can now get the roof up well within five minutes (including a full minute for smirking); connect hood to windscreen, drop the levers, a small tug over the rear turnbuckles, work the levers again to tension the hood and slide the new latch forward to lock everything in position. Pure magic - and a small fraction of the price I was considering paying. Give the man a medal - I'm actually looking forward to the next downpour! Simon Hartgroves, Cornwall, UK L277 ULU