
Front Wheel Vibration or shimmy is a very common complaint by Morgan owners. Identifying which of the various front suspension components is causing these vibrations can be very frustrating. To try to ease some of this frustration, I will talk you through the steps of isolating and fixing the problem.
CHECKING THE TYRE PRESSURE The first and easiest to check https://www.zupimages.net/viewer.php?id=24/21/4c5a.jpg is tire pressure. For earlier 4/4s, it should be 16 to 18 pounds, for Plus 8s 20-22 (add 3-4 pounds for high speeds driving. If in doubt, check your Manual.
CHECKING THE RIMS Next comes the possibility that a rim is "out of round". This condition is more prevalent in the cars fitted with wire wheels but if a disk wheel has had a brush with a curb, it too can be warped. The procedure to check the tyres and wheels is similar and simple. Jack up far enough to get the desired wheel off the ground.
Place the brick along side the wheel and move the pointer so it is perpendicular to the wheel. You want the pointer to just touch the rim where it rolls in - where the bead seats. Again spin the wheel and watch for variations in the gap between the pointer and the rim. If the gap is less that 1/8" the rim is OK. If the gap is greater than 1/8" the wheel will have to be trued - especially so for wire wheels. For disk wheels, the wheel is usually replaced.
CHECKING THE TYRES, place brick just in front of the tyre. On the brick place a screwdriver (or something) to be used as a pointing device. Slide the pointer towards the tyre, until it just touches. Now slowly rotate the wheel. As the tyre passes the pointer watch the gap between the pointer and the tyre. If there is a "hi" spot the tyre will push the pointer back onto the brick. At the low spot on the tyre, you will see the widest gap between the tyre and the pointer. If this gap is less than 1/8" the tyre is OK.
CHECKING THE BUSHES
from Greg Solow on eMog
With the car sitting on the ground at normal ride height, have a friend grab the top of the front wheel and push inward toward the center of the car and then pull outward away from the car. This must be done with some degree of force. While your friend is doing this, take a bright light and look carefully at the point where the spindle rests on the top of the rebound spring (that is the small lower spring at the bottom of the kingpin).
You are looking for side to side movement at this point. This is where most wear occurs on the kingpin. With unworn parts there will be no movement here, and the greater the usage the more the movement. More than 1/8 inch of play at this point is an indication of worn out bushings and probably kingpins also. 1/8 inch of wear at this point probably equals about 1/2 inch or more of movement at the edge of the tyre.
Movement at the edge of the tyre can also indicate play in the front wheel bearings. That is why it is important to look at the interface of the rebound spring and spindle to ascertain exactly where the play is located.
CHECKING THE WHEEL BEARINGS
from Lorne Goldman on eMog
With the car on the ground and front wheels facing straight
ahead, grab the tread at the top of tyre with your fingers try to push and
pull in and out.. Do you feel a significant movement (a slight click can
be ok) . If the movement is excessive, you should check the adjustment of
the castle nut holding the bearing. To adjust the castle nut, you remove its
cotter pin and then tighten until it makes just contact with the bearing and
then back OFF to first cotterpin hole. (WATCHPOINT: If you tighten the castlenut
too tightly against the bearing, you will quickly burn the bearing.)
CHECKING THE DAMPER BLADES To test for wear, with the car on the ground, grab the blade and push forward and back. If a click or movement can be heard or felt the shims need to be pushed tight against the blades to prevent that. However, there MUST be free movement in and out of the slot made by the shims. Push down on the blade to see if it can move in and out.
There are two places where disc steel wheels "normally" crack, firstly, at the lug nut and secondly, at the hub cap attaching stud. Cracking at the lug nut is not caused by over tightening the lug nut, but rather by the stress to the wheel induced by the stiff sliding pillar suspension under racing conditions. The factory also introduces stresses at this location by stamping the wheel to provide full purchase for the sloped shape of the wheel lug nuts. Lastly, wheel stresses are also magnified by the fact that these wheels have only four lug nuts, a 20% increased loading factor on each nut over normal five studded wheels.
The crack at the hub cap studs is due to the factory induced stress when the curved portion of the wheel is flattened for insertion of the hub cap stud. These cracks then radiate to the ventilation holes in the wheel. An appropriate solution is to have a competent and experienced welder weld 1/8 inch flat plates to the back side of the wheel with appropriate holes for the lug nuts and the center hub.
With these items checked it's time to head down to the local tyre shop and have your wheels dynamically (spin) balanced. Most shops take the wheel and tire off the car to balance it.. It requires a special adapter, so check with the shop to ensure that they have the adapter.) The advantage here is that the wheel/tyre unit can be moved around to any of the 4 axles and maintain its balance.
Sometimes the suspension components can add to the balancing problems. To try to balance the entire suspension you will have to find a shop that can still spin balance the wheels on the car. But this seem to have passed on to oblivion like so many other things. This method will give you a better balance at each corner but the wheels and tyres can not be moved. When the tyres are rotated, the suspension will have to be re-balanced.
| Thread Size | lbs / ft | Kg / mtr |
| 3/8 UNF | 38 - 40 | 5.2 - 5.5 |
| 7/16 UNF | 53 - 55 | 7.3 - 7.6 |
| 1/2 UNF | 77 - 79 | 10.6 - 10.9 |
| M12 x 1.25 | 65 - 67 | 9.09 - 9.20 |
Front Vibration (Curing it when all else fails)
|
|
Webmaster Note: There is plenty in these pages that will show how to sort ANY stock Morgan front suspension and rid it of vibration. In theory..and happily most often in practice, these pages can cure all issues in the original Morgan manner. However, for whatever the mysterious reasons, sometimes vibration will be beyond the skills of the owner or various addons or changes he may have made. It such cases the cars become a source of deep frustration. The point of this Manual is not to force you to sort your Morgan as it was originally meant to be. The priority is to help you reap enjoyment, not frustration from your mog. For those of you with front end vibration that resists your efforts, here is a quick fix to stop vibration and get you back on the road. You can always renew your efforts for the proper cure at your leisure. And if someone sees this non-Morgan solution and takes you to task, direct them here and beat them on the head with your knock-off hammer. That's what it's for. Enjoying your Morgan is more important than being correct. |
|
|
|
 Lorne,
I wanted to wait until the traffic died down before I wrote.
eMog was good to me and I thank you for it. I wanted to let you know that
my St. Malvern's dance is gone. I made lower adjustable braces, but with
them I was only able to limit the shake to a very narrow critical speed (about
45 MPH) or make it much worse depending on how I had them adjusted. At the
worst, I was able to make the shake occur at 60MPH accelerating, and then
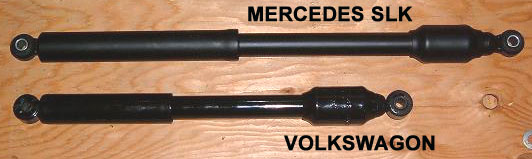
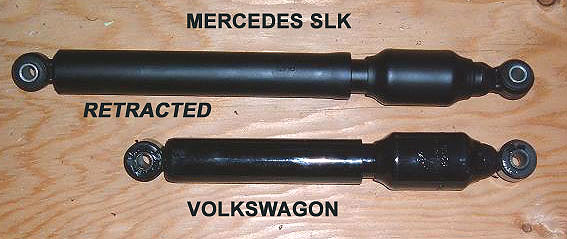
shake again at 40MPH decelerating. I could not rid the car of the stroke
of 5 1/4 inches (same as a VW beetle damper) and my car requires 5 3/4 inches
for the steering to go fully right and left, so I have ordered a damper for
a Mercedes SLK or Chrysler Crossfire which has a longer stroke. I should
have that installed in the next month, but I'm in no hurry since I can now
drive the old car. Caster certainly plays a part, but adding the damper worked
like magic. I cannot detect it as far as steering effort goes, and the only
side effects are the good feeling steering and no shake. I'll send you a
picture of the Mercedes unit when I get it fitted. In the meantime, these
are pics of the VW unit installed. I used some very stiff alloy 3/16" aluminum
flat bar mounted to the lower rad mounts. The rad is still mounted as before
on rubber with the nyloc nuts only snugged up enough to compress the rubber
a little, but the forward bolts are tight to hold the flatbar in place. When
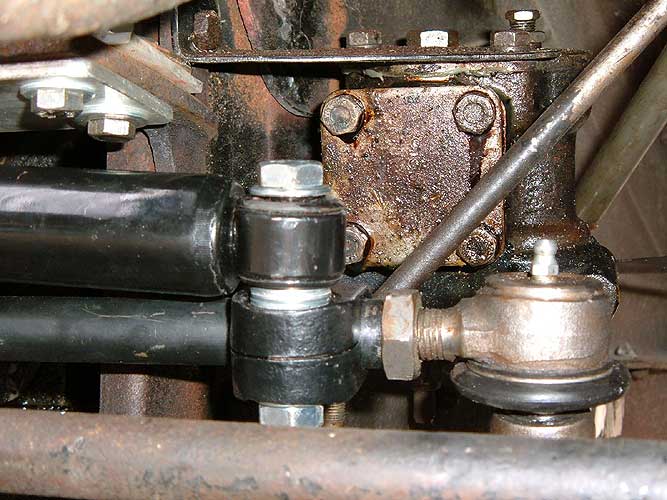
I install the Merc unit, I will have to mount it more to the right of the
car, and about 1-1/2 inches forward so that it does not foul the steering
rod on large bumps. I am now of the opinion that those old cars should have
come with a damper. :-) Fred
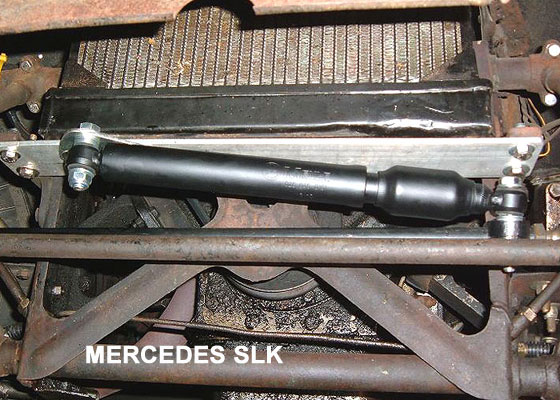
Three weeks later!!!
Lorne, I hope all is well with you. My aftermarket Mercedes SLK (also fits Chrysler Crossfire) steering damper arrived and I mounted it. As I predicted, I had to mount the fixed end slightly forwards of the aluminum plate to prevent the steering rod from contacting it on hard right hand bumps. This time I also mounted the damper correctly so that the dust cover would not collect water. The previous photos of the VW bus damper show how NOT to do it. This damper works even better than the VW unit. It has plently of travel with some to spare so that the wheels will turn fully to the steering stops. Also, this damper is slightly stiffer, but not so stiff as to be noticeable when turning the steering wheel, but stiff enough to completely damp the steering vibration. With the VW damper, the critical speed at which the St Malvern Dance occurred could be felt, although the dance never started. With the Mercedes damper, running the car up and down through that critical speed reveals no evidence that there is a critical speed at which vibration occurs. Here's a couple of pictures of the installation and the parts I used. Take care, Meyle part number 026 046 0161 FredIf you run over a nail or other road debris and it punctures your tyre, there is a specific area of the tyre where a repair is safely possible. This area is on the tread face of the tyre, between the outermost circumferential grooves (grooves that wrap all the way around the tyre). Or, on tyres with tread patterns that don’t have circumferential grooves, no closer than 2 inches to where the shoulder meets the sidewall. Also, puncture repairs are limited to holes of 1/4″ or less in diameter. Cuts are not repairable if they are deep enough to have cut into one of the steel belts inside of your tyre.
No-Nos
Sidewall puncture: If the puncture is in the sidewall of your tyre, you need to replace it. If you were to repair it, you would run the risk of the tyre repair failing. This is because the sidewall of a tyre flexes so much as you drive. A tire plug or patch can work its way loose after so many repeated flexes. Also, the air in your tyre is pressing out on its sidewalls under the weight of the vehicle when you drive. Any weak spot on the sidewall of the tyre will be attacked by the extreme pressure, and there is a risk of blowout at the spot where the repair was done.Shoulder puncture: If the puncture is on the shoulder area of the tyre, it can’t be repaired. As you drive, the shoulder area of your tyre is under the most pressure and flexes the most out of any part of your tyre. Also, the curve of the shoulder of your tyre makes it difficult for a patch or plug to stay in place there. if you perform a tyre repair here, it will likely work its way loose and fail. You risk a blowout by repairing a tyre with a shoulder puncture, but not as high a risk as repairing a sidewall puncture.
Cuts and gashes: If you have a cut in your tyre, it is likely not repairable unless it is 1/4″ long or less. Cuts can sever the steel cords inside the rubber of your tyre that give it its strength. A tyre repair in this case would only keep the tyre from losing air through the hole, not restore the strength of the tyre. It’s also hard for a patch or plug, which is designed to repair a round hole, to effectively repair a cut or gash. If your tyre has cuts or gashes, it’s time t look at new tyres for sale.
If you drive on a tyre that has too low of air pressure, or is flat, you can quickly damage the tyre beyond repair. When a tyre is driven on low enough air pressure that part of the sidewall makes contact with the road, the inner liner of the sidewall will wear away and weaken the sidewall of the tyre. This damage runs around the entire side of the tyre, and cannot be repaired. The initial loss of air pressure might have been caused by a puncture or some other issue that a tyre repair shop could have fixed, but driving on a tyre with low air pressure will destroy it. Make sure tomaintain the correct air pressure in your tyres at all times by checking them at least once per month with a tyre pressure gauge.
A tyre that has been severely damaged in a collision or other impact is not repairable. This includes bulges, tread separation, slipped or broken belts, large cuts or gashes, bead damage, and tyres that were knocked off the rim by an impact. If you have a tyre with any of these problems, you must replace it.
When dealing with a borderline tyre repair, it’s better to play it safe by replacing the tyre. If your tyre is in a condition that is at the edge of the line between being repairable and not repairable, and you have an option between repair and replacement, replacement is the safer choice. Any risk of a tyre blowout is not worth taking.
When Replacing a Defective Tyre on a Morgan
GoMoG Law of Tyre Replacement: When replacing a tyre on a Morgan, remember that you will prejudice the handling and comportment of the car if you do not replace, two at a time..front or back. This is true of all 4-wheeled vehicles, but is more true of trad Morgans than any other car! As well, different make and model tyres, including the spare, leads to a failure in Concours competition as well as a poorly handling car.