 drill to check functioning here and after
it works smoothly with the drill I clip it on the gearbox.
drill to check functioning here and after
it works smoothly with the drill I clip it on the gearbox.
(See the VDO articles for later Speedo problems and/or calibration)
Here may be your problems, in an order of likelihood;
1. The cable is "binding"
at its clip point on the speedo. Some mildly frustrating fiddling can cure
that problem..it is related to the length of the cable tip entering the
speedo. I use the reversible drill to check functioning here and after
it works smoothly with the drill I clip it on the gearbox.
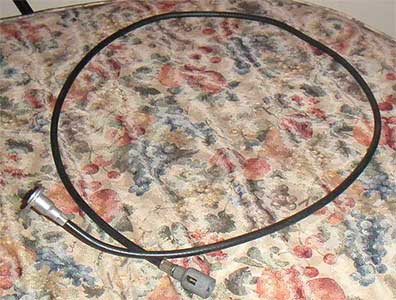
2. Bad routing. Here
is a picture of the original cable that graced the cars..and ALL Plus 8s
from the introduction
of the 5-speed in 1977 until the advent of the 3.9 dictated the need for
a transducer. It sells for $30..where the later ones with a transducer
have three parts (lower 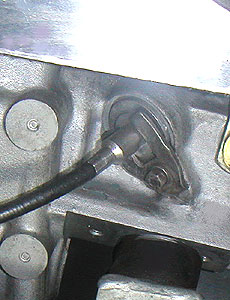 cable/transducer/upper cable) for a total of $170
IF you can find one. The Morgan cable is 53 inches long and a bad routing
can create binding.
cable/transducer/upper cable) for a total of $170
IF you can find one. The Morgan cable is 53 inches long and a bad routing
can create binding.
Morgan had two speedo routings. One went out the side of the bell housing and then back in to the car through the firewall. Even at 53 inches this stretches the cable so tight that the cable will inevitably (5 minutes - 20 years) bind or snap the plastic press fit lock. The other routing...which is less "clean" but safer, has the cable coming out a hole (through a rubber grommet) in the top of the gearbox cover and then under the padded leather cover until it ends and then loops back into the speedo. This routing leaves more slack and less chance of binding.
3. Dirty or worn cable
sleeve. The cable sleeve is dirty, defective or has oil in it. It can sometimes
be rectified by running the cable through it a few times to clean it. With
the cable sleeve unclipped/removed at either end (nor necessary to do both)
it is a simple matter to remove the cable from its sleeve, clean it, lubricate
or replace it. I maintain mine once every year as I find it gives me a
steady needle on the speedo. Lubricate with speedo cable lubricant or powdered
graphite.
4.. The ends of the cable
have worn. This problem normally means that the female entry point has
worn as well. A worn piece wears everything it touches.

5. The speedo gear has gone.
These little plastic gears are very cheap and, of course, no one who has
them will supply them to you. This is another area where I would like to
get a supply source up on GoMoG. The gear costs pennies, is easy to replace
and saves a $125 USD or 90 pound service charge and two week turn-around
time.
| WATCHPOINT: The LT77 and R380 have many choices of speedo gears fit into the gearbox..chosen to match the axle ratio you have (or the speed you want to think you are going!!! (GRIN!) In my case, when I installed a more agressive BTR final ratio 3.45:1), I had to adjust for that by installing a different speedo gear in the R380. There are four different ratios to choose from..each is a different color. They differ in the amount of teeth they have and therefore the spped thay will spin and turn the speedo. Other Morgan gearboxes and differentials have a choice of speedo gears as well. |
6. The speedo needle is stuck. On some speedos, for some bizarre reason, the needle can go too far back to it is beyond zero and then it can jam itself at 0. This is easily remedied. I just fixed the same problem on the e-type with its Smiths.
7. The gear box connection is askew. When you get everything together, be very careful with the connection at the gearbox...you must have it perfectly placed and tight or the cable will not like you either. If the small bracket at the gearbox entry is loose, it will give you a very nervous needle..with a sad up and down movement straddling 5 to 15 mph.
8. Later cars have a speedo cable in three parts, a gearbox to transducer section, the transducer and the transducer to speedo. The parts can be purchased in sections but are becoming difficult to find. You can have one made. see http://www.speedycables.com/Control_Cables.htm The transducer sends a signal necessary for the smooth running of the engine to the ECU. If this section is broken or the transducer is fault you will have a red warning light and poor performance. Often, the transducer ground is at fault. Simply verify that and off you go.
| WATCHPOINT: This watchpoint is sad. It is very likely, that after the best of maintenance and care, your Smiths speedo will still wobble at low speeds. The reason is the routing of the cable which takes too sharp a u-turn to reach the speedo from the gearbox. This causes stress, binding and wobbling. This is one example. Howver, there is hope. You can convert your unit to electronic and use an electonic sender. The parts can be had from Caerbont, the maker of Smiths speedos. |