 Over time, the rubber sides split, leaving the occupant with a bowled uncomfortable
seat. The membrane holding the seat up inevitably tears at its rubber
sides at the bottom section of the seat.
Over time, the rubber sides split, leaving the occupant with a bowled uncomfortable
seat. The membrane holding the seat up inevitably tears at its rubber
sides at the bottom section of the seat. The Seat Webbing
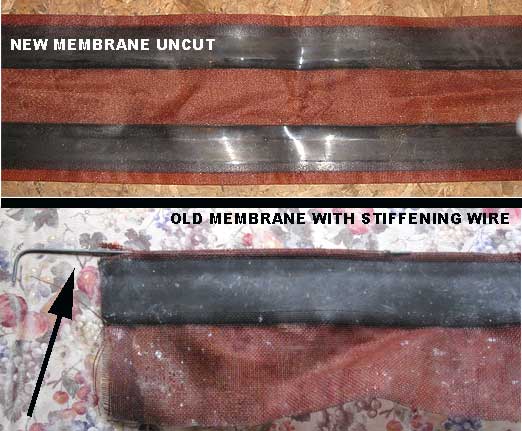
Morgan seats are made
with a webbing supporting the back and bottom. This webbing has rubbersides
and is stretched and hooked to the seat frame sides.
Over time, the rubber sides split, leaving the occupant with a bowled uncomfortable
seat. The membrane holding the seat up inevitably tears at its rubber
sides at the bottom section of the seat.
The solution is replacement
with another membrane...one sheet, cut in half will replace the torn section
at the bottom on one seat. This membrane used to be obtainable from the MMC
but there have been occasions where they have been back-ordered for many months
and there is a possiblity soon they they will eventually not be obtainable.
Check first. Failing 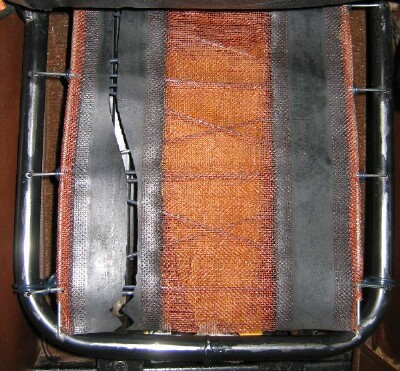 their supply. One can take the torn old one to
an upholster and find another replacement. That has
happened with success. As well, I have once used the retaining hooks and
"laced" them with the nylon line used with grass trimmers. This will work
for years if you want.
their supply. One can take the torn old one to
an upholster and find another replacement. That has
happened with success. As well, I have once used the retaining hooks and
"laced" them with the nylon line used with grass trimmers. This will work
for years if you want.
The membrane length is sufficient to do one full seat (seat and its back) which is unnecessary as it is only the seat section that splits faithfully after 10 to a maximum of 20 years. You can cut three seat sections from one full membrane. Replacing the full membrane is a real pig, an upholsterer's job.
WATCHPOINT: As you have already seen, there are thick reinforcing wires threaded into pockets on each side of the membrane. The old wire, if you do not have a new one, must be threaded in. The hooks go around these wires and without them, the pocket or the membrane will quickly split.
If I remember correctly, after putting in the wire, hook the hooks to the membrane, then one side of the seat frame and the pull the other membrane side on the other side of the frame by pulling over the hooks with pliers.
By the way, they were originally Alpha Romeo parts. They are now made by Recoro.
 Removing the seats
is not hard, it can even be classifed as easy. BUT it is a bit of a fiddle
to get them back on. Each seat has two metal rails that sit on wooden slats.
There are 3 bolts a rail or six per seat. Push the seat as far back as possible
and, using a small vice-grips, clamp the front bolts (4) first, and remove
their nuts under car. (if you have problems as they are rusted look HERE.
Removing the seats
is not hard, it can even be classifed as easy. BUT it is a bit of a fiddle
to get them back on. Each seat has two metal rails that sit on wooden slats.
There are 3 bolts a rail or six per seat. Push the seat as far back as possible
and, using a small vice-grips, clamp the front bolts (4) first, and remove
their nuts under car. (if you have problems as they are rusted look HERE.
Now push the seat forward as far as possible. (This is where you will be thrilled if you have tilting seats! If not, it will be harder.) Clamp the last two bolts inside their rails with a vice-grip needle nose, The remove the nuts at the bottom.
Now carefully remove the seats as you should take note which wooden slat goes where and ESPECIALLY which of the sides is "up". The side with the drilled indent GOES UP.
To re-install, first position the seat, its rails and the slats in the car with the bolts properly positioned. You will be better off if you slide the mechanism to allow you to start by putting in the front bolts. Once you find their holes with the bolt, put the nut on loosely. It is best to position the front of the seat's bolts as that will make it easier for you to find the holes for the rear bolts.
Make sure you get the right seat on the right and the left seat on the left.