Later Morgan 4/4 and Plus 4 tank
(Earlier models had a different tank)
Should you decided to convert your Morgan from propane back to petrol (gasoline for the Yanks among us), the project can be divided into five parts as shown below. As you read on it may sound rather daunting, but it is not as difficult as it sounds. And the results will be well worth the effort. I got significantly better performance and much better mileage (about 30 MPG on the highway as opposed to 23). And petrol is everywhere.
1. Determine and obtain new parts needed.
2. Fabricate wooden parts as needed.
3. Remove propane hardware and lines.
4. Install new parts.
5. Test and adjust as necessary.
1. Determine and obtain new parts needed:
Let’s start by dividing the parts into systems, which we will treat in the installation phase.
· Carburettor and air filter
· Fuel pump
· Fuel tank
· Fuel lines and fittings
· Fuel gauge and sender
· Wooden parts
· Hardware
Chances are your car still has the original intake manifold, but now has an adapter plate and a propane carb on top. If you have difficulty determining the model carb that was on your car originally, try one of the well-known U.K. dealers. If all else fails you have can contact me at lg@gomog.com
Finding a supplier can be a hurdle. Some models of Weber were U.K. only models. For Kent and CVH engined 4’s you can try Specialized Engines in Essex England (http://www.specialisedengines.co.uk/). Rather than try to replace the original air filter housing, go with a K&N filter. You will get more air intake noise but better performance.
You can get info on the fuel pump from the U.K. sources or you may wish to install an electric fuel pump. This is a matter of personal choice. Specialized Engines will likely be able to supply the correct mechanical pump for your Ford engined car. The CVH engine uses a pump that is driven by a special lobe on the cam and requires a short actuator rod.
Your car will have been shipped without a petrol fuel tank which will have been replaced by a propane cell. Bill Fink first used two 20 pound steel propane bottles (cooking grill type), one on each side of the car in place of a standard petrol tank. One bottle could be refilled at the time or switch over to fill both. Later a single 18 gallon steel propane tank (cylinder) was added in place of the twin 20 pounders. Filling is done through two standard but internal modified locking flip fillers on the rear deck. Visually they looked stock but when the flip cap was opened the filling hose was screwed in on one side and the pressure relief valve (bleeder) was on the other side. Then the propane vaporizer, propoane fuel regulator with aeroquipped fuel lines , and a modified fuel gauge. Some years after, a valve was added to shut off the fuel flow when the engine was off and a pressure pop off valve were all added. Some used an Offenhauser 360 degree intake manifold and a downdraft IMPCO propane carb for better performance.
You will need to buy a petrol tank or have
one built. I won't go into fuel cells but have supplied a drawing
of an original tank that will likely fit any two seater and has a
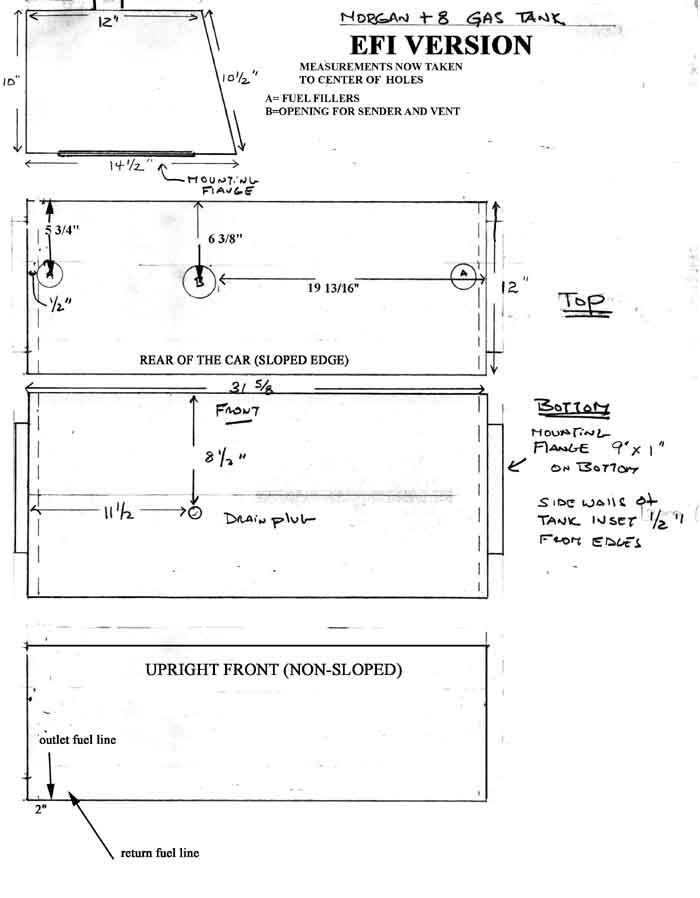
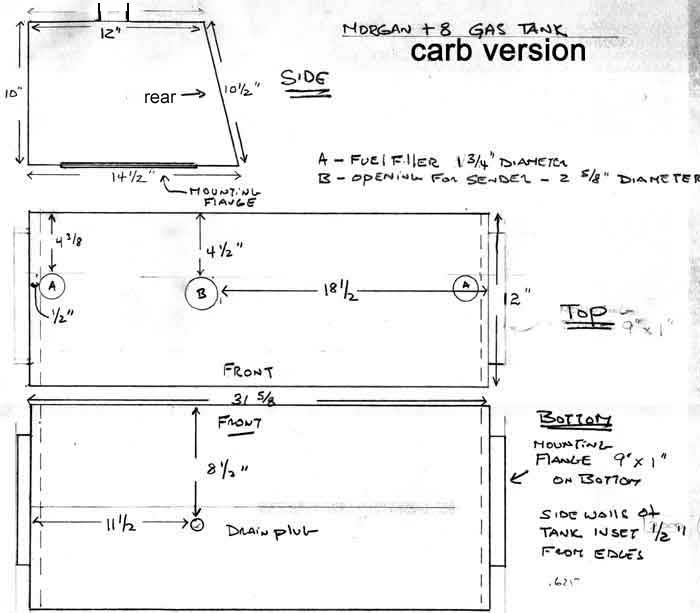
capacity of over 15 usable gallons (US). There is also a drawing of an
original Plus 8 tank which is larger and comes in two versions (carb and
EFI) and a 19 gallon capacity. Please check to make sure it will fit your
car. This may be a good time to think of switching things around, especially
for those going to use the original EFI fuelling systems. Morgan sets its
cars up for RHD not LHD. Sadly this means that battery placement is on
the driver's side on LHD this heavily unbalances the car to that side.
If you are going to switch the battery to the right side, planning now
will help muchly switching the side of the tank outlets will save many
hassles.. especially with the EFI cars. Considering the price of
a Bosch/Jaguar pump external pump that Morgan uses (Bosch 0580 464 055
or Rover FDB704 sagem), it would be use to consider a internal pump in
the tank (longer lasting and much much cheaper) and an appropriate fitting
should be made.
| WATCHPOINT: For the fuel pump simply use a Facet carb pump putting out from 4.5-7 psi. No regulator is necessary with that range. |
The issue of most concern will be length. If you do have a tank built you will need to obtain the fittings that attach to the tank for fuel feed (and possibly return) and for venting. I had a tank fabricated locally rather than having one built in the U.K. and shipped. For the filler neck, I picked up a piece of exhaust tail pipe. Part of this pipe was also taken to a fellow who could fit it to the underside of one of the fuel caps to replace the neck that had been cut off during the propane conversion. You will want these necks to be as short as possible and still provide enough length to clamp on the filler hose. This will help reduce kinking of the hose. The placement and angle of the neck on the tank will also help. If you have a tank built you get to choose which side to use for the filler or you can use the twin fillers. If you put necks and hoses on both sides and fill from either, this offers the advantage that you could open both and one acts as a vent to help prevent fuel from sloshing back out on your shoes. If you choose not to do this, one side will be a dummy cap. In this event you should install a vent on the tank. I found a rollover check valve that works as a vent as well and describe installation below. You should have all fuel tank fittings, including the sender unit, in hand for the firm that will build your tank. That will ensure that they attach the correct threaded bits to the tank.
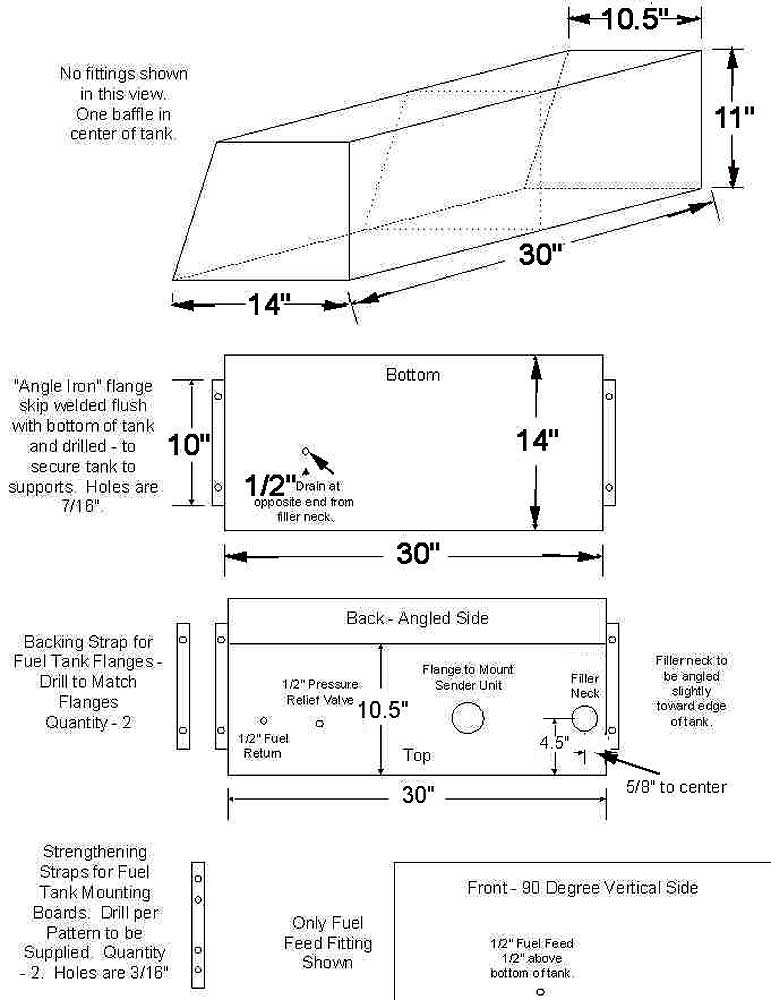
Later Morgan 4/4 and Plus 4 tank
(Earlier models had a different tank)
Note that the parts labelled ‘angle iron
flange’ are simply pieces of the same material the tank is made of.
They have been bent into the shape of angle iron. The tank can be made
from stainless steel or alloy if you are feeling flush. Or better
still a fuel cell which is the ultimate for safety. I went with mild steel.
My tank builder used 12-gauge steel, so the tank is quite stout. See
watchpoint.
| WATCHPOINT: With due respect to the writer and his efforts, the use 12 gauge steel plate is decidedly over-enthusiastic. Professional Morgan petrol tank makers in the UK use 18 gauge. I made a polished stainless tank in 16 gauge. It is 20 kilos with fittings, making it 12 kilos more than my earlier aluminum boxed bladder with foam filling! I compensated by replacing the Morgan boards with annodised metal brackets. 12 gauge would be 64 kilos, enough to affect the handling and braking of the car. I would also use to baffle plates rather than one. This inhibits the sloshing much more and adds strength to the tank. I hope to find the time to write an article on its construction and design. |
You will need to decide what type of fuel lines to use, where to route them, and how to attach them to the fuel pump, tank, etc. Don't forget the small bits, like clamps to secure the lines along their route. I went with solid lines and short pieces of flexible tubing and clamps, but more on that later.
The fuel gauge in your propane-powered car measures pressure rather than volume of propane. I found this out the hard way when I ran out of fuel while the gauge still showed almost a quarter of a tank. So you will need a new fuel gauge as well as the sender unit for the tank. Order the fuel sender unit and gauge from the same supplier to make sure they are compatible. If you provide info on the dimensions of your tank it may help the supplier in selecting the correct sender which will be long enough to reach near the bottom of the tank and have the right ohm range for the gauge. You have three types of senders to choose from, the original that acts like a toilet tank flusher with a a long arm and a float at the end, a VDO unit which is a tube that contains a small float and a Centroid Unit looks like a tube and electronically measures the humidity between two tubes and can be cut to fit any depth of tank.