Hoods on 4 Seaters
by Dave
When I went to get a new hood fitted I was provided with
a lesson from Charlie the trim
shop foreman especially for hoods on 4 seaters.
1.Take off the rear sidescreen. Stretching the
hood over the sidesceen as you put it up can
cause the hood to split (now
he tells me)
2.Then erect the frame.
3.Put the hood over the frame and do up the twist
fasteners on the back
4.Now connect the "lift the dot" nearest the windscreen
centre
5.Then the second one in from the edge
6.Do all the others on that side
7.Repeat 4-6 on the other side
8.Finally install the rear sidescreens making
sure they are inside the flap provided and do up the poppers.
9.Climb inside and close the door, make sure the
sidescreen is under the flap or they bend out at speed.
10.Finally; since the whole process takes several
minutes and the weather has been making like a monsoon all that time
even though Michael Fish swore that it would be a dry day, dry yourself
off with the towel you keep for the purpose (Charlie didn't include that
one).
If you don't want the hood to split you have 2 possible
courses of action:
1.Don't use it
2.Never take it off!!
Finally warm hoods erect far more easily. Most of the
damage to my old one, including the final catastrophe, occurred in winter
when forced to use pliers to enhance the available grip. Some owners have
even split the windscreen erecting a tight hood. If travelling on your
own keep the hood in the passenger footwell, there is enough heat to make
it reasonably easy where there is a heater, and enough from the engine
where there is no heater to make it at least easier to erect (Making the
wife/girlfriend/husband/boyfriend travel in the back to make room for the
hood is not usually well received). If at home bring the hood inside and
put it in the airing cupboard for a couple of hours before fitting.
Hoods on 2 Seaters Classic Morgan 'til the end of 2001
by Lorne Goldman September 2015
 I regularly
get asked how to put on the hood stays and how to run their straps. I
promptly run out to my nearest Morgan to double check. I then answer
the person asking and I promise myself to write a GoMoG article which,
just as promptly, I forget to do. This has been going on for 20 GoMoG
years.
I regularly
get asked how to put on the hood stays and how to run their straps. I
promptly run out to my nearest Morgan to double check. I then answer
the person asking and I promise myself to write a GoMoG article which,
just as promptly, I forget to do. This has been going on for 20 GoMoG
years.
This time my Morgan is 5500 miles away. We are in South America until next June. So
I guess it is time to write the article once and for all! This has become increasingly important
as the new bunch at the factory stopped using the traditional hood in 2001 and switched to
more modern nonsense which leaks as badly as the hoods did 20 years earlier! It took them 60 years to
get the old vintage hood leak free, so I imagine it will take them the same time to get
the new type leakless.
Aside from these much more modern leaks, the current
system prevents sidescreen and hood storage within the car
and cuts the sublime Morgan profile by adding a rumpled hump when the hood is down during best driving days. (enough ranting! Get on with it Lorne!)
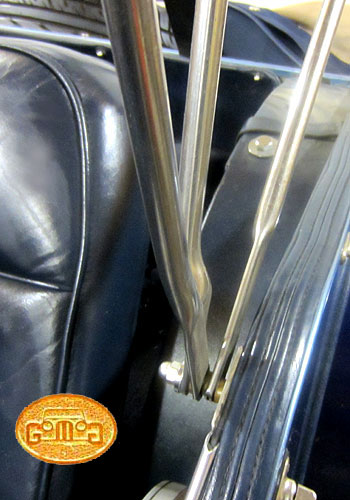
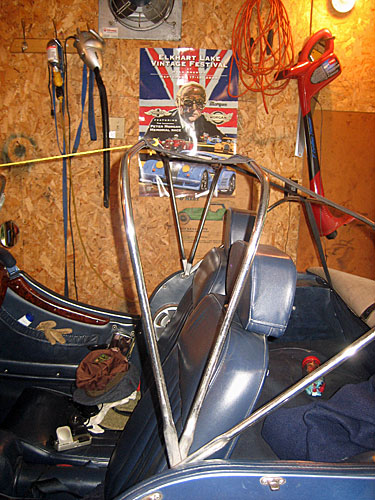
THE STAYS
The first task is to figure out how the hoods stays fit. This is
easy. Each stay is shaped in a fashion that makes their order of
fitting simple to fathom. Just in case, look at the pictures of the
stays to the side here. Rear stay (when up) is fit the most outboard.
The middle stay (when up) is
the one fit the most inboard and the forward stay (when up) is the one fit between the other two.
er...wasn't that simple?
| WATCHPOINT: The best ways to clean a Top and/or Tonneau is to remove it, and
either pressure hose wash it or throw it in your clothes washer with a
top/tonneau cleaner or mild colorsafe detergent. However, they should never be allowed to dry off the car. It should be refit to the car, and raised or used to cover the interior (speaking to the tonneau). This
can be done damp of soaking, whatever your choice. A frequent issue is
owners driving in the rain whicle using the rain gear and then taking
them down, folding them back while wet. This is also NOT advisable,
though you will not have stretch where the fittings are still used. It
will merely make the next time difficult when you want to use them. The
best idea then, is to simply soak them and refit them. |
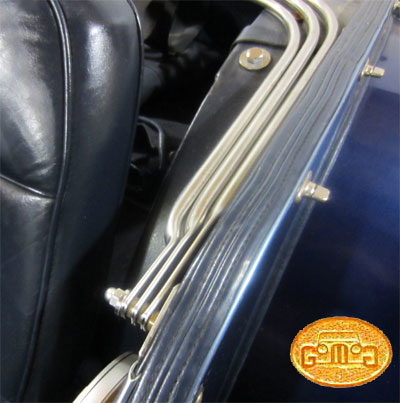
THE STRAPS
Now here is where life gets complicated. (evil smile) The sequence of the stays when up determine the sequence the straps are attached when up as well! The
straps are attacked at the top of the rear deck, travel to the most
inboard stay (when down) then to the most outboard stay (when down) and
then to the middle stay. The proper way to measure the straps is to
install the hood with the stays down and no straps, put up the stays
and position them in the proper sequence (described above), adjust them
until the hood looks its best, and then measure the distance between
the rear deck fitting point, then the next upright stay (which is the forward stay when down and the middle one when up) at its top then on to the front stay (which is tthe middle one when down.
You will have to add a bit to reflect the fact that the strap circles
each stay. I also stressed the fact the the measurement must be at the
top of the stay as you want to make your seams at the top of the stays
so as to give you a smooth hood rather than one which shows the stays
like protruding ribs.
Yes, this sounds a little involved. It isn't. AND it is nothing the
ladies won't be able to understand instantly and sew. They can
visualize better than men. Please send me feedback after trying these
instructions and suggest any corrections or improvements to make it
clearer.
A SMOOTH HOOD
by Lorne Goldman
Many
owners of older Morgans complain that the newer hoods fit more tightly
and attractively than theirs. Admittedly, Steve Simmonds, while he was
around, pushed Morgan hood lore further forward than at any time
since HFS. Many of his ideas are now part of the current production and
there is, to some extent, greater care is taken. But the primary
difference in looks is caused by materiel wear. In a nutshell, they all
stretch (and shrink) over time and look less attractive and lumpy
as time passes. It is difficult to re-tailor what you have as the
stretching takes place everywhere on the hood and it is esy to butcher
what you have in an effort to make it look more trim.
However, there are tricks.
The first of these is the Morgan Hood Swivels.
These items are designed to assist raisng and lowering the hood.
However, ever they can also serve another two benefits that are
unmentioned.
1. They can, to a degree, re-tension an older stretched hood. I have
often wished they had an adjustment feature to better serve this
purpose.
2. They can cut out a LOT of time when putting the vintage hoods up or down.
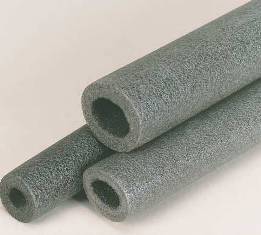 FOAM
FOAM
There is another simple method of smoothing the hood. It came to
me after Audrey wacked her head once on one of the hood stays. (I was
instantly blamed.) So I stopped at the next hardware store and
purchased some pipe installation. This is made of foam sold in 3-4
different diameters. It is inexpensive and can be easily cut to fit
around the hood stays and straps. It idely cussions the stay and
protected my beloved's head. It also shaped the 15 year old mohair hood
on the Plus 8 we were driving until it looked like a Simmond's work of
art.
It was seen by others who adopted the idea for that purpose, and they covered the foam with the cloth of their choice!
RAISING THE HOOD QUICKLY
by Lorne Goldman
i. Remove the tonneau, (If there is a big risk of rain, we leave the
full hood down, folder into the rear compartment, with the front two
side fittings off. This leaves the hood at the ready and does NOT
change the profile of the car. You can even cover the fit hood with the
tonneau, but if you are into speed of installation, don't.
ii. Attach the hood to the windscreen.
iii. Pull up the hood stays by the middle (when prone) stay.
iv. Adjust the straps evenly.
v. Use the hood swivels to tension the hood.
Audrey and I can do this business in well under a minute. Admittedly, we have far more experience than most. (wryly)