by David Rutherford & Lorne Goldman
We recommend that the rear telescopic
shock absorber kit is used with softer rear springs than the standard 7-leaf
springs which we feel are stronger than necessary even for those that have passengers in the rear. When we fit a 4-seater
rear telescopic kit we usually remove the Oddly some race preparers think the more leafs the better.rear springs and convert them
to 6-leaf springs. See Converting
from 7 to 6.
For those who require maximum ride comfort and never expect to drive their 4-seater fully laden with four adults and a full luggage rack, it is possible to change the rear springs for 5-leaf springs. These combined with the quality telescopic shock absorbers provide the best control for the 4-seater rear suspension.
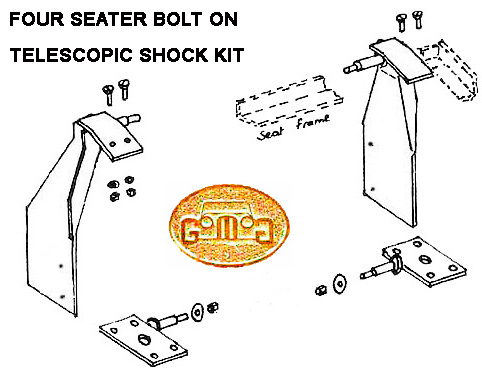
1. Remove the rear seats, seat floor pan and shock absorber covers. Mark the position of the vertical edge of the shock absorber covers on the plywood heelboard. It is better to remove the front seats for access, and essential if the springs are to be removed as well.
 6. Fit the u-bolts and new spring
clamp plates with the shock absorber pins at the front. Tighten u-bolt
nuts evenly.
6. Fit the u-bolts and new spring
clamp plates with the shock absorber pins at the front. Tighten u-bolt
nuts evenly.
7. Remove the packing blocks and let the axle sit on the rebound rubbers.
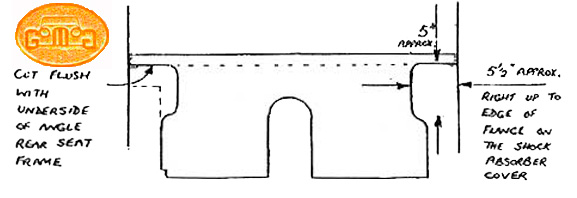
8. Hold out of the way the rubber
matting on
the heelboard and cut the plywood panel to make clearance for the top of
the shock absorber. See sketch adjacent.
9. Position the new shock absorber
mounting plates with the top brackets pointing backwards and located under
the seat angle iron frame. The position of the side brackets is usually
close to the 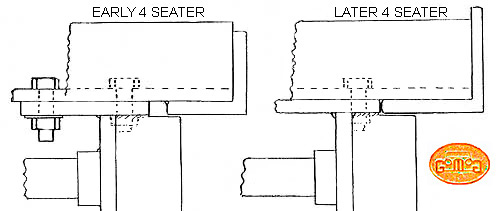 position
of the original lever arm side plates. The aim is to position the side
brackets so that an almost fully extended shock absorber fits on both mounting
pins as upright as possible. Bend the top mounting if necessary so that
it is flush under the seat frame.
position
of the original lever arm side plates. The aim is to position the side
brackets so that an almost fully extended shock absorber fits on both mounting
pins as upright as possible. Bend the top mounting if necessary so that
it is flush under the seat frame.
The top bracket fits under the seat crossmember close to the weld where the crossmember is attached to the seat frame sides. Later cars with integral seat belt mountings have seat frame sides of 1 5/8" width, early cars have seat frame sides of 1 1/4 width. On the later cars the top bracket of the shock absorber mountings must be fitted right up to the weld of the seat frame. On earlier cars there should be 1/4" to 3/8" between the top bracket and the seat frame side. See sketch below.
10. When the best position has been ascertained, clamp the side plates in position on each side, mark and drill four 1/4 holes through the chassis holes and drill 1/4 holes through the angle iron seat frame and the top of the shock absorber mounting bracket.
11. Bolt the mounting plates in position with the 1/4" nuts and bolts supplied. The 3/4 long bolts face outwards through the chassis and the washers are used under the nuts on the outside of the chassis. The 1" long bolts go down through the seat frame and the top of the shock absorber plates. (The car may need supporting under the axle to move the springs in order to give access to fit the lower of the four side mounting bolts.)
12. Fit the shock absorbers but do not tighten the nuts. Adjust the brake hose if necessary for clearance.
13. Lower the car to the ground and settle by bouncing once or twice. Tighten the shock absorber nuts ensuring that there is clearance between the lower end of the shock absorber body and the u-bolt mounting plate. Also at this stage, tighten the spring mounting bolts and nuts if the springs have been removed and refitted or replaced.
14. Refit the shock absorber covers (which may need slight bending to clear the top of the shock absorber brackets), the seat pan, seats, etc.
15. Road test. If using Spax, or Konis adjust to the required setting which for road use is usually the softest setting.
I rebuilt my 66+4 rear suspension about 5 years ago. Used the Rutherford engineering individual towers "bolt on kit" made for the 4 seater (these fit in the original "shock boxes" in the rear footwells and are tied together using the "bar" that forms the front of the rear seat bottom cushion). I highly recommend the setup as it uses the "long" Koni's or Spax shocks (as Lorne notes this gives maximum travel).
For the springs, when I rebuilt in early 90's I put in new 7 leaf springs then, when converting to the Rutherford system Dave Rutherford was kind enough to give directions on how to cut a 7 leaf system to replicate a 6. See below.
go from 7 leaf to 6 leaf by
remove leave 5 (3rd from the axle)
leaf one stays the same (duh! it has the shackles)
leaf 2 stays the same (tied to leaf 1)
leaf 3 cut the front portion to 15.5 inches from 18.25 inches
leaf 4 cut the front portion to 12.5 inches from 15.75 inches
new leaf 5 (old leaf 6) unchanged
new leaf 6 (old leaf 7) unchanged
You'll need to shorten the shackle bolts or have new ones made. Don't forget to grind the new cut edges and oil between the leaves.
THE HARD TRUTH ABOUT MORGAN 4-SEATER REAR SUSPENSIONS
Please pre-forgive me for the following: Morgans are so light that adding or subtracting 2 people from rear seats makes for a constantly badly balanced and uncomfortable car with very bad handling. After all, two people represent 20% of the weight of the car! Of course, 4 people can be lots of fun, but it is NOT sportscarring or perfectly safe for these reasons.
One can, as one can with 2 seaters, adjust the suspension, either for two people or 4 people, but not both simultaneously. There is also the matter of the numbr of leaf springs. The Too many make a Morgan painful. I use (on my muscly Plus 8s), 5 leafs or the newer 4 leafs. Morgan 6 leafs are only suitable for the area around Malvern where the MMC tests everything. Morgan 7 leafs make any Morgan undriveable, IMHO and that of the legendary D. Rutherford. There are devices that can change the spring rate of leaf springs and some, shocks are adjustable, at least for a short time. But the adjustment time is a hassle and the methods are a hassle. The other solution is to leave the rear alone and suffer the lack of comfort and handling when you are only 1 or 2 people in front,
| WATCHPOINT Oddly some race preparers think the more leafs the better. Sadly this makes their cars bounce with every minor road surface anomoly and spend more time in the air, where the skills and power are moot. For some reason amateur moggers think that setting their cars up for racing is a good thing, though the environment and goals in racing are quite different from those of a road going Morgan. I have done both though admit to enjoying pitcrewing more than piloting. |