 electrical
systems, and other electrical accessories. It also maintains the batteries
in a charged state, recharging them as necessary.
electrical
systems, and other electrical accessories. It also maintains the batteries
in a charged state, recharging them as necessary.
1. Generally
2. Primary Causes of Charging
System Malfunction
3. Preventive Maintenance Procedures
4. Diagnosis/Troubleshooting
5. Alternator Replacement
1. The charging system
is an important part of the electrical system. It provides electrical current
for the lights, the radio, the heater, the engine's electrical
systems, and other electrical accessories. It also maintains the batteries
in a charged state, recharging them as necessary.
In order to properly service the charging system, you need to understand how it operates. The charging system has three main components: the alternator, the voltage regulator, and the batteries.
The alternator generates electrical power to run accessories and to recharge the batteries. It is normally driven by a belt located off the crankshaft. Mechanical energy from the crankshaft is converted by the alternator into electrical energy for the batteries and accessories.
The voltage regulator acts as an electrical "traffic cop" to control alternator output. It senses when the batteries need recharging, or when the vehicle's electrical needs increase, and adjusts the alternator?s output accordingly.
The batteries are a reservoir of chemical electrical power. Their primary purpose is to crank the engine. They also supply power to vehicle accessories when the electrical load is too great for the alternator alone.
2. Primary Causes of Charging System Malfunction
Before discussing the preventive maintenance and diagnostic procedures for the charging system, we're going to cover certain environmental and product application factors that can cause the charging system to malfunction.
Excessive heat An alternator can become damaged if it operates too long at excessive temperatures. Damaging heat levels are generated in two ways: when the alternator becomes dirty either externally or internally restricting its ability to dissipate heat from its external surface or not allowing air to pass through the unit, and when air ducts and heat shields are not replaced after the alternator has been serviced.
Dirt and dust Charging system components operate less efficiently when buildup of dirt particles form around wire and cable connection points. Dirty connection points impair the flow of electrical current.
Vibration If charging system components are poorly or loosely mounted to the vehicle?s frame, the resulting vibration can damage sensitive internal components. A loosely mounted component will also diminish the performance of the important belt drives. This is very important on high powered engines.
3. Preventive Maintenance Procedures
The object of preventive maintenance is to identify and correct the potential problems BEFORE they occur.
There are three preventive maintenance procedures that can greatly enhance the efficiency of the charging system's functions. These three procedures also represent the initial steps you should take when fully diagnosing (i.e. troubleshooting) a problem in the vehicle's charging system. The three preventive maintenance procedures are as follows:
Clean alternator and connection points Insure that all alternator surfaces are clean to the point that they do not have a buildup of dirt, grease or dust. Air flow passages must also be clear so that air can easily pass through the unit. All connection points must be clean and free from corrosion.
Component mounting brackets As mentioned previously, you need to make sure that the charging system components are securely mounted to their applicable brackets; the brackets, in turn, need to be bolted securely to the engine. Again, if charging system components are poorly or loosely mounted, damaging vibration and diminished belt drive performance are the result.
Tension and condition of belts You
need to also check the belt for proper tension. Caution: be sure the engine
is turned off. A loose belt will slip on the pulley and fail to turn the
alternator's rotor. Check belt tension with cricket belt tension gauge.
Refer to vehicle manufacturer's specifications for proper 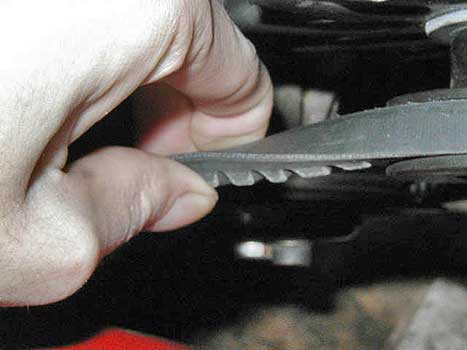 belt
tension. Before you adjust it, however, tilt the belt and inspect it for
glazing, cracks, or dryness. A worn or damaged belt should be replaced.
belt
tension. Before you adjust it, however, tilt the belt and inspect it for
glazing, cracks, or dryness. A worn or damaged belt should be replaced.
If the belt is in satisfactory condition, you can use a belt tension gauge and check the results, Different belt systems use different gauges. Use proper tensioning gauge for your application. Then adjust the tension according to the manufacturer's specifications. I generally use the "Rule of the Thumb" when tensioning a v-belt. If I grab the belt with my thumb and forefinger, I should be able to twist the belt about 90 degrees but not much more.
If you replace a worn or damaged belt, the new belt should be checked for proper tension as well. A new belt loses 60% of its tension in the first few hours of operation. So it needs to be tested under heavy load, and then retensioned. After a new belt is installed, run the engine - with every accessory turned on - for 15 minutes (this puts a heavy load on the belt). Then check the belt tension again and adjust it if needed.
Please note that belts on high amperage output alternators may need retensioning twice after installation. Further note that if the vehicle has a multi-belt drive, the belts need to be matched. Finally, in most cases and on most vehicles, belt tension should be tested every 10,000 miles. Carry a spare belt with you.
Timely preventive maintenance of the charging system should keep it running smoothly. However, when a problem does occur, effective diagnostic and troubleshooting procedures will help you locate and correct the problem quickly and economically. Any discussion about the electrical system must begin with the batteries. Before you begin analyzing the charging system here, you must be sure the batteries have been properly tested and are at least 90% charged. Otherwise, any electrical tests you conduct on the charging system will be inaccurate.
Alternator Performance Test - NO LOAD
A. Connect voltmeter to alternator terminals and ammeter to alternator's positive output cable. Make sure ammeter is at least 6 inches (15 cm) away from alternator to eliminate the possibility of faulty readings. Make sure voltage is present at alternator's output terminals.
B.Start engine and run it at 1500 RPMs (the operating RPM).
C.Check that all vehicle loads are turned off and reading on ammeter is less than 20 amps. If ammeter reading is greater than 20 amps double check that all vehicle loads are turned off and that batteries are fully charged.
D. Record voltage on voltmeter. Reading should be between 13.8 & 14.4 v for a 12 volt system. If the voltage is not within these ranges then try adjusting the regulator if available. If the regulator can not be adjusted, assume the alternator is defective.
 Alternator
Performance Test - UNDER LOAD
Alternator
Performance Test - UNDER LOAD
A. Keep engine running at 1500 RPM (operating RPM) and meters are connected.
B. Turn on vehicle loads until 75% of the alternator's rated output is achieved on ammeter display. Record voltage on voltmeter. Compare reading to that taking during the NO LOAD test (above).
C. If alternator voltage drops more than .5 volts for a 12 V system then alternator is defective.
N.B. An alternative method of putting load on an alternator is with a carbon pile tester. Connect carbon pile tester across batteries. Adjust carbon pile until desired reading is obtained on ammeter. Record voltage on voltmeter and shut off vehicle.
Alternator Cable Test
A. To test the positive cable connect the ammeter to the positive cable from the alternator. Make sure the ammeter is at least 6 inches (15 cm) away from the alternator to eliminate the possibility of faulty readings.

B. Connect the voltmeter’s negative lead to the positive
terminal of the alternator and the positive lead to the positive terminal
on the battery.
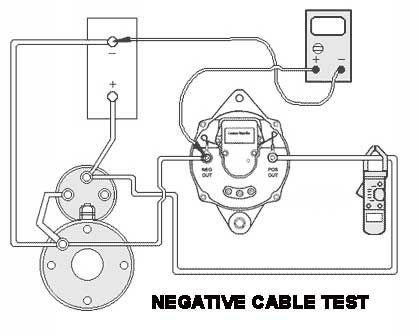 C. Start engine and set engine RPM to 1500 RPMs (operating
speed).
C. Start engine and set engine RPM to 1500 RPMs (operating
speed).
D. Turn on vehicle loads until 75% of alternator’s rated output is achieved on ammeter display. If necessary use a carbon pile tester to apply load on alternator.
E. Record voltage on voltmeter. If reading is greater than .25 volts in a 12 volt circuit check all wire connections and cable connections. If reading is less than .25 volts in 12 volt circuit cables are good.
F. Turn off vehicle loads and shut off engine.
G. To test the negative cable test move voltmeter’s negative lead to the negative terminal of the battery and the positive lead to the negative terminal of the alternator. Run test again. (Use data displayed here for recommended wire sizes for any cable repairs.)
In the event that all of the diagnostic/troubleshooting procedures point to a faulty alternator, you'll need to select a new alternator. Its amperage capacity rating must support the vehicle's intended application, or load and duty cycle.
If the vehicle has had a history of charging problems and you've eliminated failure in the system, you may want to reevaluate the capacity of the alternator and move to a higher output model.
When installing a new alternator and retensioning belts,
be sure to carefully follow the instructions noted earlier in this section
under "preventive maintenance".