 Tuning Your Carbs with an Exhaust Gas Analyzer
... from Fred Sisson's "Bedside Reader"..
with an EFI Addendum by Lorne Goldman
PICK A NUMBER BETWEEN ONE AND THREE HUNDRED...
Did you know that there are 354 needles listed for
(the most common) .090 jet SU! To further compound the problem of choice-
your particular car will probably run lousy on 40% of them, OK on
30%, feel great on 20%, run really great on 5% and really kick
butt on 5%. No wonder so few people
change needles. Where do you start?
Other people's recommendations, even "factory" recommendations
are probably off somewhere in your driving range... maybe WAY off! Just
remember "different is not the same". Different car (and EVERY one is different)
- different requirements- different needles.... No one can "tell" you what
is the really proper needle for your own car. No matter how experienced
they are, it will only be an educated guess at best. We all know that
the big-bucks racers have their engines checked on a dynamometer, simulating
race conditions, with lots of very expensive instrumentation. This is a
bit beyond my modest means and... expertise. Still- there is a way to sort
through the haystack and find the right SU needle for your own particular
car. I guarantee that it will improve your engine's performance, it is
not too costly and it is very rewarding.
ARE YOUR NEEDLES CORRECT FOR YOUR ENGINE?
This is not about "thinking"- this is about "knowing".
How do you know? As far as I am concerned, the ONLY way to
tune SU carburetors is with an on-board exhaust analyzer ($100 bucks).
This way, you can check your car while you are driving it, on your roads
(or track). Anything else is groping in the dark.
Many companies make exhaust analyzers today. They run
somewhere around $100.00. They use an O2 sensor that fits into your exhaust
system and are described in the book. Racer Wholesale now offers
an analyzer that will read two sensors (and there is a decent one in
the J.C. Penny catalogue for $120. GoMoG Webmaster). This is
the really hot setup for twin carbs as you can exactly tune each carb (not
just the resultant combined mixture of the two.)
The analyzer itself is a 'bitty thing. Mine is about 1
½"x 2". It has a series of LEDs that instantly read the fuel/air
ratio- as you drive! Real world stuff here..... I doubt that
any standard carburetor will give the absolute perfect ratio at all times.
However, you can get darn close and the reward for your time and
effort might just be a very dramatic improvement in performance.
At the very least, you will have peace-of-mind, knowing that your engine
is not being hurt from the effects of a drastically rich or lean mixture.
Many of the hot sports racers have the analyzer permanently
mounted in their car. They "tune for the course". Exhaust analyzers are
available as in-dash instruments also. I personally use the analyzer with
the temporary mount as the in-dash units are a bit out of place in
a vintage car. There is also a choice of O2 sensors. I have been using
the cheap kind which runs around $30.00. The 70 buck O2 sensor is better
as it is electrically heated and comes to the initial readings quicker,
but the cheapy works fine once it gets hot. I tape the gage to the
windscreen with "racer tape" so that I can see it at all times while driving/testing.
It reacts instantly so you can even use it to set the power valve for a
Holley carb. Pretty neat. When I am done- remove the gauge and O2 sensor.
There is a blank plug that screws into the sensor hole.
AN ADDENDUM FOR EFI (FLAPPER SYSTEMS)
by Lorne Goldman
Fred's article points to one of the inexpensive devices
that the home mechanic can purchase to fine tune there engine as well or
better than most roadside professional garage. An exhaust gas analyzer
takes the guess work out of carburetor tuning.
It is also the only method of precisely tuning the Plus
8 Rover "flapper" EFI system that was optional between 1984 and 1986
and standard between 1986 and 1990. The later "Hotwire" system has the
ability to be "hooked-up" to a diagnostic unit but the flapper does not.
Tuning is done by attached a exhaust gas analyzer to the tail pipe and
turning the idle air bypass screw on the airflow meter until the analyzer
LED shows the correct CO2 level. (normally 1.5 to 2.5% for a Plus 8).
LR/ROVER PLUS 8'S CLUTCH SLAVES
1. Mossbox Plus 8s, 1968-1972
1.01 the 1" bore Girling 64068329 (either 7/8 or 1" will do)
1.02 the 7/8" bore ? (checking possibly 64674336)
2. The Rover 4-Speed era 1972 to 1977
3. The LT77 era 1977-June 1993
4. The R380 era 1995ish-2004
5. Non-Morgan D&D
THE MOSSBOX ERA
The Mossbox Plus 8s
by Lorne Goldman with help/photos from Duncan Charlton, Tony McLaughlin & André Koopman
As you see above, these cars first used a
1" bore slave and then switched to a 7/8' both used by Austin. For
Morgan it was only important that they fit. The "feel" difference
between 1" and 7/8" should be negligible. The slaves are placed
both used on Austin: The Mini and the
| Duncan: I
have always found it tricky to get the slave cylinder adequately bled
on my 1971 Plus 8. The bleeder screw is not mounted at the highest
point, so I connect the hose but don't mount the slave cylinder to
bleed it. I clamp the piston so it can't exit the bore and then bleed
while I support it so that the bleeder is now at the highest point.
Only after bleeding in that position do I mount it to the car. |
Others, possessing a lift find access easier.
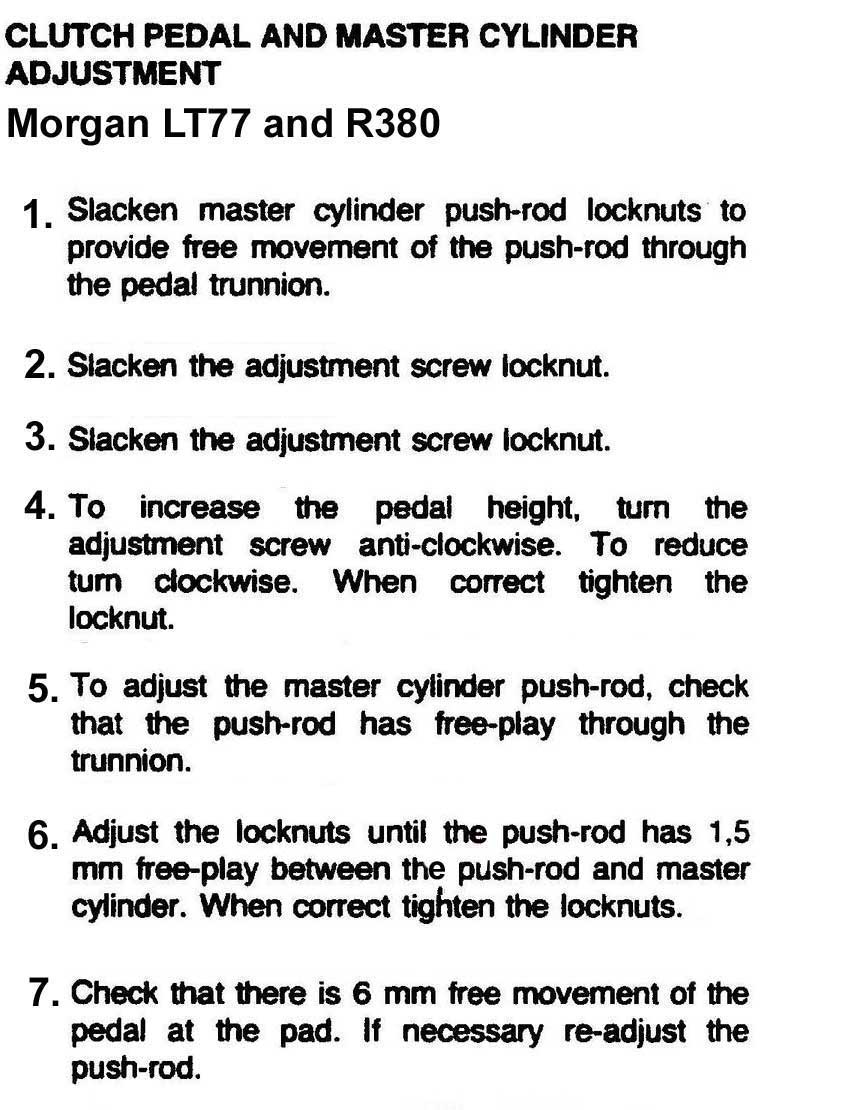
THE CLUTCH SLAVE Plus 8 FOR THE MAURICE OWEN SYSTEM
by Lorne Goldman
Plus 8s 1977-1994ish & Rover Plus 4s 1987-1994ish
A
right hand Girling Clutch Slave cylinder with either a 1" or 7/8" bore. Right hand
inlet and bleed nipple It has a short throw of 1 3/8" (35mm). Casting number as stamped on the base is 64673467 but the part number is .
The bleed nipple and hose inlet can be swapped around, they are both
3/8" UNF ports. Waiting time at this date (2024), if you find it,
is 50 days until shipping.
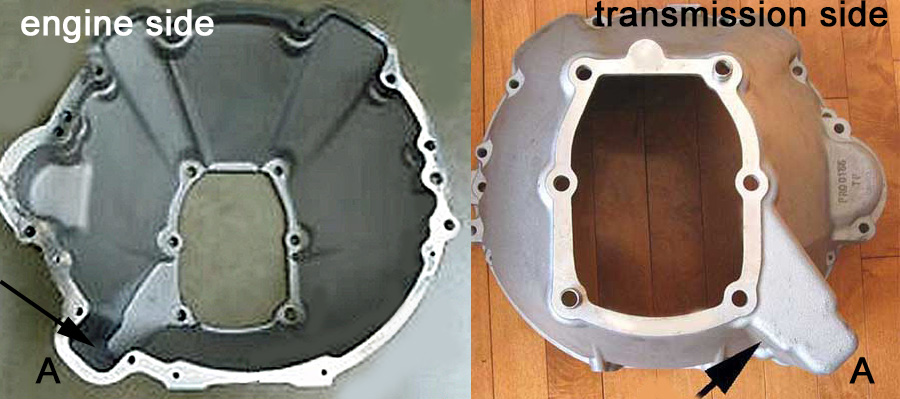
THE POST-1977 BACKGROUND
The
background is that the Sd1 bellhousing (the all-important part that
mates a transmission to the engine) used to fit the LT77 or R380
gearboxes to these cars for more than a quarter of century
(1977-2004) is not compatible with a Morgan trad, frame or body. It
and/or the frame HAS to be altered. Here is the offending part of the
bellhousing. It is the part that was designed by Rover to accommodate
the clutch slave.
The Morgan Company accomodated the clutch slave in two different configurations
which I have named after the two MMC design chiefs responsible for
them. All Plus 8s (1977 - 2004) and the Plus 4s (1987-2000) used
the LT77 or the R380 Gearbox SD1 bellhousings as their base. But the versions were modified differently.
THE MAURICE OWEN SOLUTION
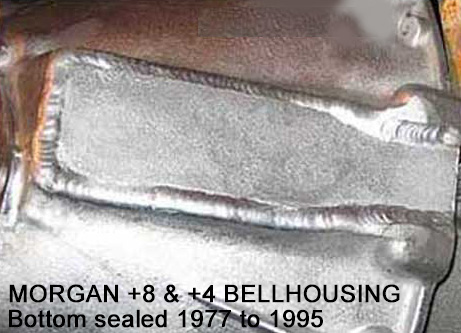
Maurice sheared the offending section for the Rover clutch slave off the
bottom of the bellhousing (left) and welded the section off (MMC metal
work shop). He then
opened the TOP of the bellhousing (right), and moved the release
bearing pivot
from its normal position on the gearbox to the top of the bellhousing.
He then found a tiny non-Rover generic much shorter clutch slave
to replace the now too
long original from Rover.
Bill Beck's
case, he had the
chassis crossmember altered to allow a
bit more bellhousing egress under the bulkhead, giving the
Plus 8 engine some
badly needed room at the front and allowing the engine to be a bit and
level, meaning that it cleared the bonnet hinge and cutting the hinge
or smashing down the SU air filter box was no longer necessary!
However, the outer side of the regular slave's protection had to be cut
off to allow sufficient spacing and debris easily enters these
bellhousings. On the other hand,
production was MUCH faster and the factory could save as the clutch slaves
were free with the engine/transmission purchase.
PROS:
1. It solved the fit problem without requiring a modification of
the frame or the firewall or the engine or its components. Earlier
models forced the hammering flat of the SU air filter housing and later
models a scoop out of the right side valence for the alternator. Early
EFI models required a cut out of the bonnet hinge.
2. It created a bit more clearance under the bellhousing.
CONS:
A. The shorter a clutch slave it the more susceptible it is to
wear. (as noted these little non-Rover/LR slaves are easily confused
and don't last long is the car is used at all).
B. The placement at the
top means a releatively short push rod which usually prejudices the
entry angle and path which causes the slave cylinder to wear faster as
well.
C. As a general rule, it is unwise to place any
hydraulic cylinder BELOW its reservoir. This too accelerates
wear and makes bleeding more difficult.
D. Access to the slave became much more of a hassle in later EFI cars because of the complexity of the hoses and loom above it.
| These
cons makes the normal life span of this clutch slave of
this configuratrion decidedly short. You can expect only 12,000
to15,000 miles and must carry an extra one with you at all times. They can be changed roadside. However, I discovered a permanent solution 20 years ago. A used slave sent to an expert to be sleeved
in stainless steel lasts forever. The cost is the same as buying a new one with its limited lifespan. |
THE BILL BECK SOLUTION
Bill
Beck's solution is smarter and saved the MMC even more in cost and
labor. Bill made two changes so that the stock LR/Rover slave can
be used an no welding or patching is needed. Bill sliced the
bellhousing section housing the stock slave open.
PROS:
1. It
allows the standard Sd1 clutch
slave to be used which elminates parts confusion and makes
sourcing easier. Much cheaper in labour and parts than the Maurice Owen
solution. No welding involved.
2. It is easily accessible..
3. It is longer and allows for greater longevity
4. It is below its reservoir which increases longevity.
CONS:
A. It required
a modification of the crossframe piece below. The piece arcs
downward eliminating precious ground clearance at this point;
B. An open
bellhousing is unwise for obvious reasons. (Though I have seen
much worse design modifications in mating bellhousings to
gearboxes! See the
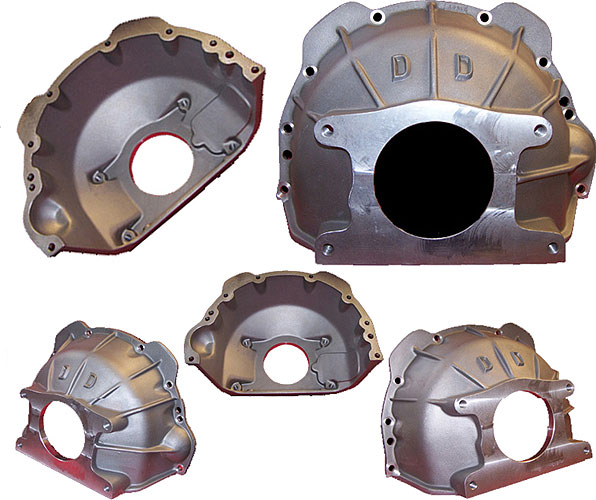 THE TREMEC T-5 CONVERSION BELLHOUSINGS

To the
right!! [shiver]) An open bellhousing collects
debris which must inevitably effect the components inside and accelerates
rust... from a US source..D&D otherwise an excellent source for Buick 215s work and components. This infinitely worse than the Bill Beck
solution which did save the MMC money while curing important earlier
issues.
N.B. To
date, the very best bellhousing to mate a T-5 to gearbox to a
Rover V8 is that made by
J.E. Developments of the UK to fit a Tremec T-5 to a Plus 8. It
is bespoke and totally enclosed. It uses an internal concentric clutch release which eliminates the issues created by an external setup.
N.B. Both boxes use a internal concentric clutch release.
THOUGHTS & INFO ON A ROVER PLUS 8 GEARBOX SWAP
by GoMoG (who uses later versions of the 2WD R380)
I strongly favor a T5 for a Morgan Plus 8. The T5 is a design from Borg
Warner who sold the rights to it to Tremec who imporved the unit which
became an American icon for GM and Ford. It is manufactured in Mexico
for, primarily the American market. There are other variants from
Tremec but the T5 has a choice of gear sets to suit any taste. It
can be made to handle any amount of bhp and torque..and is advertised
to handle as much as 600 bhp. (BHP and torque figures become modest when speaking to a hyper-light weight Morgan Plus 8 sportscar). Tremec
makes a number of heavier versions now but their added weight,
deep body work for Morgans at double the price makes no sense.
T5 Parts, servicing and used versions can be found easily. It was
adopted decades ago by the UK Morgan racing community. All the niddling
little problems have been worked out for Morgans. They are an excellent
value, new or used.
WATCHPOINT 1: If buying second hand, make sure you buy their "World Class" version. If buying new, all their T5s are now WCs.
WATCHPOINT 2:
Be very careful on who you buy the conversion bellhousing from. Many of
these bellhousings will not fit a Morgan Plus 8s despite what the
seller assures you. Look above. |
I prefer the T5 over the Mazda
5-speed. T5s are cheaper, been used for decades in Morgan Plus 8s and
can handle double the bhp and torque as the Mazda.
 Replacing the Clutch Slave (LT77 and R380 Plus 8s (1977 to 1996) and Plus 4s (1987-1996)
A local garage will not have an advantage over you here, especially. The area is Morgan-configuration only. Part
of the neverending odd modifications needed to keep fitting later
motors to an engine bay designed in the Thirties for a 36bhp tractor
engine. ;) That task constantly exhibits a GoMoG Law I call the Deadly
Domino Effect. In this case, the bellhousing doesn't quite fit far
enough into the car because of the:
Replacing the Clutch Slave (LT77 and R380 Plus 8s (1977 to 1996) and Plus 4s (1987-1996)
A local garage will not have an advantage over you here, especially. The area is Morgan-configuration only. Part
of the neverending odd modifications needed to keep fitting later
motors to an engine bay designed in the Thirties for a 36bhp tractor
engine. ;) That task constantly exhibits a GoMoG Law I call the Deadly
Domino Effect. In this case, the bellhousing doesn't quite fit far
enough into the car because of the:
1. the width of the area for
bellhousing,
2, the crossmember at the bulkhead underneath
3. and the
bellhousing casting placement for the regular LR clutch slave.
4. The best is perhaps the Maurice Owen solution to which one uses slave with a stainless sleeving. It
works and lasts forever while leaving a pristine interior for the
bellhousing. The ideal would be a bellhousing with a removeable side access panel that allows for clutch replacement without removing the engine. A right PIA!! The
MMC forgets that these cars are supposed to last forever and they manufacture cars without a body on them!!
You see, the two Rover Plus 8 designers, Maurice Owen and the Bill Beck (1967-2002)
addressed the issue differently. Both designs have
issues.
These these designers were given
priorities and instructions and attitudes from on high. You would be
wrong to think that they were incompetent. The sad pity is that, as these cost priorities are indulged and such designs are currently multiplying,
the cars are becoming less and less reliable. (Do not confuse aging and
poor maintenance with bad design They are separate issues.)
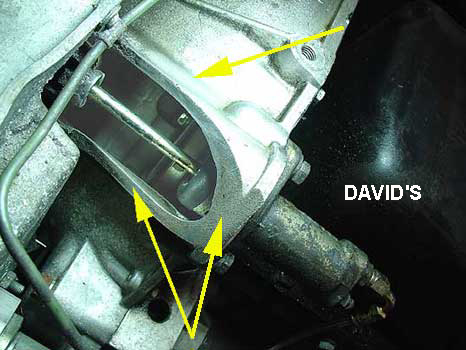
We will be deal here with replacing the slave in the Maurice Owen
system. Look at the area atop your engine. I have found some piccies
(above If that is what you have on your car, go pump your clutch
vigorously a bit and then go check if you can see/feel any brake fluid.
(If you get
clutch fluid on your hands, wash it off quickly. I use spray brake cleaner.)
To change the clutch slave shown above.
1. with a 7/16 spanner, remove the line to the clutch master. I find
this makes the rest of the job easier as you can tighten the line at
the slave without twisting the line.
2. Remove the fluid line from the clutch slave.
3. Now the big bolts. These often are unwilling as they are steel and
the bellhousing is aluminium. That creates a galvanic reaction (aka
metal rot) that seizes these bolts. Use the correct socket and if the
two bolts seem reluctant, take some time and use a penetrating oil,
even many times over a few days.
4. When they loosen, do not remove them right away.
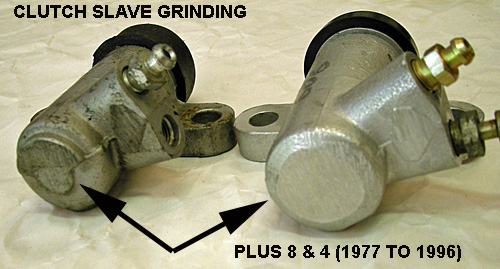
| WATCHPOINT: the
only annoying danger in this task is losing the cylinder's actuating
rod...which can be a pain in the butt. What I do is grab it with a
small needlenose vice grips as you are removing it then lock
it the vice grips and secure the grips at the side. |
 5. Once the rod is secure, remove the big bolts by hand, and
slowly draw the slave towards the engine and, if necessary, a bit
upward until it is free from its actuating rod.
5. Once the rod is secure, remove the big bolts by hand, and
slowly draw the slave towards the engine and, if necessary, a bit
upward until it is free from its actuating rod.
6. Check the new cylinder. You do not
need a rod (assuming it came with one). You should use the old rod
as it has likely been adjusted to the right length for your car. Additionally, this little cylinder, even if it is the correct one, must have had its rear ground/filed to fit a Morgan.
7. Now you must reverse the procedure with the new slave. Carefully
position the slave on the engine side and angle/slide it onto the rod,
only removing the vicegrips when the rod slides in and is captured into
the cylinder and the rubber!
8. Now (after covering the bolts with a little silicone to prevent the
same galvanic reaction mentioned above), thread in the big bolts. Then
tighten them firmly with your socket and ratchet. You can now breath.
9. Now you must reconnect the line to the master clutch cylinder. Use the bottom fitting on the slave for this as you need access to the top one. (there
is no difference between the two but easy access to the top is
necessary for bleeding the system which is next up).
10. Remove the top fitting to allow you access to tighten the line and tighten the line.
11. Thread on the fitting into the master clutch cylinder and tighten after you are assured it is not cross-threaded.
12. Now you must refill and bleed the system. We all have different systems for that. I use any glass jar that happens to be around... with a tube connected between the bleeding nipple and with the other end submerged in brake/clutch fluid.
Make sure the reservoir never empties or you will pumping air rather
than fluid into the system. On which brake fluid to use, CLICK HERE.
BACK