GENERAL
SET UP AND SAFETY BRAKE WATCHPOINT
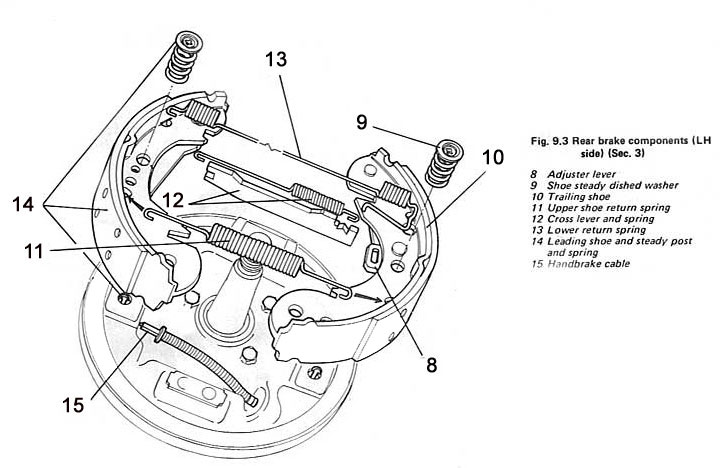
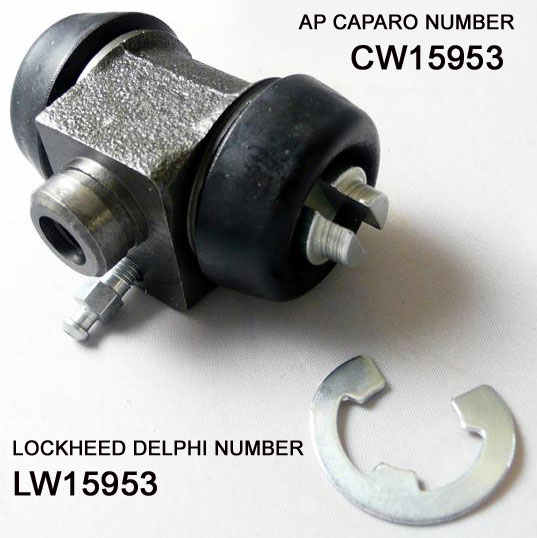
The hydraulics and rear brakes on the Morgan have remained the same since mid-1993...though the calipers were updated (thouigh not improved) in 2008. They are made by a India-owned UK company called AP Caparro that took over Lockheed in Leamington Spa. Therefore the rear hydraulics rears closely resemble those of other British cars. Here is a diagram from a 1970 Austin Princess which is a good match for the system used on the Morgan rears since June 1993. I have taken some liberties in adjusting the diagrams to match Morgan. I do not know of any Morgan, Lockheed or AP Caparo diagrams or documention on Morgan specific. :( In essence, the standard Lockheed fitament has been turned upside down to accommodate the Morgan handbrake cable.
The springs are harder to install than the older (Triumph
type) brakes. You have to put one on both shoes and then hold the other
(lower?) spring just right to have it slip into its slot...then push the
shoes into place. After 1/2 hour of frustration you will get the hang of
it. When you do, try to remember how you did it because I promply forgot
the next day. (sad smile)
Here is what I have. Please remember that the diagrams
and pictures will seem bottom side up. I will contact Caparo and see if
they have anything more helpful for the fronts, the hydraulics and the
rears.

CHANGING THE WHEEL CYLINDER (POST-1993)
 Aside
from one watchpoint and one trick-of-the-trade, this is a straight-forward
job that can be done in minutes on the post-1993s.
Aside
from one watchpoint and one trick-of-the-trade, this is a straight-forward
job that can be done in minutes on the post-1993s.
1. Loosen the wheel spinner or nuts and place the car
solidly on stands.
2. Remove the spinner or nuts completely and take off
the wheel.
3. Remove the drum.
4. Undo the brake line to the wheel cylinder at the rear
of the back plate. (Be careful to remove the fluid from yourself and make
sure it does not not touch the car paint!)
 5.
Remove one end of the long spring ( #12 in diagram 9.2 above). Leave the
shoes in situ. (I use a small needle nose vice-grip.)
5.
Remove one end of the long spring ( #12 in diagram 9.2 above). Leave the
shoes in situ. (I use a small needle nose vice-grip.)
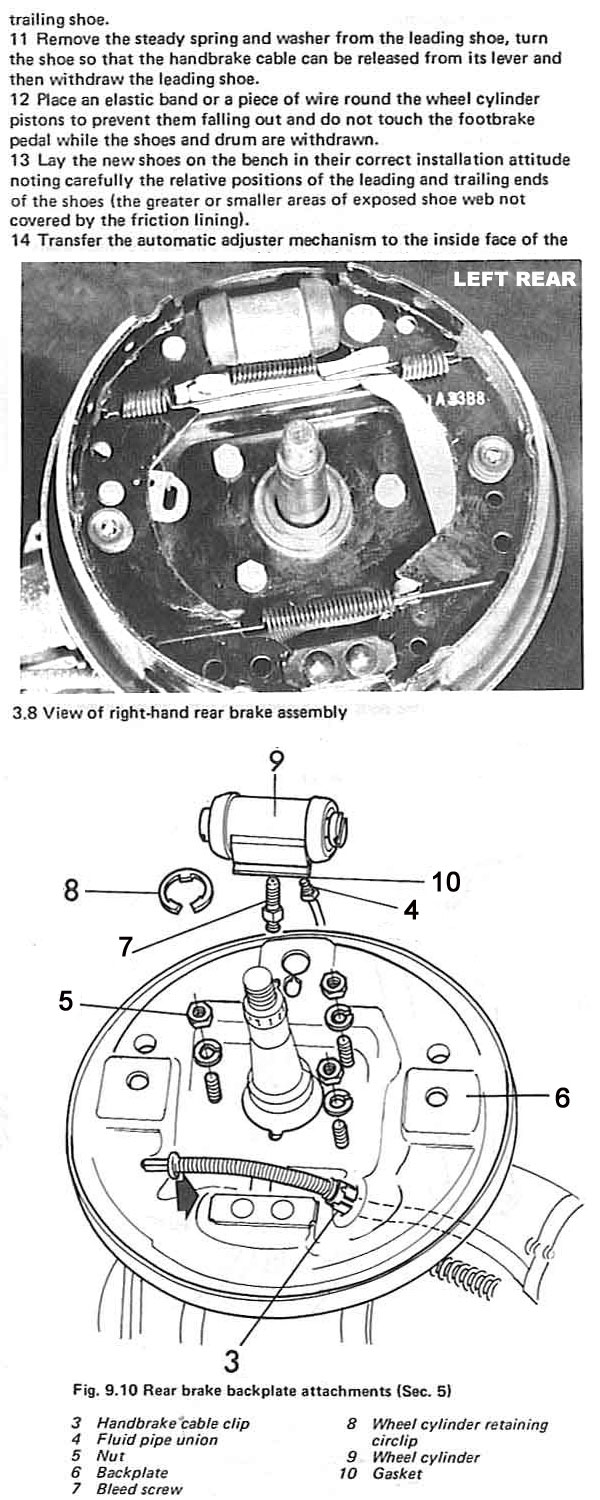
6. Pry the C-clip holding the wheel cylinder to the back
plate out of its slot.
7. Move the shoes with a screwdriver out of the wheel
cylinder and wiggle the cylinder off.
8. Install the new one the same way.
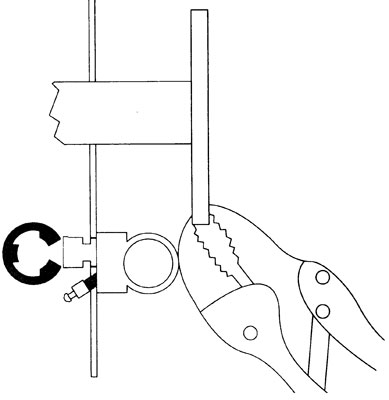
9. Jam it fast in place from the front using vice grips
betweeen the adjacent flange and the body of the wheel cylinder.
10. Install the new c-clip by bending one part of the
clip up so that the other two contact points can be seated into the slot,
and then pull or pry the bent end of the "C" over the post and force it
into the slot. Make extra sure that all three contact points of the clip
are in contact with the slot and well-seated.
11. Carefully position the ends of the shoes in their
wheel cylinder slots. Squeeze the wheel cylinder ends and shoes togther
to make sure the cylinders are not holding the shoes apart.
12. READ WATCHPOINT ABOVE
13. Reinstall the drum.
14. Bleed the brake lines.
15. Pump the brakes and you will hear clicks as the adjuster
takes up any slack.
SAFETY BRAKE WATCHPOINT
by Lorne Goldman at the eMog Pub 2003
UPDATE 2011
There is another watchpoint for all with later brakes post June 1993 brakes.
At the rear, the compensator bracket was removed from the rear of the axle and the shoes became self-adjusting. The earlier Girling required regular manual adjustment. Sadly, Agents and owners complain that the self-adjusting feature does not seem to work well. This stemmed from an improper original proper setup in Production. It can be cured fairly easily.
What happened is that Factory, for many years (still?) had been connecting the hand brake cable before filling and bleeding the hydraulics. By doing so, the handbrake prevents the self-adjustment feature from working properly. The proper sequence is to first fill and bleed the hydraulics, pump the brakes and ONLY THEN connect the handbrake system.
To cure and properly setup the rear brakes, fully slack off or disconnect the hand brake cable at its adjuster (located in the rear just off the "hoop" at the rear...(loosen and remove the outboard nut.) Then simply pump, the brakes slowly until the clicking from the rear drums stops. (3-4 pumps). Each click indicates the adjuster is adjusting to do its job. (This will resolve many issues, from the squeaking many have experienced to uneven wear and a bevy of other issues in between.)
Now you must tighten the hand brake cable until it works when engaged and doesn't when it is not engaged. This may be a bit of a hassle.
The new handbrake cable (FAR superior to the Girling one) was made to engage after as much as 7 clicks at the handbrake lever. The Girling had a rather bizarre set up where the lever was straight upright when unengaged and required only 4 clicks backwards to stop the wheels. The AP was designed to be engaged at 7 clicks and cants backwards like a normal handbrake lever when doing so.
Sadly the Production department interpreted this new proper angle as too far back as they were used to the Girling system. To compensate and get it back to the Girling position, they shortened the handbrake cable/space between the bracketry section at the rear. This may make reconnecting the adjuster difficult. (It likely contributed to the improper set-up of the brakes as well.)
I was able to get mine back in but for those who are having a hassle, simply remove the cable at the inboard "stop" (bolt is underneath) reconnect the cable/adjuster by threading it just a bit, and then reconnect the cable at the stop. (The short cable problem can be permanently cured by bringing the stops together about 1" to create the proper slack.)
WATCHPOINT HAND BRAKE Post 2009
by Lorne Gldman
Owners and dealers report that there has been a "bad batch of handbrake cables". The outer plastic sheath cracks and allows water entry. The most common site is at the bend where the cable enters the brake drum but it can occur elsewhere. Anyone with a post-2009 car should check the cable carefully for damage from rust. This presages a break. (see the other Remedial Tweaks on the gearbox cover modification)
The other end will require some brake work to access the
cable.
| N.B. Regardless of how old the car is or how much of your warranty remains, the Factory will not accept a claim on the cables. Claimants have been informed that the new MMC Warranty Manager, Tim Whitworth the company bookkeeper, considers it a "wear" part and will not entertain any responsibility. Perhaps the MMC modified its policy since his leaving. |
