email: "Armando Picciotto" <apicciotto@wccusd.k12.ca.us>
Originally written: Circa 1995
Last update: June 16, 2009
Is there a better way to spend your Fourth of July weekend other than installing an oil cooler in your Morgan? Don't answer that. Anyway, if you want to know about the trials and tribulations of fitting one to a +4 read on…
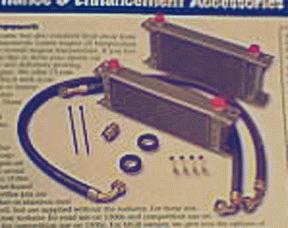 UPS delivered my oil cooler kit from Moss ($229.00 total)
on Thursday, so why not use the three day weekend to put it
on? The kit consists of a 13-row cooler (13"X4"), two
stainless steel hoses with brass fittings (with rubber hoses,
it costs $10.00 less), an adapter that fits between the engine
and the oil filter head, bolt extensions so you can use your
existing oil filter head bolts, plates with holes to mount
the cooler, and bolts to mount the cooler to the plates. No
gaskets are included, so make sure you order at least two of
them (one between the adapter and the engine and one between
the adapter and the oil filter head). They are only 75 cents
each, so you may want to order more in case you need them in
the future (like when you want to take the thing off). No
instructions are included.
UPS delivered my oil cooler kit from Moss ($229.00 total)
on Thursday, so why not use the three day weekend to put it
on? The kit consists of a 13-row cooler (13"X4"), two
stainless steel hoses with brass fittings (with rubber hoses,
it costs $10.00 less), an adapter that fits between the engine
and the oil filter head, bolt extensions so you can use your
existing oil filter head bolts, plates with holes to mount
the cooler, and bolts to mount the cooler to the plates. No
gaskets are included, so make sure you order at least two of
them (one between the adapter and the engine and one between
the adapter and the oil filter head). They are only 75 cents
each, so you may want to order more in case you need them in
the future (like when you want to take the thing off). No
instructions are included.
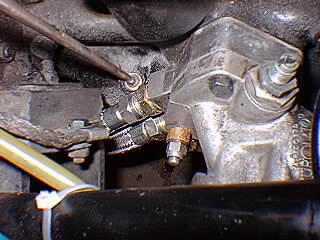 I first removed the oil filter and the three bolts and a nut
holding the filter head to the engine. The nut screws into
a bolt that is itself screwed into the engine (what do you
call a bolt with no head with different threads at each
end?). It holds the line to the oil pressure gauge, so
handle with care. I had to remove this two-sided bolt with
lock pliers, grabbing it in the center where there is no
thread. A slight rap on the filter head unstuck the head
from the engine. After removing the old gasket from the head
(I had to do some careful scraping to get it off) and removing
grime that was previously inaccessible, I held one of the new
gaskets against the engine opening and screwed the four bolt
extenders in (don't reverse this process since the gasket
holes are too small to slide through the bolt extenders).
The adapter has two brass fittings (one for each hose) at
a slight angle so when the hoses are attached they will move
away from the engine block. It slides easily into the bolt
extenders. I placed the three original bolts back into the
filter head and slid the other gasket into place. I then
placed the filter head assembly against the adapter and hand
tightened the three bolts. The two-threaded gizmo went on
last, followed by the oil pressure line and the nut holding
it in place. After properly tightening the three bolts and
nut, everything seemed to be going just fine, until…
I first removed the oil filter and the three bolts and a nut
holding the filter head to the engine. The nut screws into
a bolt that is itself screwed into the engine (what do you
call a bolt with no head with different threads at each
end?). It holds the line to the oil pressure gauge, so
handle with care. I had to remove this two-sided bolt with
lock pliers, grabbing it in the center where there is no
thread. A slight rap on the filter head unstuck the head
from the engine. After removing the old gasket from the head
(I had to do some careful scraping to get it off) and removing
grime that was previously inaccessible, I held one of the new
gaskets against the engine opening and screwed the four bolt
extenders in (don't reverse this process since the gasket
holes are too small to slide through the bolt extenders).
The adapter has two brass fittings (one for each hose) at
a slight angle so when the hoses are attached they will move
away from the engine block. It slides easily into the bolt
extenders. I placed the three original bolts back into the
filter head and slid the other gasket into place. I then
placed the filter head assembly against the adapter and hand
tightened the three bolts. The two-threaded gizmo went on
last, followed by the oil pressure line and the nut holding
it in place. After properly tightening the three bolts and
nut, everything seemed to be going just fine, until…
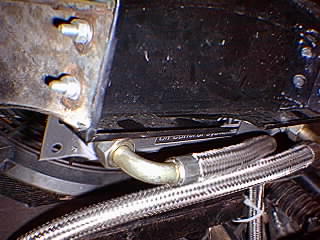
I guess the kit is really designed for a TR3, not a Morgan. When you try to install the hoses to the fittings on the adapter, the engine mount bracket is in the way of the top hose! Not by much, but in the way nevertheless. In the Moss catalog, the nice glossy picture shows the hose having two fittings, a right angle one and 45 degree one. Well, you don't get a 45 degree one. You get a right angle and a straight through one. After considering all my options (calling Moss, getting 45 degree adapter fittings, etc…), I decided it would be nice to keep a straight through shot out of the adapter to avoid kinking the hose, and I could do this by filing off about 1/4" off the offending engine mount. I figured 1/4" out of a corner of the mount would not cause the engine to fall off. I did just that and the hose now clears the mount with about 1/8" to spare. Don't tighten the hoses into the adapter until you install them in the cooler to avoid twisting the hose.
 Next came mounting the cooler itself. Since by now it was
dark, I decided to call it quits until the next day. But
first, I spray painted the cooler with a couple of coats of
high heat black paint so it wouldn't look too obtrusive. The
spray paint did not clog any of the air passages and the
cooler looked pretty nice black rather than silver. The next
morning I installed the cooler about 4" behind the grill with
its base at the level of the shelf behind the grill. This
position placed it about 4" in front the radiator. The top
edge of the cooler itself is higher than the base of the
radiator by less than two inches, so I figured there wouldn't
be too much obstruction to the air flow into the radiator. I
used the mounting plates to attach the cooler to the side
shrouds (after bending them and cutting them to size), and
painted everything black. The hoses were too long, but you
can't cut them because the fittings are an integral part of
them. I hung one of the hoses from the bottom right radiator
bracket and attached it to the left cooler inlet. I did the
Next came mounting the cooler itself. Since by now it was
dark, I decided to call it quits until the next day. But
first, I spray painted the cooler with a couple of coats of
high heat black paint so it wouldn't look too obtrusive. The
spray paint did not clog any of the air passages and the
cooler looked pretty nice black rather than silver. The next
morning I installed the cooler about 4" behind the grill with
its base at the level of the shelf behind the grill. This
position placed it about 4" in front the radiator. The top
edge of the cooler itself is higher than the base of the
radiator by less than two inches, so I figured there wouldn't
be too much obstruction to the air flow into the radiator. I
used the mounting plates to attach the cooler to the side
shrouds (after bending them and cutting them to size), and
painted everything black. The hoses were too long, but you
can't cut them because the fittings are an integral part of
them. I hung one of the hoses from the bottom right radiator
bracket and attached it to the left cooler inlet. I did the
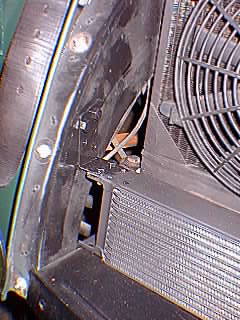 same with the other hose, hanging it from the bottom left
radiator bracket and attaching it to the right cooler inlet.
The lengths of the hoses is perfect for crossing them like
this, and everything looks nice and neat, with plenty of
clearance between the hoses and all the rods and whatevers of
the car's front end. I also figured that the longer stainless
hoses would also serve as a radiator of heat, increasing
cooling capacity (yeah, I know, I always look at the bright
side). I then remembered to tighten the hoses at the adapter
end and inserted a new oil filter. Now to test it all.
same with the other hose, hanging it from the bottom left
radiator bracket and attaching it to the right cooler inlet.
The lengths of the hoses is perfect for crossing them like
this, and everything looks nice and neat, with plenty of
clearance between the hoses and all the rods and whatevers of
the car's front end. I also figured that the longer stainless
hoses would also serve as a radiator of heat, increasing
cooling capacity (yeah, I know, I always look at the bright
side). I then remembered to tighten the hoses at the adapter
end and inserted a new oil filter. Now to test it all.
I ran the engine for a few minutes with no oil leaks showing
up. The oil cooler heated up gradually, so oil was certainly
flowing into it. I also watched how the engine moved with
respect to the engine mount and the hose close to it to make
sure there was no chance of a collision. The engine twist
seemed to move the hose parallel to the offending mount and
the clearance did not decrease, so I think I'm safe there,
but I'll keep my eye on it. The road test was a success.
The engine does run cooler as measured by my fairly accurate
temp gauge hidden behind the dash, but a thorough test of it
will have to wait until Mog West later this month, when about
50 to 70 Morgans meet in central California for their yearly
 ritual. It's over a 500 mile round trip, parts of it through
the hot interior valleys. The cooler should show it's worth
at high speeds with lots of air blowing through it. By the
way, you can barely see it behind the grille, so overall, I'm
quite pleased with it. If you are thinking of installing a
cooler yourself, take a close look at the fittings that come
with the hoses. You may be able to avoid my problems.
ritual. It's over a 500 mile round trip, parts of it through
the hot interior valleys. The cooler should show it's worth
at high speeds with lots of air blowing through it. By the
way, you can barely see it behind the grille, so overall, I'm
quite pleased with it. If you are thinking of installing a
cooler yourself, take a close look at the fittings that come
with the hoses. You may be able to avoid my problems.
Armando Picciotto '63 +4
Return to the Index of Tech. articles